*This post may contain affiliate links to support the cost of this blog. At no cost to you, I may make a small commission if you purchase through these links. Read our Privacy Policy HERE
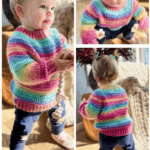
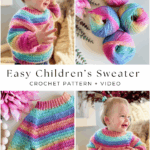

Introducing the easiest children’s crochet pullover, a highly requested addition to our beloved Athabasca Falls pullover design.
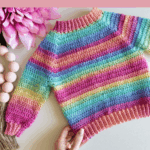
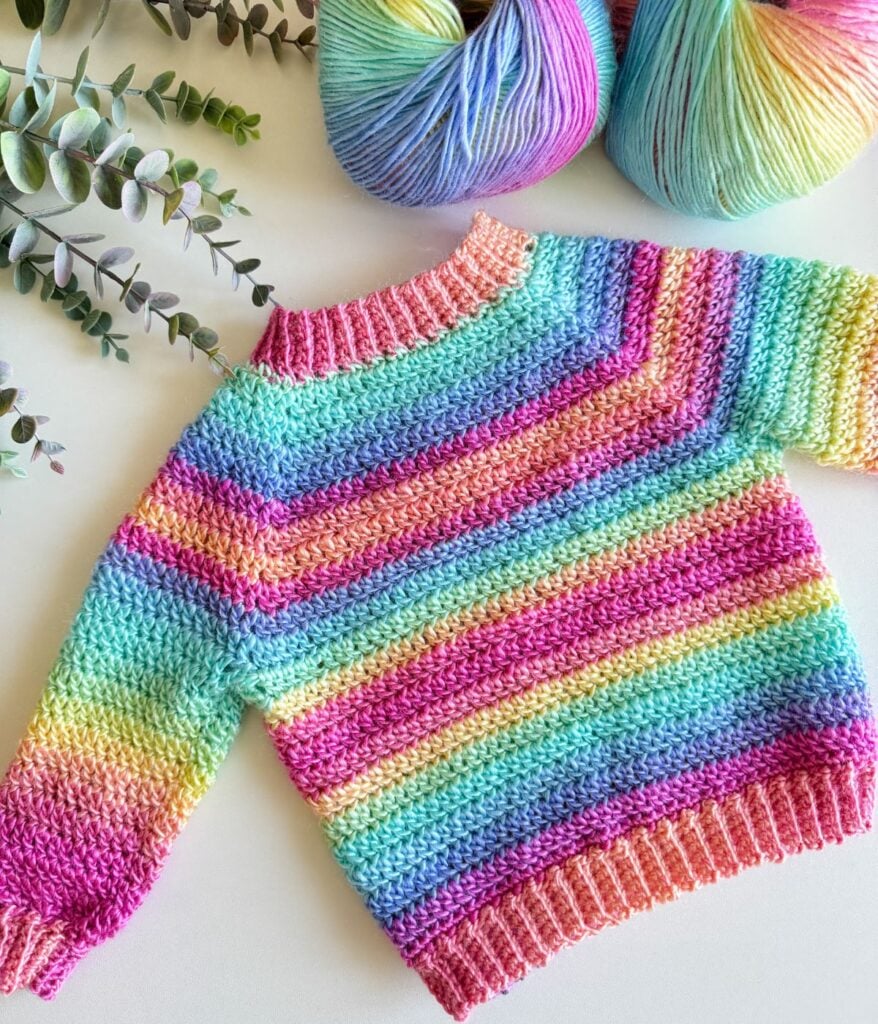
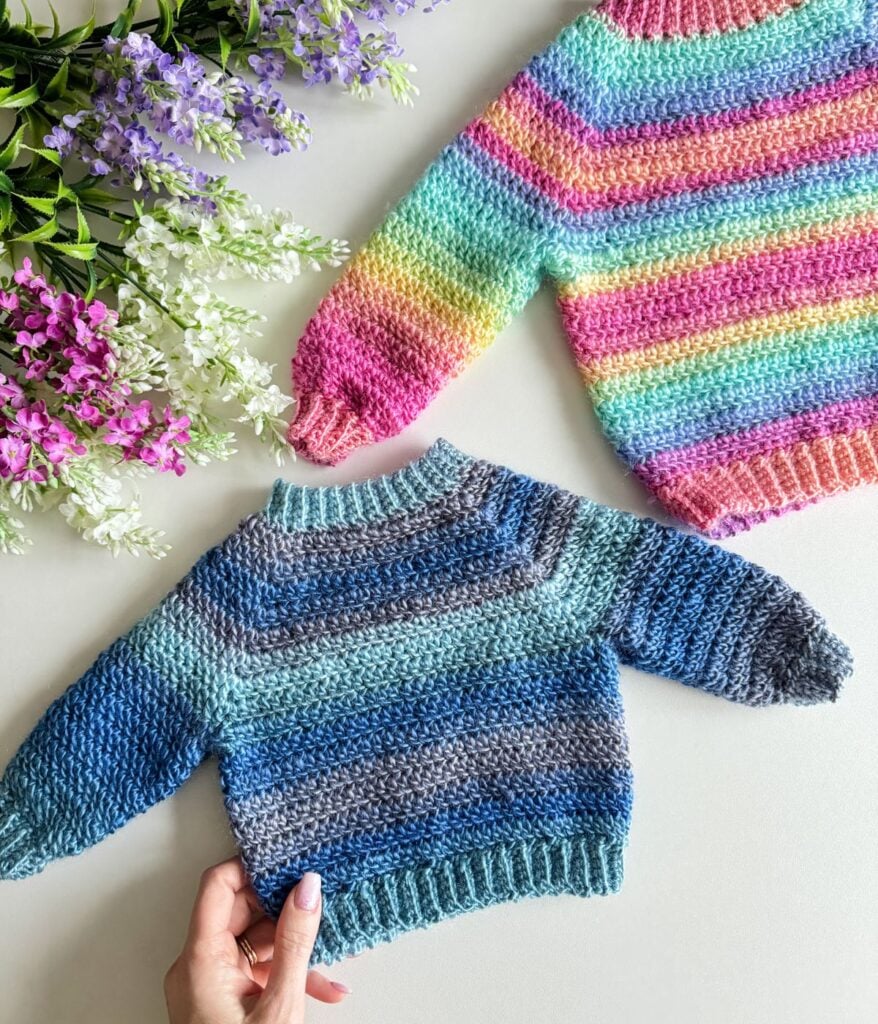
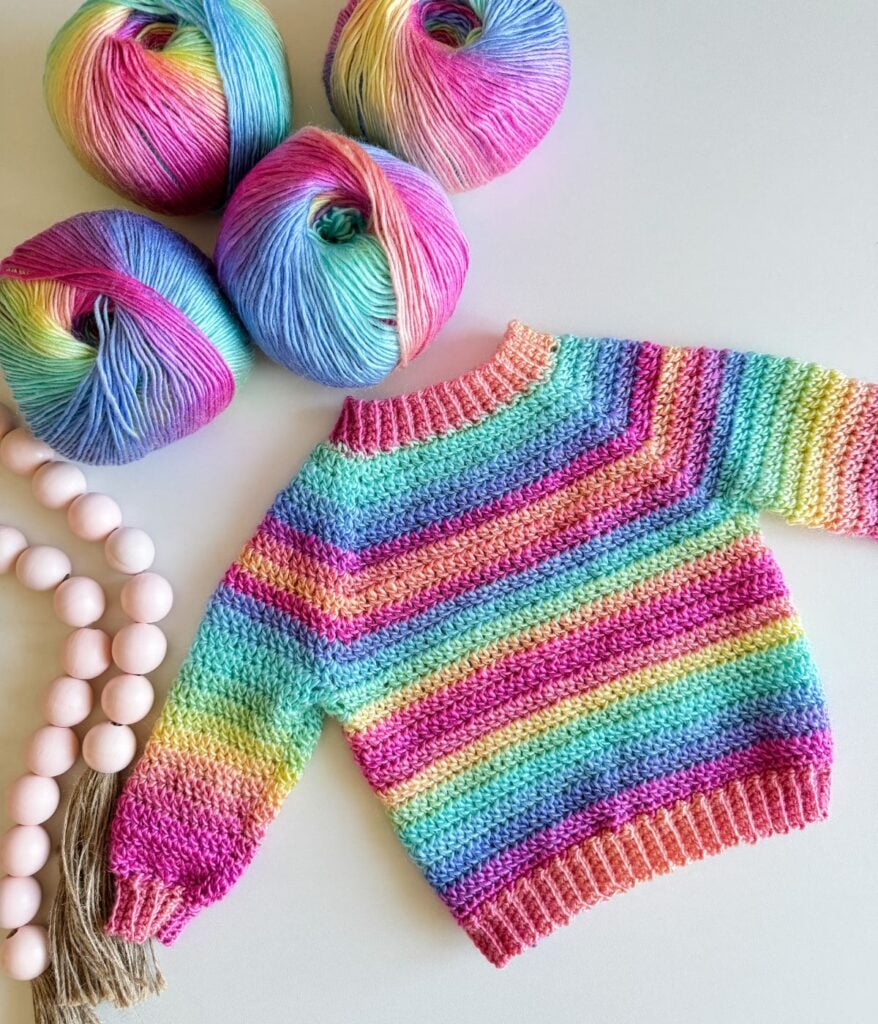
This easy crochet children’s pullover pattern is perfect for beginners, as it is worked from the top down using double crochet stitches. Say goodbye to seaming—this pattern is seamless and worked in the round, allowing for a smooth and professional-looking colour transition, especially with gradient yarns like Prism from Mary Maxim.

Key Takeaways
- The Easiest children’s crochet pullover is a seamless, top-down design perfect for beginners.
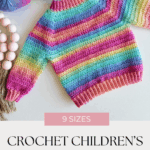
- This pattern accommodates sizes from newborn to child size 12, with detailed step-by-step instructions included.
- Crocheting is done in the round, avoiding seaming and ensuring a smooth colour transition, ideal for gradient yarns.
- Materials needed include soft yarns like merino, cashmere blends, bamboo, or acrylic, with recommendations provided.
- Free access to a video tutorial and a PDF pattern is available, along with tips for gauge and yarn substitution.

Project Overview
The Athabasca Falls Children’s Pullover is a top down, seamless raglan sweater designed for an easy and professional finish. Worked in the round using double crochet, it creates beautiful colour transitions, especially with gradient yarns like Prism.
Available from newborn to child size 12, with sizing that can fit XS to S adults, this beginner friendly pattern includes detailed step by step instructions to guide you through every stage.
Skill level: Easy
Sizes: 0-3 (3-6, 6-12, 12-18, 2/4, 6, 8, 10, 12)
Yarn Weight: DK Weight #3
Yarn: Mary Maxim Prism(CDN)
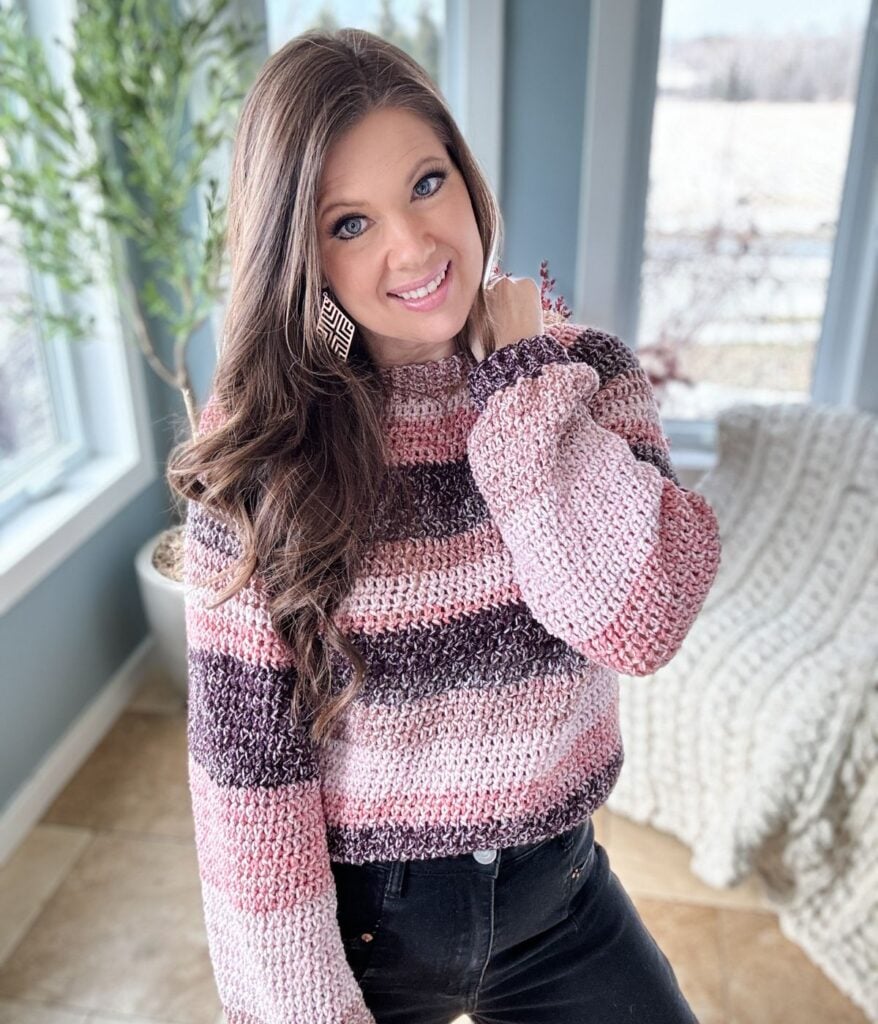
This sweater’s raglan style offers a perfect fit. It is available in sizes ranging from newborn to child size 12 and can even accommodate XS-S adults.
Our pattern includes detailed, step-by-step instructions to assist you at every stage of the project. With the Athabasca Falls Children’s Pullover pattern, you can create a stunning and cozy sweater for the little ones in your life!

Below, you will find everything you need to make the easiest children’s pullover pattern, including the yarn, hook, materials, free written pattern for blog subscribers, pictures and a video tutorial. If you love this free children’s crochet pattern, please share!
How to Crochet a Top-Down Sweater
Crocheting a top-down sweater offers one of the easiest ways to crochet a sweater. Begin with the neckline, noting that the initial stitch count will vary each size, for children’s size garments. Progress with the yoke, gradually reaching your intended size.
Once achieved, separate the sleeves and body. Continue crocheting the body to your desired length. Finish off with a join-as-you-go band for a seamless touch. Rejoin to work the sleeves in the round, concluding with the cuffs. The beauty of a top-down sweater lies in its adaptability to your individual style and fit preferences.
How do I Join Yarn in my Crochet Project?
My preferred joining method is the Thumb Join, though I acknowledge it can be challenging for some to grasp initially. I find the thumb join the fastest way to change or join a new yarn. Watch the tutorial 02:28. Another favourite joining technique, especially for my daughter, is the magic knot. The magic knot is one of the easiest ways to change or join a new yarn. Watch the tutorial 01:06.
When using a gradient yarn in projects like this one, I often receive inquiries about how to join the yarn seamlessly. I typically unravel the ball to align with the previous colour for a smooth transition. When beginning sleeves, I ensure both match in colour for symmetry.
If you love the easiest children’s pullover pattern, you will also love the Athabasca Falls Pullover adult version!
Video Tutorial
The tutorial provides a walkthrough of the entire crocheting process, featuring detailed instructions for each critical step

Recommended Yarn for a Children’s Pullover
When selecting yarn for a children’s crochet sweater, I recommend avoiding scratchy wool and alpaca. Opt for softer options like merino wool, cashmere blends, bamboo, or acrylic.
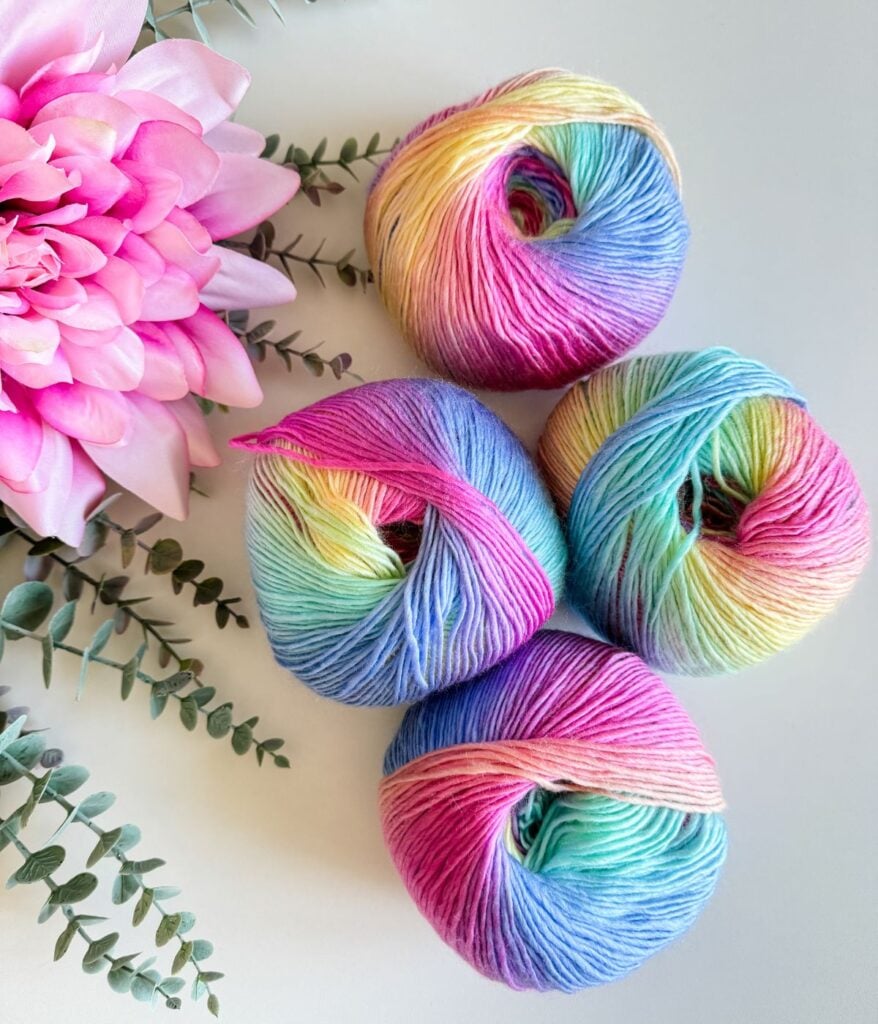
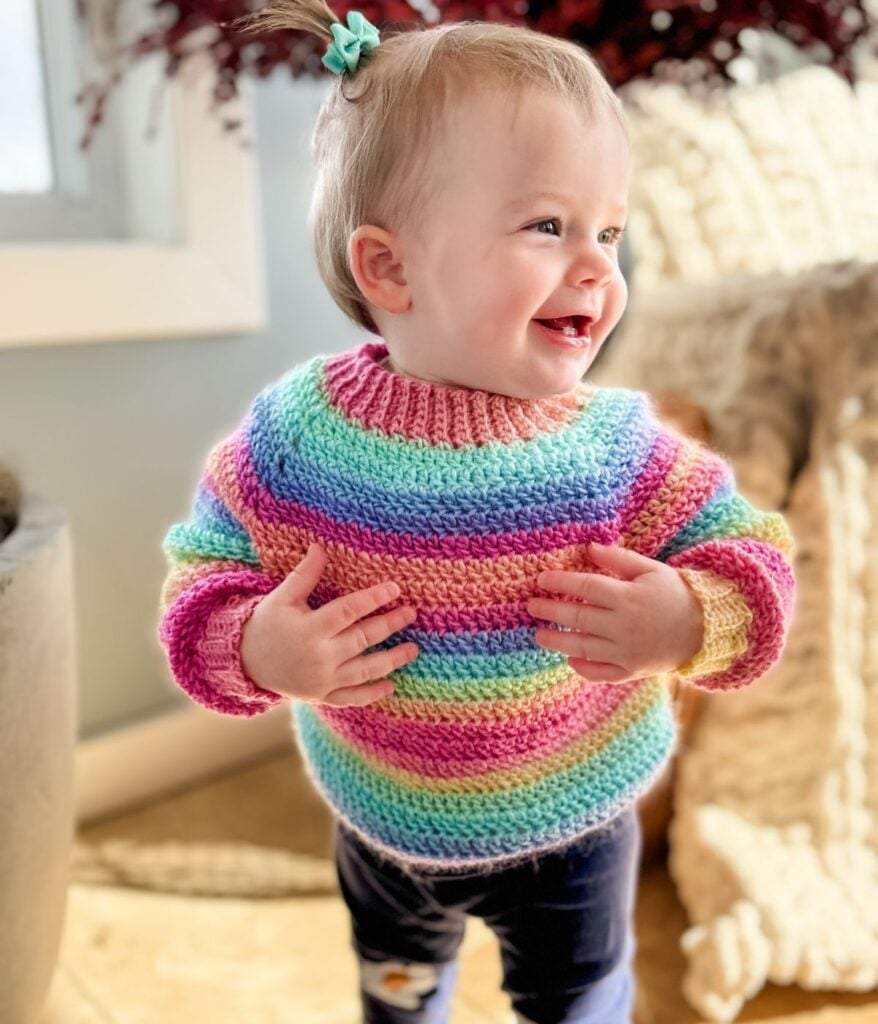
Currently, my favourite yarn for children’s sweaters is Mary Maxim Prism (CDN). I’m absolutely obsessed with their beautiful colorways! I couldn’t resist grabbing some of this rainbow hue for my granddaughter—it’s simply stunning!
Yarn Requirements
DK Weight #3
290yds/100g, 100% Acrylic Shown in Denim Blues (0-3mth), Rainbow (6-12mth) and Westwinds (12years)
See the size chart for yarn requirements
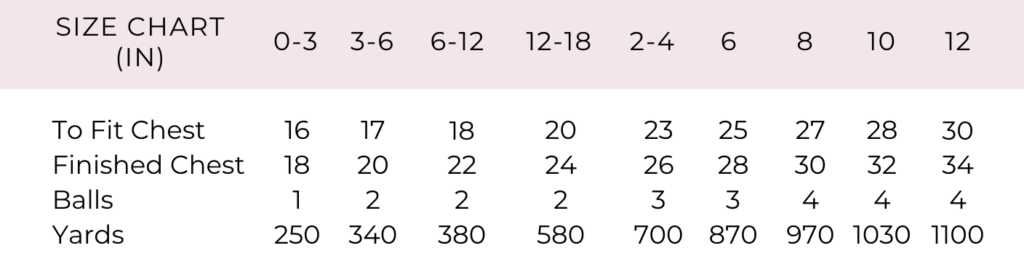
Sizes Included for the Easiest Children’s Crochet Pullover
0-3 (3-6, 6-12, 12-18, 2/4, 6, 8, 10, 12)
Curious about how sizing is determined? Check out the Craft Yarn Council site for helpful information on garment size.
Skill Level
Easy, written in standard American terms.
Substituting Yarn
Before starting your project, it is best to create a gauge swatch. This initial step ensures that your tension and stitch count align with the pattern’s specifications, a vital aspect when the original yarn recommended is unavailable or when a yarn substitution is necessary. Maintaining the recommended gauge is essential for achieving the desired fit.
Adjusting your crochet hook size can assist you in reaching the pattern’s required gauge or switching hook style or brand can help as well. It’s important to note that not all DK Weight #3 yarns are identical; variations in thickness, drape, and softness can occur.
Guage Swatch
For your gauge swatch, I recommend crocheting a 6″ x 6″ square in double crochet stitches. Measure your stitches at the center of the swatch, aiming for 16 stitches by 9 rows for this specific pattern.
If you discover too many stitches, consider switching to a larger hook size. Conversely, if there are too few stitches, opt for a smaller hook size. The height of the stitch is less critical; you can adjust it by adding or reducing rows as necessary. Additionally, you can lengthen stitches by pulling up on them or shorten them by tightening your tension.
I’ve included some yarn recommendations that I believe would serve as excellent alternatives.
Suitable Yarn Substitutes
Mellowspun(CDN) – 284 yards/100g
Lion Brand mandala or Baby – 590 yds/150g
Bernat Softee Baby (CDN) – 362 yds/140g
Brava Sport – 273 yds/100g

Materials
Use code MJS15 for 15% off Furls Crochet
Helpful Resources
- Join our Facebook Crochet Community for pattern support and inspiration
- Subscribe on YouTube for hundreds of free tutorials
- Sign up for our newsletter and receive 40% off your first Ravelry purchase!
- Sign up for our YouTube Membership
Construction
The Raglan pullover is seamlessly worked in one piece, starting from the top down and working in the round. Once you complete the yoke, continue working the body in the round. Join at the underarm and work each sleeve in the round, finally completing the cuffs with a join-as-you-go technique. For the newborn size, we have a step-by-step video tutorial available on our YouTube channel.
Gauge
Body: 16 sts and 9 rows equal to 4″ in dc with 5mm hook
Ribbing: 10 sts and 10 rows equal to 2″ in sc blo pattern with 4mm hook
Obtaining the correct gauge is fundamental to having correct garment sizing. You may need to adjust your hook size to meet the pattern gauge.
Abbreviations
Blo – Back Loop Only
Ch – Chain
Dc – Double Crochet
Dc2tog – Double Crochet Decrease
Pm – Place Marker
Rep – Repeat
RS – Right Side
Sc – Single Crochet
Sc2tog – Single Crochet Decrease
Sk – Skip
Sl St – Slip Stitch
Sp(s) – Space(s)
St(s) – Stitch(es)
V St – dc, ch 1, dc in the same st
WS – Wrong Side
( ) – Work step in parentheses in indicated stitch
Special Stitches
Double Crochet Decrease (dc2tog): YO (yarn over), insert hook through indicated st and pull up a loop, YO, pull through 2 loops, YO, insert hook in next st, pull up a loop, YO, pull through 2 loops, YO pull through the last 3 loops on the hook.
Single Crochet Decrease (sc2tog): Insert hook through indicated st and pull up a loop, insert hook in next st, pull up a loop, YO, pull through 3 loops on the hook.
Reverse Sl St: Go through the stitch back to front; keep working yarn to the front, YU (Yarn Under) pulling through the stitch and loop on the hook.
V st in V st: Work (dc, ch 1, dc) in ch-1 sp of V st in the previous row.
Purchase the Beautifully Designed AD-FREE PDF Download
The PDF includes a schematic and row-by-row stitch count chart.

Easiest Children’s Crochet Pullover
FAQ & Terms
This pattern requires a easy skill level.
This pattern is professionally written in technical writing and tech edited for accuracy.
1. Affiliate Links & Ad Support
This post may contain affiliate links. At no extra cost to you, purchases made through these links may earn MJ’s Off The Hook Designs a small commission. The content on this site is supported by advertisements. By using this site, you agree not to circumvent, block, or tamper with these ads.
2. Copyright & Intellectual Property
All content on this blog, including free crochet patterns, instructions, charts, photos, videos, and written materials, is the property of MJ’s Off The Hook Designs Inc. and is protected under copyright and other intellectual property laws.
3. Personal Viewing & Use Only
Free patterns published on this site are provided for viewing only on this blog. You may not:
• Copy, download, print, take screenshots, or redistribute the pattern in any form (digital or physical) outside this blog.
• Post the pattern or instructions elsewhere online or share it publicly without written consent.
Even for “personal use,” the pattern must only be used while viewing this blog post with the ads intact. Tampering with, hiding, or removing ads while accessing the pattern is strictly prohibited.
4. Screenshots & Unauthorized Sharing
Screenshots or any other method of copying the pattern for offline use or redistribution is prohibited. Sharing patterns in forums, social media groups, or private messages without permission is also prohibited.
5. Legal Enforcement
Violation of these terms may constitute copyright infringement and could result in civil or criminal penalties under intellectual property laws. By using this pattern, you agree to comply fully with these terms.
6. Questions & Permissions
For questions about these terms or for permission to use or share patterns outside of these rules, please contact MJ’s Off The Hook Designs Inc. in writing.
Thank you for respecting our work and supporting MJ’s Off The Hook Designs.
Yes! You may sell finished items made from MJ’s patterns, but please credit:
“Pattern by MJ’s Off The Hook Designs Inc.”
Pattern Support is only available in our Facebook Community group and Video Tutorials.
No additional support is provided for modified patterns, alternate yarns, or changes to gauge.
Pattern
0-3 (3-6, 6-12, 12-18, 2/4, 6, 8, 10, 12)
Notes
The pullover is worked from the top down in the round. The collar is completed first by working in rows. It is then slip-stitched together, and the pullover begins by working around the collar’s edge. Work pullover in rounds until the required size is reached. The pattern is written for the smallest size, with the larger sizes in parentheses ( ). If there is only 1 number, it applies to all sizes—a step-by-step video tutorial is provided on YouTube.
Collar
Notes
You can alter the width of the collar by chaining out more or fewer chains.
Row 1 (WS):
With the smaller hook, ch 6 (6, 7, 7, 8, 9, 10, 10, 11), 1 sc in 2nd ch from hook, 1 sc in each ch across, turn—5 (5, 6, 6, 7, 8, 9, 9, 10) sts.
Row 2 (RS):
Ch 1 (not included as a st here and throughout), 1 sc in blo of each st across, turn—5 (5, 6, 6, 7, 8, 9, 9, 10) sts.
Rows 3-52 (58, 64, 70, 76, 82, 88, 94, 100):
Rep Row 2. After the final Row, ch 1, fold collar RS facing and sl st together (work through the blo). Flip the collar so that the seam is to the inside. Change to larger hook.
Yoke
Setup Round:
With the larger hook, ch 1, work sc sts evenly around the collar (1 st/row), sl st in the first sc to join—52 (58, 64, 70, 76, 82, 88, 94, 100) sts.
Round 1:
(Ch 3, 1 dc) in the first st (beg V-st made), 1 dc in each of next 8 (9, 10, 11, 12, 13, 14, 15, 16) sts (right sleeve), V-st in next st, 1 dc in each of next 16 (18, 20, 22, 24, 26, 28, 30, 32) sts (front), V-st in next st, 1 dc in each of next 8 (9, 10, 11, 12, 13, 14, 15, 16) sts (left sleeve), V-st in next st, 1 dc in each of next 16 (18, 20, 22, 24, 26, 28, 30, 32) sts (back), sl st in the V-st to join—56 (62, 68, 74, 80, 86, 92, 98, 104) dc, 4 ch-1 sps.
Project Tip
When slip stitching to join, keep the slip stitch loose; the last dc of every round needs to be worked into the sl st to keep the st count on track.
Increase pattern begins – Continue increasing the yoke for the size you are working.
Round 2:
Beg V-st in ch-sp, *1 dc in each st across to V-st, V-st in V-st; rep from * around omitting last V-st, sl st in the V-st to join—64 (70, 76, 82, 88, 94, 100, 106, 112) sts.
Rounds 3-8 (9, 10, 11, 12, 13, 14, 15, 16):
Rep Round 2, each section (sleeve, front, sleeve, back) will increase by 2 sts each round for a total of 8 sts per round, ending with—112 (126, 140, 154, 168, 182, 196, 210, 224) sts. Don’t fasten off. See charts on pg. 13-18 for Row by Row stitch counts.
Separate Body and Sleeves
Setup:
Ch 4 (underarm chs), sk over sleeve section to the next V-st, sl st in V-st to join and fasten off. Skip over the front section, put a slip knot on the hook, join yarn in next V-st with a sl st, ch 4 (underarm chs), sk over next sleeve section, join yarn in next V-st with a sl st and fasten off.
Body
Work in a continuous round throughout the body; mark the first st of each round with a marker, moving it up each round.
Round 1:
Put a slip knot on your hook, at the join, join yarn in 3rd ch with a sl st, 1 dc in same ch, 1 dc in each ch and st around—72 (80, 88, 96, 104, 112, 120, 128, 136) sts.
Round 2:
1 dc in first st (pm in st), 1 dc in each st around—72 (80, 88, 96, 104, 112, 120, 128, 136) sts.
Rounds 3-8 (10, 11, 13, 14, 16, 18, 20, 20):
Rep Round 2. Last round work 1 hdc in the last st, work 1 sc in first marked st, sl st in next st. Feel free to work as many rounds as you like. For the perfect fit, remember to try on the sweater as you progress. Keep in mind that the band will add to the overall length.
Band
The band is joined as you go to the body edge.
Row 1:
With the smaller hook, ch 6 (6, 7, 7, 8, 9, 10, 10, 11), 1 sc in 2nd ch from hook and in each ch across, sk first st at body edge, sl st in next 2 sts (body edge), turn—5 (5, 6, 6, 7, 8, 9, 9, 10) sts.
Row 2:
Sk sl sts, 1 sc in blo of each st across, turn—5 (5, 6, 6, 7, 8, 9, 9, 10) sts.
Row 3:
Ch 1, work 1 sc in blo of each st across, sl st in next 2 sts (body edge), turn—5 (5, 6, 6, 7, 8, 9, 9, 10) sts.
Rows 4-72 (80, 88, 96, 104, 112, 120, 128, 136):
Rep Rows 2 & 3 ending on Row 2. In the last Row, ch 1, with RS facing sl st band together, fasten off and weave in ends.
Sleeves
Optional: You may match the sleeves’ colour to the body by starting with the same shade.
Feel free to customize the number of decreases based on your personal preference.
Project Tip
For a discreet join, utilize the reverse slip stitch technique. Use the starting tail to neatly sew any potential gaps at the underarm. If desired, you can continue working in a continuous round without joining.
Round 1:
Leave a long tail, put a slip knot on the larger hook, sk over the first 2 chs of the underarm, join yarn in the 3rd ch with a sl st, ch 2, work 1 dc in the same ch and next ch, work 1 dc in each st around, work 1 dc in the last 2 chs, rev sl st in the first dc to join—28 (31, 34, 37, 40, 43, 46, 49, 52) sts.
Round 2:
Ch 2, dc2tog across the first 2 sts, 1 dc in each st around, rev sl st in the first dc to join—27 (30, 33, 36, 39, 42, 45, 48, 51) sts.
Round 3:
Ch 2, work 1 dc in each st around, rev sl st in the first dc to join—27 (30, 33, 36, 39, 42, 45, 48, 51) sts.
Rounds 4-8 (10, 12, 16, 18, 22, 24, 26, 28:
Rep Round 2 & 3 ending on Round 2 with—24 (26, 28, 29, 31, 32, 34, 36, 38) sts.
You can adjust the number of decreases at this round according to how snug you want the cuff to be.
Last Round:
With the smaller hook, *work 1 sc in the first 2 sts, 1 sc2tog across the next 2 sts; rep from * around, sl st in first sc to join, ending with 1 sc in the last 0 (2, 0, 1, 3, 0, 2, 0, 2) sts—18 (20, 21, 22, 24, 24, 26, 27, 29) sts. For sizes ending with an odd number, I prefer to do an extra decrease so that all sizes end with an even number.
Cuff
The cuff is joined as you go to the sleeve edge.
Row 1:
With the smaller hook, ch 6 (6, 7, 7, 8, 9, 10, 10, 11), 1 sc in 2nd ch from hook and in each ch across, sk first st at sleeve edge, sl st in next 2 sts (sleeve edge), turn—5 (5, 6, 6, 7, 8, 9, 9, 10) sts.
Row 2:
Sk sl sts, 1 sc in blo of each st across, turn—5 (5, 6, 6, 7, 8, 9, 9, 10) sts.
Row 3:
Ch 1, work 1 sc in blo of each st across, sl st in next 2 sts (sleeve edge), turn—5 (5, 6, 6, 7, 8, 9, 9, 10) sts.
Rows 4-18 (20, 21, 22, 24, 24, 26, 27, 29):
Rep Rows 2 & 3 ending on Row 2 for even and Row 3 for odd rows. In the last Row, ch 1, with RS facing sl st cuff together, fasten off and weave in ends.
Blocking
Wet or steam block to finish.

If you love this pattern check out these patterns!
For more crochet patterns by MJ’s Off The Hook Designs see our Ravelry, Etsy, LoveCrafts, WeCrochet or Ribblr Shop. Check out our Facebook and Instagram for daily inspiration!
This pattern is designed by Michelle Moore of MJ’s Off The Hook Designs Inc., based in Lakefield, Ontario, Canada. Your go-to source for modern, easy crochet patterns. Published on April 5th, 2024.
Thank you for visiting MJ’s Off The Hook Designs! I hope you enjoyed this pattern and feel inspired to pick up your hook and start creating.
You can find even more crochet patterns in our Ravelry and Etsy shops.
For daily inspiration and behind the scenes peeks join me over on Facebook or Instagram or join our YouTube Membership for exclusive content!
You’ve got questions, we’ve got a community!
Crocheting is better with friends! Join our group to post pictures and ask all your pattern support questions.