*This post may contain affiliate links to support the cost of this blog. At no cost to you, I may make a small commission if you purchase through these links. Read our Privacy Policy HERE


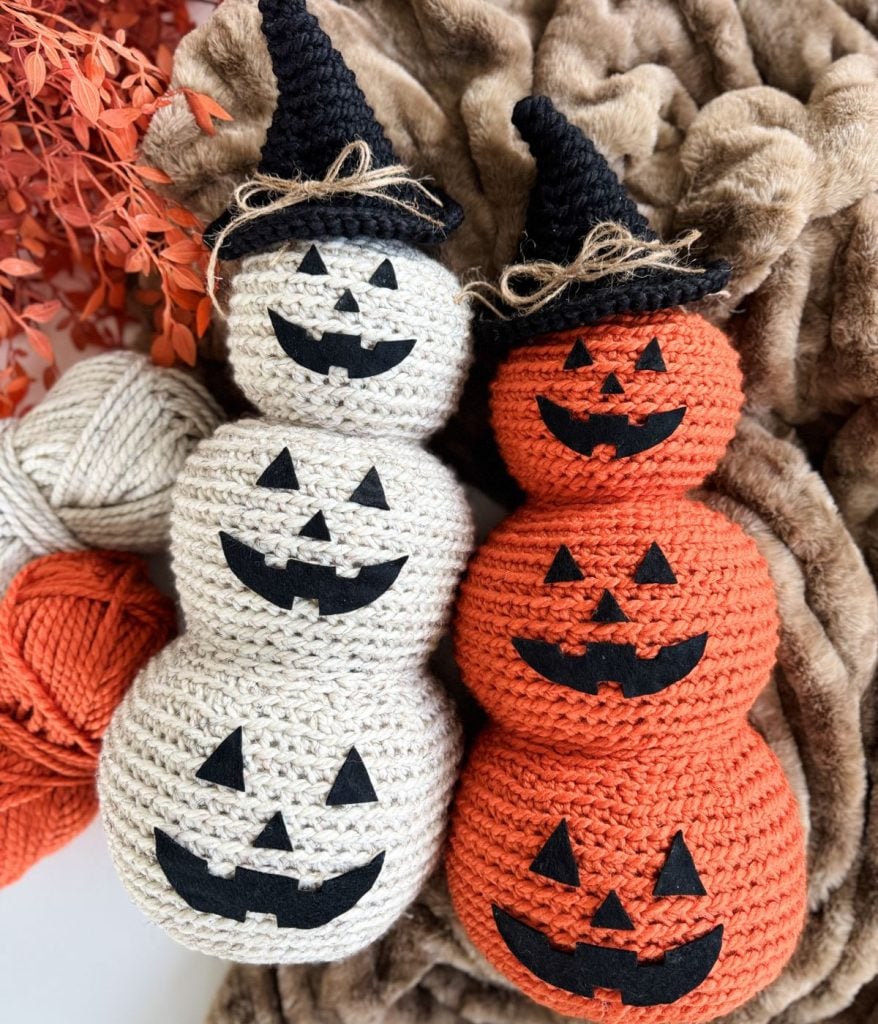
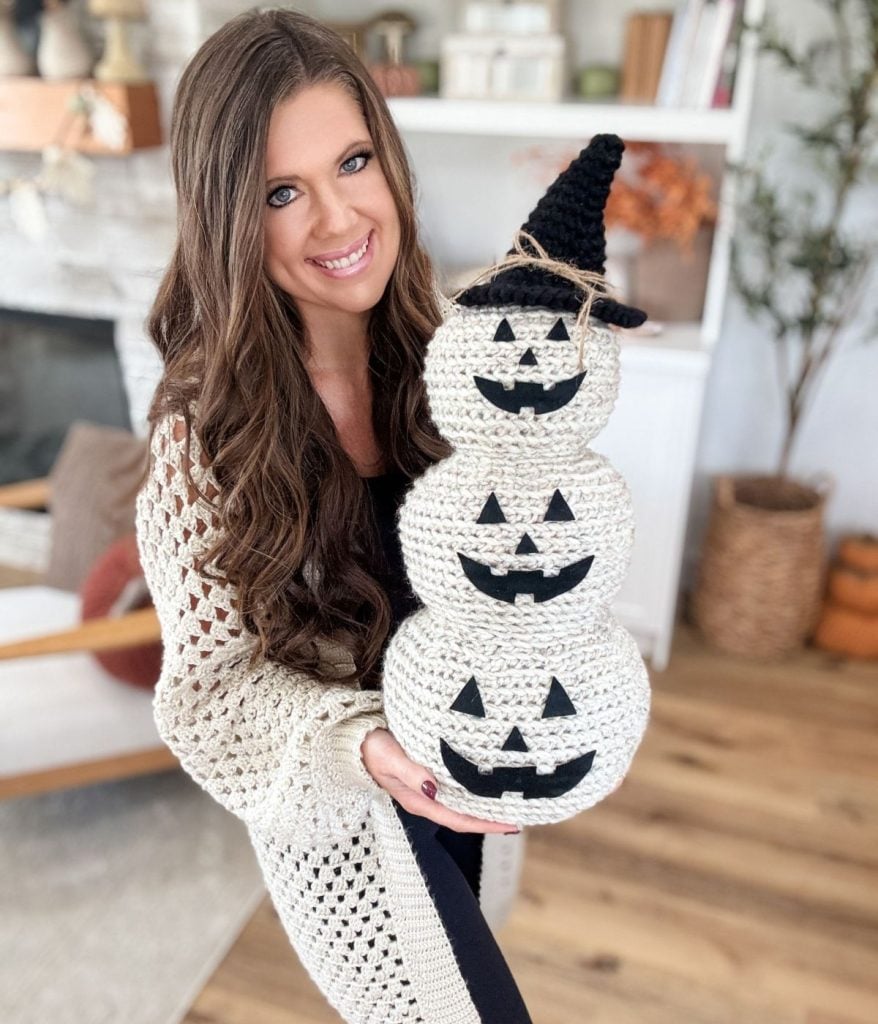
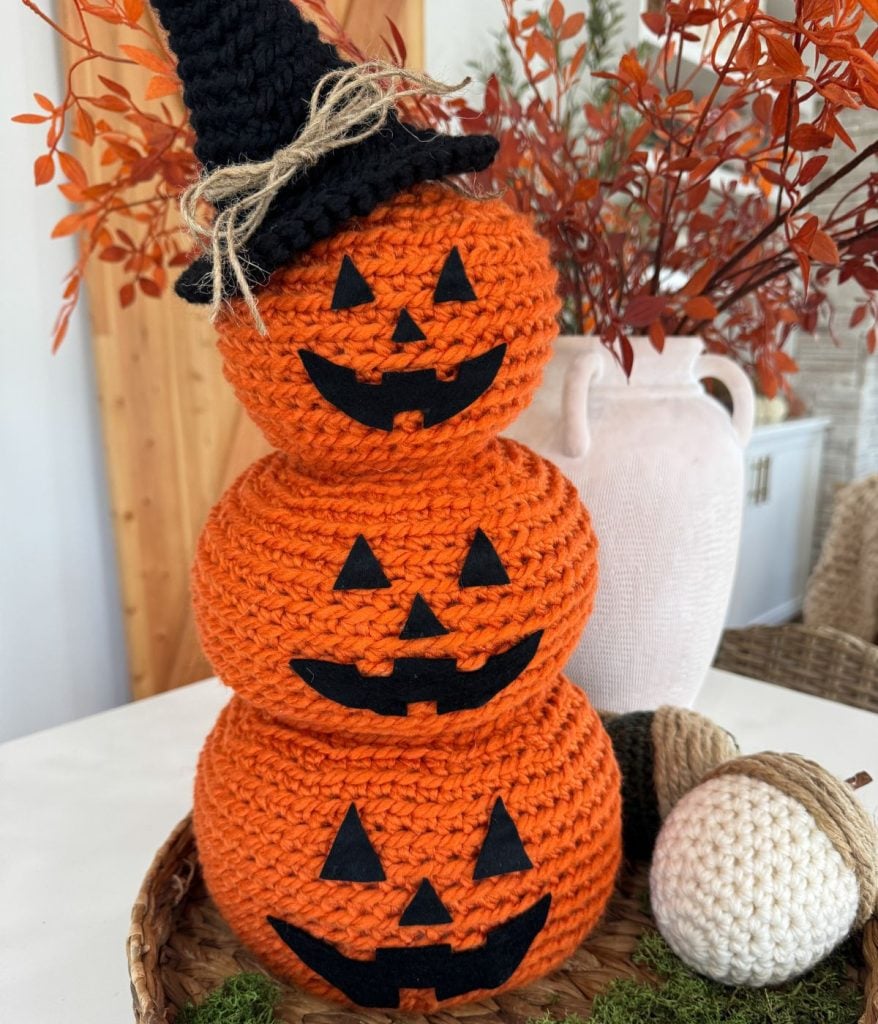
Bring festive charm to your home with the Crochet Jack-O’-Lantern Pumpkin Stack Pattern! This bulky, quick-to-make project is worked seamlessly from the bottom up, creating a sturdy stack of pumpkins perfect for seasonal decorating. The design features a weighted base for stability, stuffed pumpkins for a plump and cozy look, and is topped with a quick and easy witch hat for extra Halloween flair.


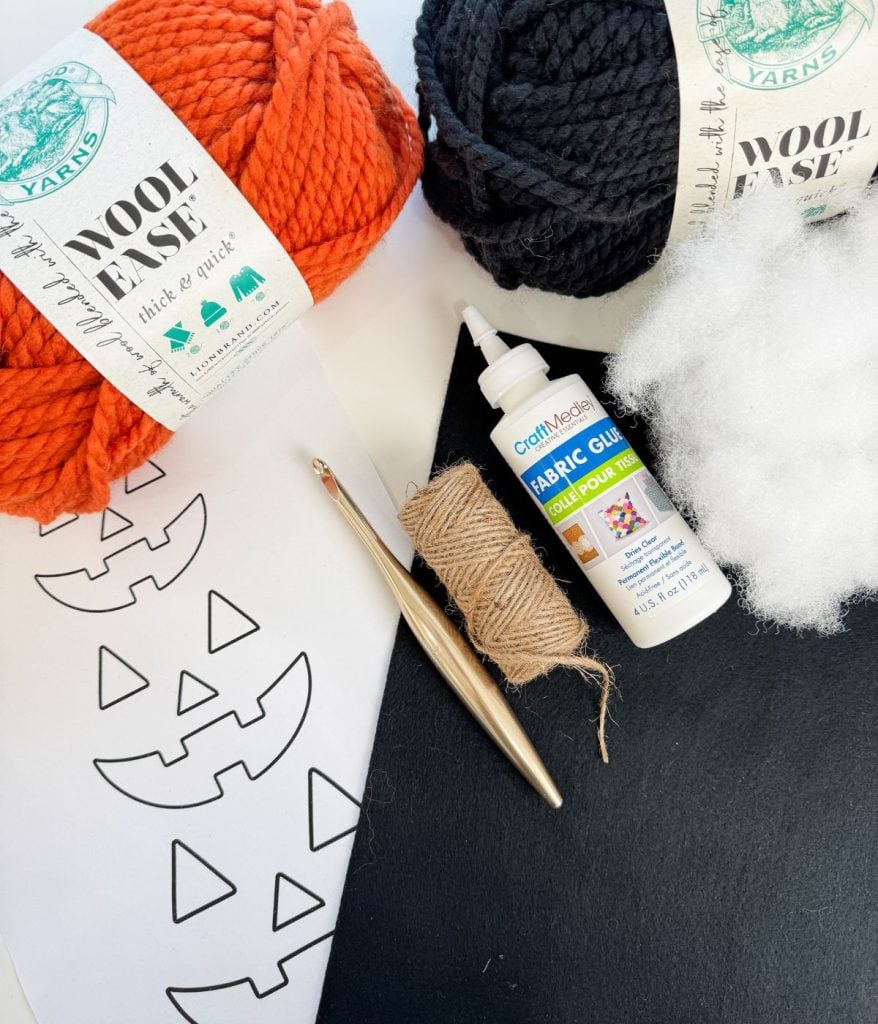
To complete the look, the pattern includes a printable Jack-O’-Lantern face template in three sizes, each designed to fit the pumpkins in the stack.
To ensure success at every step, the pattern comes with a detailed, step-by-step video tutorial available on YouTube. You’ll learn how to crochet each pumpkin, shape the stack, add the weighted bag and stuffing, and finish with the hat and felt face details.
This fun and festive design is perfect as a statement piece for your entryway, porch, or living room décor. Quick to make with bulky yarn, it’s an enjoyable seasonal project you’ll love bringing out year after year.
If you love our Jack-O-Lantern Crochet Pattern, you may also love our Rustic Farmhouse Mushroom Pattern, Woodland Ami Owl and our Rustic Farmhouse Acorn Pattern! If you love this design style, you may enjoy our Holiday Gnome, Rustic Farmhouse Bunny and our Rustic Farmhouse Snowman pattern!
Key Takeaways
- The Crochet Jack-O-Lantern Pumpkin Stack Pattern is a quick project that creates a sturdy stack of pumpkins for Halloween decor.
- The pattern includes a printable Jack-O’-Lantern face template and a detailed YouTube tutorial for guidance.
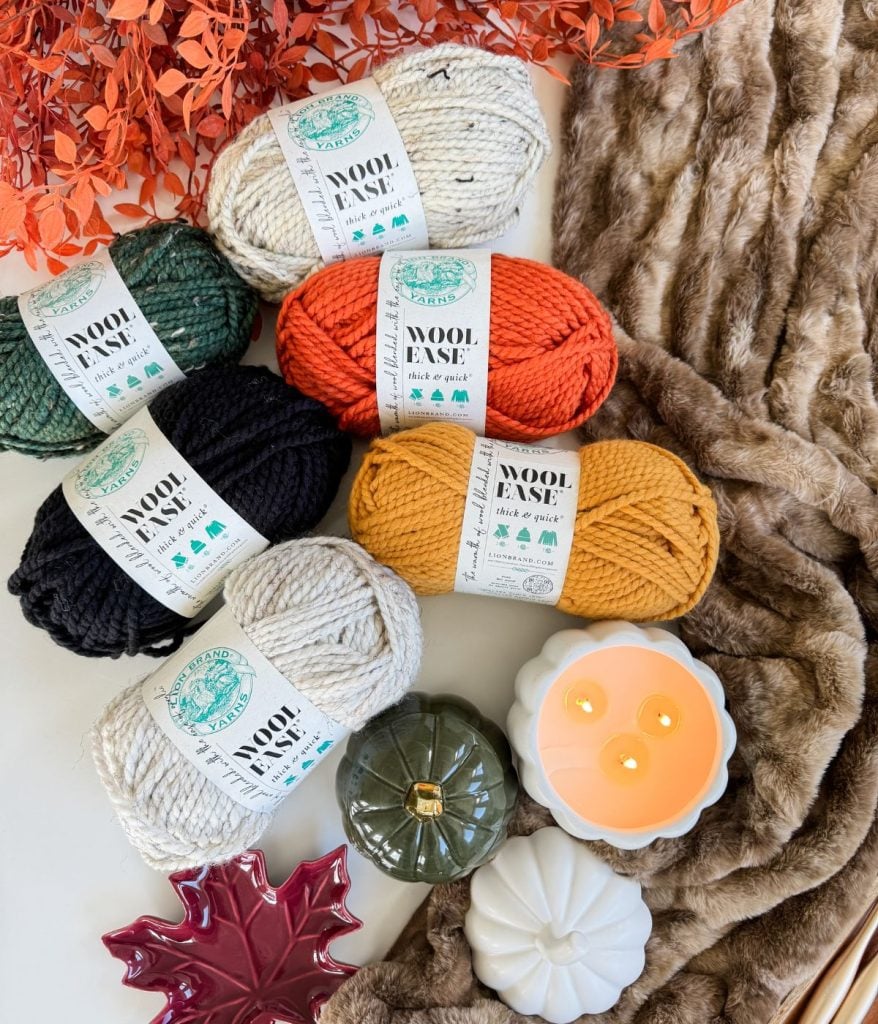
- Using Lion Brand Wool-Ease Thick & Quick yarn, the project is both fun and easy for seasonal decorating.
- This design features a weighted base and stuffed pumpkins to ensure stability and a cozy appearance.
Video Tutorial Crochet Jack-O-Lantern
Crochet the Jack-O’-Lantern Pumpkin Stack with me in this step-by-step tutorial. This quick and bulky project is worked seamlessly from the bottom up, using basic stitches to shape each pumpkin section with increases and decreases. You’ll learn how to make a magic ring, stuff and weight the base pumpkin for stability, and build the stack layer by layer. The tutorial also includes instructions for crocheting the witch hat and finishing your project with the printable felt Jack-O’-Lantern face, available in three sizes to fit each pumpkin in the stack.
Video Tutorial
In this video, we’ll guide you through each step of the pattern, allowing you to create these festive Jack-O-Lanterns!

Yarn Requirements
Lion Brand Wool Ease Thick & Quick
Super Bulky Weight #6
80% acrylic, 20% Wool, 106 yds/ 170g
Mary Maxim Canada or WeCrochet
Shown in Pumpkin, Wheat & Black
2 balls (150 yards) in Pumpkin or Wheat needed for the pumpkin stack, and 1 ball (25 yards) of black for the hat
Sizes
One Size
Skill Level
Gauge
4.5 sts and 5 rows equal to 2″ in sc blo with
8mm hook
Substituting Yarn
The Jack-O’-Lantern Pumpkin Stack is made with Lion Brand Wool-Ease Thick & Quick, which is slightly thicker than many other super bulky weight yarns. If substituting with a lighter yarn, such as Bernat Softee Chunky, you may want to use a smaller hook to achieve a dense fabric.
Before beginning, it is highly recommended to create a gauge swatch. Taking the time to swatch will help ensure your stitch tension works well with this pattern, which is especially important if you are substituting yarn or if the recommended yarn is unavailable. A swatch also allows you to test how your chosen yarn feels—whether it’s too loose, too stiff, or just right for shaping sturdy pumpkins.
For this type of amigurumi project, the exact finished size is not critical. What matters most is creating a firm, dense fabric so the stuffing does not show through and the pumpkin stack holds its shape. If your stitches appear too loose or gaps are visible, try using a smaller hook. If the fabric feels overly tight or difficult to work with, move up a hook size. Adjusting your hook will help you find the right balance between ease of stitching and durability.
This is also a great opportunity to experiment with different yarn weights and colours to create unique stacks. Try traditional orange pumpkins, rustic neutral tones, or even bold, playful colours for a whimsical touch.
We’ve provided a list of suitable yarn substitutes on the following page. You can also create a bulky-weight yarn by holding 2-3 strands of worsted-weight yarn together. This not only gives you flexibility with colour combinations but also makes it easy to use up leftover yarn in your stash.
Suitable Yarn Substitutes for Wool-Ease Thick & Quick
PREMIER BASIX CHUNKY YARN CDN) – 117yds/100g
Bernat Softee Chunky CDN– 108 yds/100g
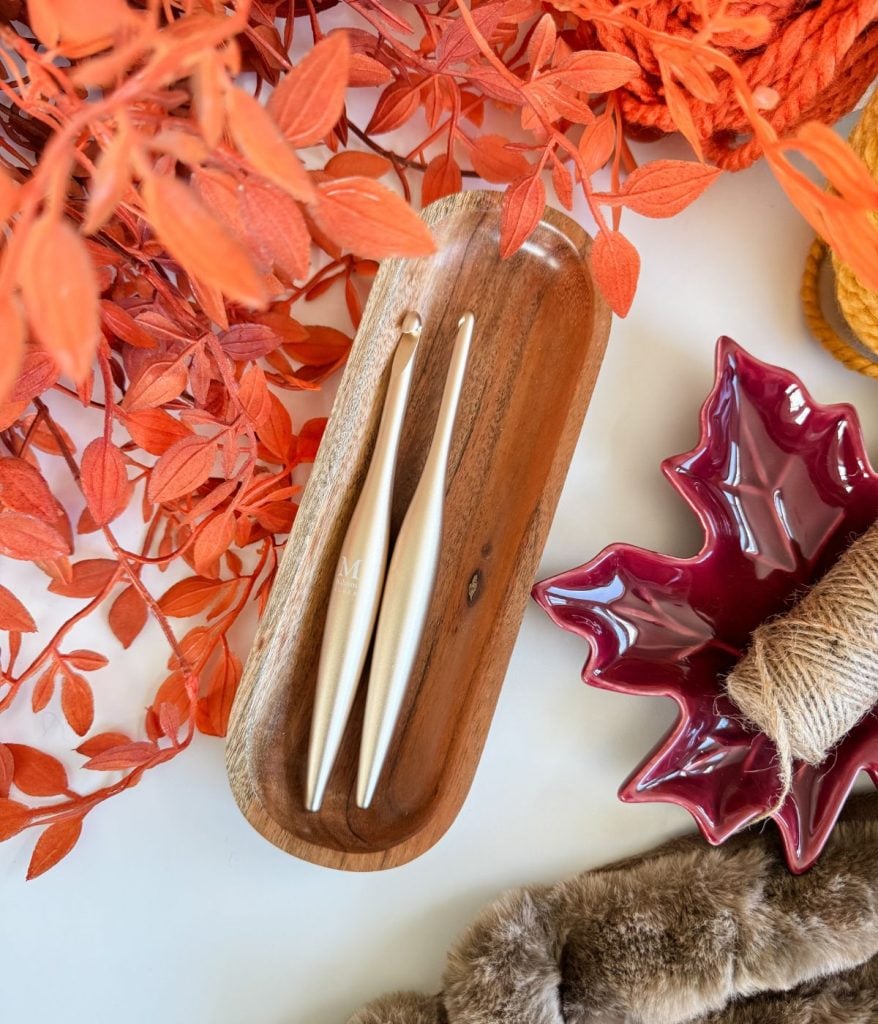
Crochet Hooks Required
7mm Crochet Hook
Materials Needed
Craft Sand and Plastic Bags or Muslin Drawstring Bag
Helpful Resources
- Join our Facebook Crochet Community for pattern support and inspiration
- Subscribe on YouTube for hundreds of free tutorials
- Sign up for our newsletter and receive 40% off your first Ravelry purchase!
- Sign up for our YouTube Membership
Abbreviations
Ch – Chain
Hdc – Half Double Crochet
Inv Sc2tog – Single Crochet Decrease
Rep – Repeat
RS – Right Side
Sc – Single Crochet
Sl St – Slip Stitch
Sp(s) – Space(s)
St(s) – Stitch(es)
Inv Sc2tog – Invisible Single Crochet 2 together – Insert hook through the blo of next 2 sts, YO (Yarn Over), pull through 2 loops on the hook twice.
Upgrade to the Premium PDF Pattern!
Digital PDF Download
Digital pattern only. No physical item will be shipped.
Crochet Jack-O-Lantern Pattern
FAQ & Terms
This post may contain affiliate links. Purchases made through these links may earn MJ’s Off The Hook Designs Inc. a small commission at no extra cost to you. Content on this site is supported by ads—please do not block or remove them.
Copyright
All patterns, photos, and written content are the property of MJ’s Off The Hook Designs Inc. and protected by copyright law.
Usage
Free patterns are for viewing only on this blog. You may not copy, download, print, screenshot, or redistribute any part of the pattern. Access must remain through this page with ads visible. Use of ad blockers, reader view, or any similar tools that remove or hide ads and site content is strictly prohibited.
Legal Notice
Unauthorized reproduction or distribution may result in copyright infringement penalties.
By accessing this post, you agree to these terms and conditions.
Yes! You may sell finished items made from MJ’s patterns, but please credit:
“Pattern by MJ’s Off The Hook Designs Inc.”
Pattern Support is only available in our Facebook Community group and Video Tutorials.
No additional support is provided for modified patterns, alternate yarns, or changes to gauge.
Having trouble unlocking the pattern?
If you’re seeing the message “Email subscription failed, please try again”, don’t worry — it’s usually an easy fix! Here are a few quick things to try:
First, double-check your login details. Make sure you’re signing in with the same email you originally used to create your Grow account. If you’re not sure, click “Forgot Password” to reset your login. Once you’ve updated it, return to my site and try again.
Next, clear your browser’s cache and cookies. Sometimes the login just gets stuck. You can also try opening the page in a private or incognito window, or switching to another browser like Chrome, Safari, or Firefox to see if that does the trick.
It also helps to make sure you’re logged into Grow directly. Visit https://grow.me and sign in there first. Once you’re logged in, come back to my site and refresh the page — your pattern should unlock automatically.
If you’re still having trouble, check your browser’s privacy settings. Grow needs cookies to verify your account, so make sure cookies and cross-site tracking are allowed. On iPhone, go to Settings → Safari → Privacy & Security, then turn off “Prevent Cross-Site Tracking” and “Block All Cookies.” On Android or Chrome, go to Settings → Site Settings → Cookies and select “Allow all cookies.”
Lastly, ad blockers or browser extensions can sometimes block the login pop-up. Try turning them off temporarily while you sign in. If nothing seems to work, log out of Grow completely by going to https://grow.me, selecting your profile icon, and choosing Log Out. Then come back to my site and try logging in again.
If you’re still stuck after trying all of this, please reach out through my Contact Page and let me know what device and browser you’re using (and include a screenshot if you can).
To unlock Exclusive Content on my Blog, all you need to do is click the box below and the Grow.me app will pop up, allowing you to enter your email and create a password. Once you’ve created an account, every time you see Exclusive Content on my blog, simply login to your Grow account. Be sure to switch to the login screen to enter your login credentials.
If you forget your password, click the “forgot password” link and follow the prompts. Please note that I’m unable to assist with resetting Grow passwords or accessing your Grow account, so be sure to save your login information in a safe place.
To make things even easier, I’ve created a video for both desktop and mobile users that offer additional assistance. You can access this video by visiting my FAQs page HERE or by watching the video below.
Thank you for subscribing and for joining me on my crochet journey. I hope you enjoy the exclusive content available to our subscribers and create beautiful crochet projects using the resources you discover.
Pattern
Jack-O’-Lantern
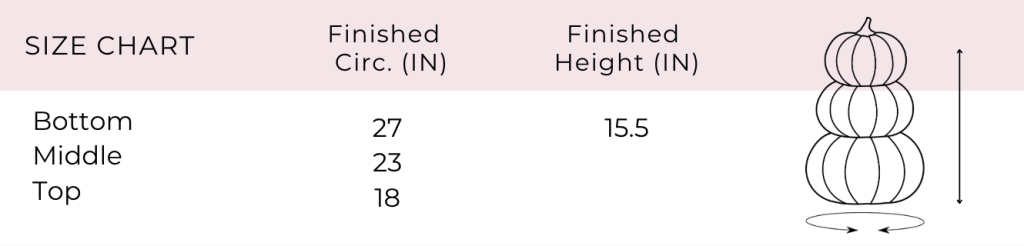
Notes: The pumpkin stack is worked in continuous rounds, worked from the bottom up. Use a stitch marker to indicate the first stitch of each round.
Bottom Pumpkin
Round 1:
Magic Ring, ch 1, work 10 hdc in the ring, pull ring tight (don’t join)—10 sts.
Round 2:
2 sc in the blo of each st around—20 sts.
Round 3:
1 sc in the blo of first st, 2 sc in the blo of next st, *1 sc in the blo next st, 2 sc in the blo next st; rep from * around—30 sts.
Round 4:
1 sc in the blo of first 2 sts, 2 sc in the blo of next st, *1 sc in the blo next 2 sts, 2 sc in the blo of next st; rep from * around—40 sts.
Round 5:
1 sc in the blo of first 3 sts, 2 sc in the blo of next st, *1 sc in the blo next 3 sts, 2 sc in the blo of next st; rep from * around—50 sts.
Round 6:
1 sc in the blo of first 4 sts, 2 sc in the blo of next st, *1 sc in the blo next 4 sts, 2 sc in the blo of next st; rep from * around—60 sts.The base should measure approximately 6.5″ in diameter.
Rounds 7-18:
1 sc in the blo of each st around—60 sts.
Round 19 (Decr.):
1 sc in the blo first 4 sts, inv sc2tog in the blo across next 2 sts, *1 sc in the blo next 4 sts, inv sc2tog in the blo across next 2 sts; rep from * around—50 sts.
Round 20 (Decr.):
1 sc in the blo first 3 sts, inv sc2tog in the blo across next 2 sts, *1 sc in the blo next 3 sts, inv sc2tog in the blo across next 2 sts; rep from * around—40 sts.
Round 21 (Decr.):
1 sc in the blo first 2 sts, inv sc2tog in the blo across next 2 sts, *1 sc in the blo next 2 sts, inv sc2tog in the blo across next 2 sts; rep from * around—30 sts.

Middle Pumpkin
Add a weighted bag to the body and stuff with polyester fill as you go here and throughout the rest of the pumpkin.
Round 22 (Incr.):
1 sc in the blo of first 2 sts, 2 sc in the blo of next st, *1 sc in the blo next 2 sts, 2 sc in the blo of next st; rep from * around—40 sts.
Round 23 (Incr.):
1 sc in the blo of first 3 sts, 2 sc in the blo of next st, *1 sc in the blo next 3 sts, 2 sc in the blo of next st; rep from * around—50 sts.
Rounds 24-33:
1 sc in the blo of each st around—50 sts.
Round 34 (Decr.):
1 sc in the blo first 3 sts, inv sc2tog in the blo across next 2 sts, *1 sc in the blo next 3 sts, inv sc2tog in the blo across next 2 sts; rep from * around—40 sts.
Round 35 (Decr.):
1 sc in the blo first 2 sts, inv sc2tog in the blo across next 2 sts, *1 sc in the blo next 2 sts, inv sc2tog in the blo across next 2 sts; rep from * around—30 sts.
Round 36 (Decr.):
1 sc in the blo first st, inv sc2tog in the blo across next 2 sts, *1 sc in the blo next st, inv sc2tog in the blo across next 2 sts; rep from * around—20 sts. Designer Tip: For best results, consider adding a small weighted bag to the middle section.
Top Pumpkin
Round 37 (Incr.):
1 sc in the blo of first st, 2 sc in the blo of next st, *1 sc in the blo next st, 2 sc in the blo of next st; rep from * around—30 sts.
Round 38 (Incr.):
1 sc in the blo of first 2 sts, 2 sc in the blo of next st, *1 sc in the blo next 2 sts, 2 sc in the blo of next st; rep from * around—40 sts.
Rounds 39-46:
1 sc in the blo of each st around—40 sts.
Round 47 (Decr.):
1 sc in the blo first 2 sts, inv sc2tog in the blo across next 2 sts, *1 sc in the blo next 2 sts, inv sc2tog in the blo across next 2 sts; rep from * around—30 sts.
Round 48 (Decr.):
1 sc in the blo first st, inv sc2tog in the blo across next 2 sts, *1 sc in the blo next st, inv sc2tog in the blo across next 2 sts; rep from * around—20 sts.
Round 49 (Decr.):
1 sc in the blo first 2 sts, inv sc2tog in the blo across next 2 sts, *1 sc in the blo next 2 sts, inv sc2tog in the blo across next 2 sts; rep from * around—15 sts.
Round 50 (Decr.):
1 sc in the blo first st, inv sc2tog in the blo across next 2 sts, *1 sc in the blo next st, inv sc2tog in the blo across next 2 sts; rep from * around—10 sts. Fasten off, leaving a tail. Create the stem by rolling the twine off the roll until the roll measures about a 3.5″ circumference. Insert the roll into the top opening. With a yarn needle, weave the tail through the front loops only of each stitch around the opening, pull tight to secure the stem in place, and weave in the ends. Finish by tying a twine bow around the stem.
Hat
Notes: The hat is worked in continuous rounds, worked from the top down. Use a stitch marker to indicate the first stitch of each round.
Round 1:
With Black Yarn, Magic Ring, ch 1, work 6 sc in the ring, pull ring tight (don’t join)—6 sts.
Round 2:
1 sc in the blo of each st around—6 sts.
Round 3:
1 sc in the blo of first 2 sts, 2 sc in the blo of next st, *1 sc in the blo next 2 sts, 2 sc in the blo of next st—8 sts.
Round 4:
1 sc in the blo of first 3 sts, 2 sc in the blo of next st, 1 sc in the blo next 3 sts, 2 sc in the blo of next st—10 sts.
Round 5:
1 sc in the blo of first 4 sts, 2 sc in the blo of next st, 1 sc in the blo next 4 sts, 2 sc in the blo of next st—12 sts.
Round 6:
1 sc in the blo of first 5 sts, 2 sc in the blo of next st, 1 sc in the blo next 5 sts, 2 sc in the blo of next st—14 sts.
Round 7:
1 sc in the blo of first 6 sts, 2 sc in the blo of next st, 1 sc in the blo next 6 sts, 2 sc in the blo of next st—16 sts.
Round 8:
1 sc in the blo of first 7 sts, 2 sc in the blo of next st, 1 sc in the blo next 7 sts, 2 sc in the blo of next st—18 sts.
Round 9:
1 sc in the blo of first 8 sts, 2 sc in the blo of next st, 1 sc in the blo next 8 sts, 2 sc in the blo of next st—20 sts.
Round 10:
1 sc in the blo of first 9 sts, 2 sc in the blo of next st, 1 sc in the blo next 9 sts, 2 sc in the blo of next st—22 sts
Round 11:
1 sc in the blo of first 10 sts, 2 sc in the blo of next st, 1 sc in the blo next 10 sts, 2 sc in the blo of next st—24 sts.
Round 12:
1 sc in the blo of first 7 sts, 2 sc in the blo of next st, *1 sc in the blo next 7 sts, 2 sc in the blo of next st; rep from * 1 more time—27 sts.
Round 13:
1 sc in the blo of first 8 sts, 2 sc in the blo of next st, *1 sc in the blo next 8 sts, 2 sc in the blo of next st; rep from * 1 more time—30 sts.
Brim
Round 14:
1 sc in the blo of first st, 2 sc in the blo of next st, *1 sc in the blo next st, 2 sc in the blo of next st; rep from * around—45 sts.
Round 15:
1 sc in the blo of each st around. Fasten off and join with a seamless join. Cut 2 pieces of twine and tie them into a bow around the base of the hat. Place the hat on the pumpkin stem or secure it with glue.
Jack-O’-Lantern Face
Print the jack-o’-lantern template below. Cut it out and pin it to the felt. With the template attached, cut out the felt pieces. Use fabric glue to secure the pieces to each pumpkin.
https://mjsoffthehook.myflodesk.com/jackolantern
I hope you love our Crochet Jack-O-Lantern pattern! . You might also love these crochet patterns:
This pattern is designed by Michelle Moore of MJ’s Off The Hook Designs Inc, based in Lakefield, Ontario, Canada. Your go-to source for modern, easy crochet patterns. Published on September 17th, 2025.
Thank you for visiting MJ’s Off The Hook Designs. I hope you enjoyed this pattern and feel inspired to pick up your hook and start creating.
You can find even more crochet patterns in our Ravelry and Etsy shops.
For daily inspiration and behind-the-scenes peeks, join me over on Facebook or Instagram, or join our YouTube Membership for exclusive content!n!
You’ve got questions, we’ve got a community!
Crocheting is better with friends! Join our group to post pictures and ask all your pattern support questions.