*This post may contain affiliate links to support the cost of this blog. At no cost to you, I may make a small commission if you purchase through these links. Read our Privacy Policy HERE


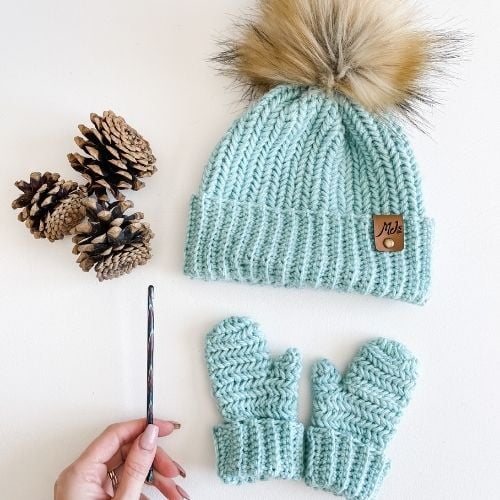
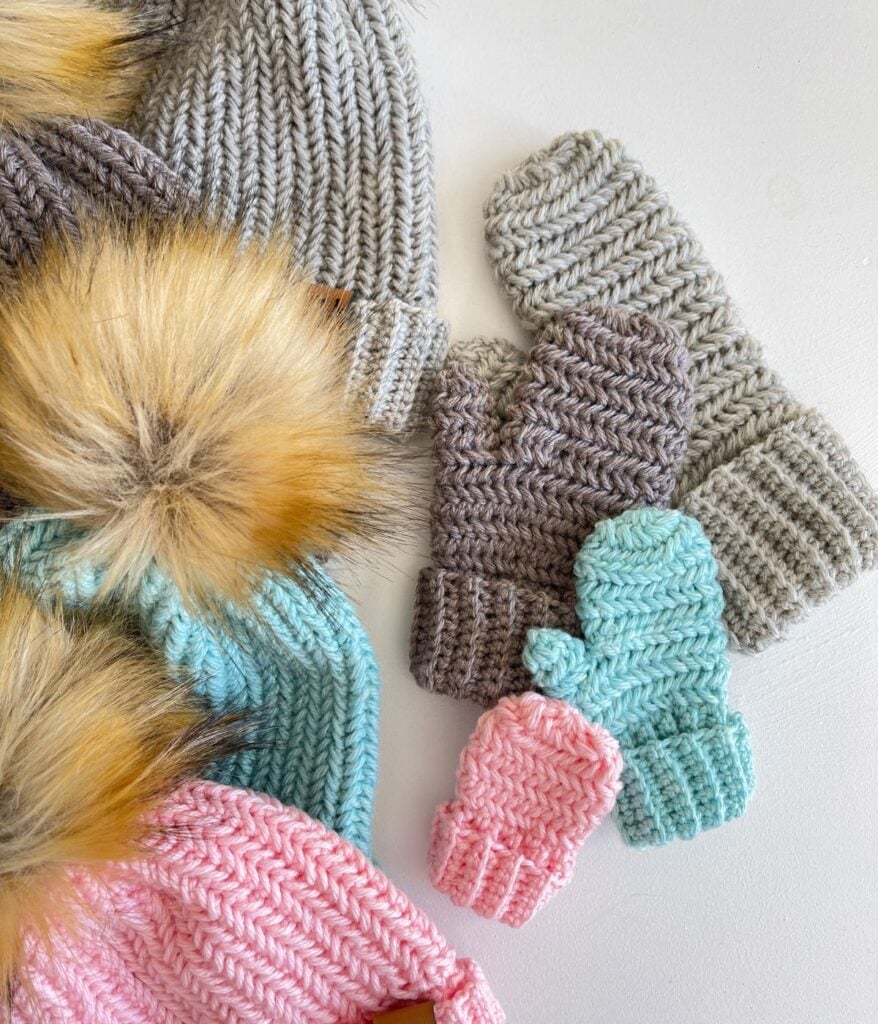
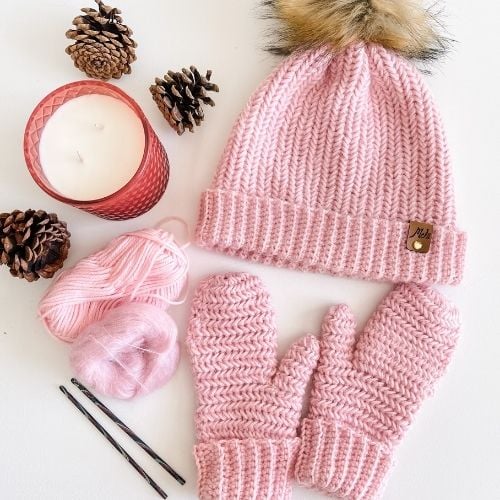
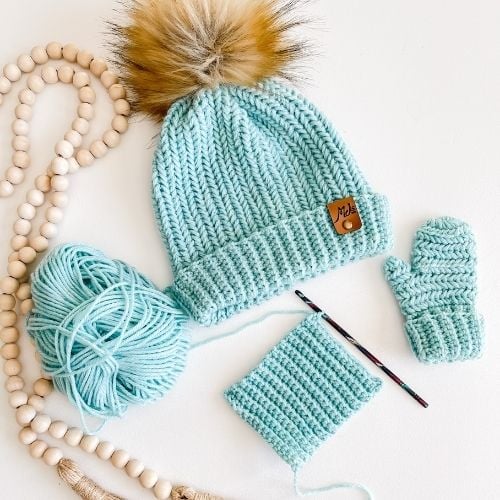
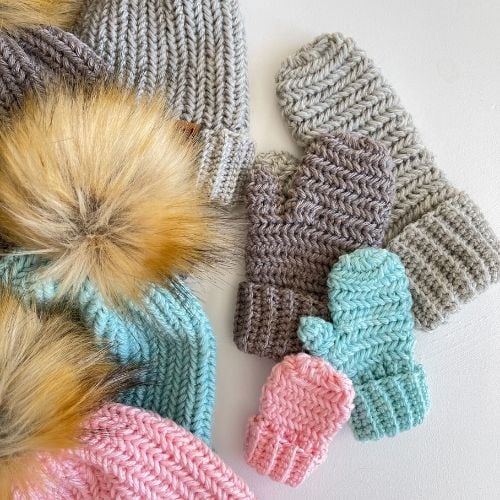
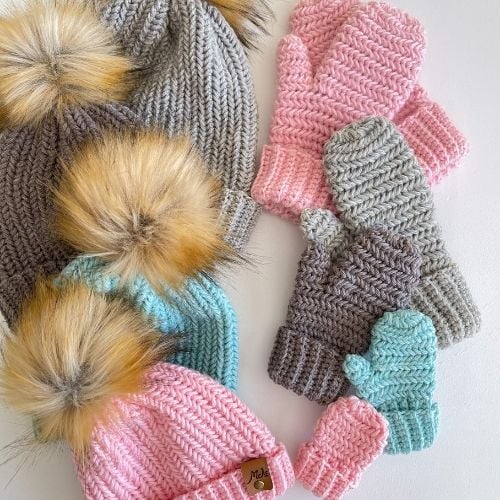
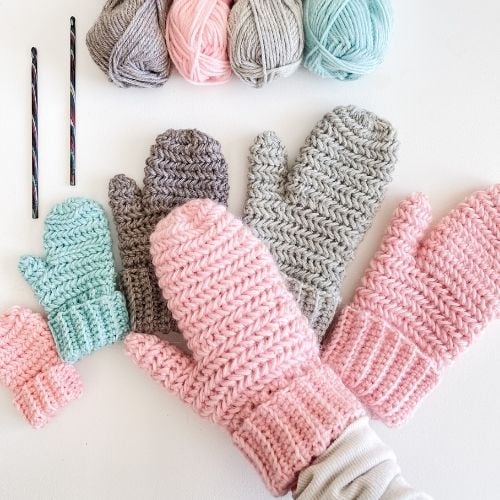
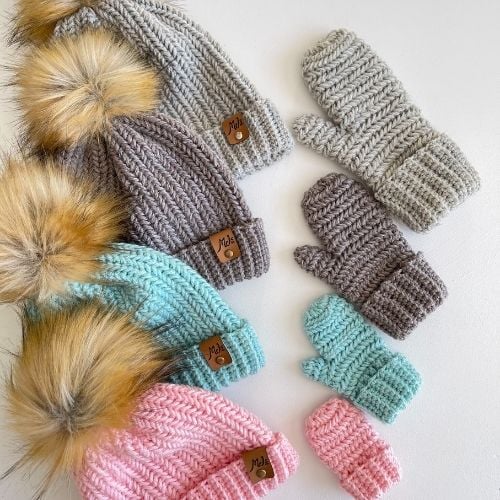
Heavenly Herringbone Crochet Mittens. Dazzle your way through Winter with warm and cozy crochet mittens designed to keep you extra snug and fashionable. The interesting herringbone single crochet stitch works up thick and squishy. Add a strand of lace mohair for a fuzzy extra-thick mitten. Pattern includes sizing from baby to adult. Video tutorial on YouTube included.

Key Takeaways
- The article features a pattern for Herringbone Crochet Mittens, highlighting their warmth and style.
- It utilizes the Herringbone Single Crochet stitch, known for its thickness and coziness.
- The pattern includes sizes from baby to adult and provides a video tutorial for beginners.
- Recommended yarn is Swish worsted weight from WeCrochet, optionally paired with Aloft mohair for added fluffiness.
- Additional resources include links to a matching hat pattern and purchasing options for ad-free PDFs.
I love crocheting new and interesting crochet stitches The Herringbone Single Crochet Stitch is a modern and beautiful stitch that has quickly become one of my favourites. This crochet stitch works up surprisingly thick and cozy, making it the perfect stitch for warm winter crochet mittens. I also designed a matching crochet hat. You can find the Free crochet hat pattern on my blog at the link below.
Video Tutorial

The Yarn
The yarn used to crochet the Heavenly Herringbone Crochet Mittens pattern is Swish worsted weight from WeCrochet. Swish is a 100% Fine Superwash Merino Wool. It’s a worsted weight yarn #4 weight and is on the light side. This yarn is so soft and squishy it should have been named squish instead of swish. For an extra thick and fuzzy mitten add a strand of Aloft super kid mohair.
Substitutes
If you’re looking for a yarn substitute I’ve listed a few that I think will work well. Make sure to meet the pattern gauge of 9 sts and 7 rows in 2″ when crocheting the crochet mittens so that the sizing will be correct.
#4 yarn, 70% Superwash Wool, 30% Nylon
100g/198yards
#4 yarn, 80% Acrylic 20% Superwash Wool
100g/208yards
#4 yarn, 100% Premium Acrylic
100g/218yards
100% Peruvian Highland Wool
50g/110yards
The Hook
I used the Majestic wooden crochet hooks from WeCrochet. They come in a crochet hook set with 8 sizes ranging from 3.5mm to 6.5mm. I find them easy to work with and very well suited for crocheting the herringbone single crochet stitch.
Upgrade to the Premium PDF Pattern!
Digital PDF Download
Digital pattern only. No physical item will be shipped.

Purchase the Ad-Free Heavenly Herringbone Hat & Mitten PDF Set on Etsy
Yarn Requirments
Baby (Toddler, Child, Ladies, Mens)
Swish Worsted Weight by WeCrochet
100% Fine Superwash Merino Wool, 110yds/50g
Shown in Frosting, Wonderland, Squirrel and Dove Heather
1 ( 1, 2, 2, 3) balls/45 (85, 125, 180, 240) yards
Optional: 1 ball of Aloft all sizes

Materials
4.5mm/G+-7 & 5mm/H-8 Majestic Crochet Hook (or hook needed to obtain gauge)
Helpful Resources
- Join our Facebook Crochet Community for pattern support and inspiration
- Subscribe on YouTube for hundreds of free tutorials
- Sign up for our newsletter and receive 40% off your first Ravelry purchase!
- Sign up for our YouTube Membership
Sizing
Baby (Toddler, Child, Ladies, Men’s)
Gauge
Herringbone Pattern: 9 sts and 7 rows = 2″ in hbsc 5mm hook
Band: 10 sts and 10 rows = 2″ in sc blo 4.5mm hook
Abbreviations
blo – Back Loop Only, ch – Chain, flo – Front Loop Only, hbsc – Herringbone Single Crochet, rep – Repeat, RS- Right Side, sc – Single Crochet, sl – Slip, sp – Space, st(s) – Stitch(es), WS – Wrong Side
Special Stitches
Hbsc – Herringbone Single Crochet: Insert hook through the vertical bar of the previous single crochet stitch, insert hook into the next stitch and pull up a loop, YO (yarn over) and pull through all three loops on the hook.
Hbsc2tog – Herringbone Single Crochet Decrease: Insert hook through the vertical bar of the previous single crochet stitch, insert hook into the next 2 stitches and pull up a loop, YO (yarn over) and pull through all four loops on the hook.
Reverse sc: Bring the working yarn towards the front of your work, insert the crochet hook into the first stitch from the back to the front (working in reverse), YO, pull up a loop, YO and pull through both loops on the hook.
Reverse Hbsc: Bring the working yarn towards the front of your work, insert hook through the last vertical bar on the WS of work from right to left, insert the hook into the next stitch from back to front (working in reverse), YO, pull up a loop, YO and pull through all three loops on the hook.
Sc2tog – Single Crochet Decrease: Insert hook into the next 2 stitches and pull up a loop, YO (yarn over) and pull through all three loops on the hook.
FAQ & Terms
This post may contain affiliate links. Purchases made through these links may earn MJ’s Off The Hook Designs Inc. a small commission at no extra cost to you. Content on this site is supported by ads—please do not block or remove them.
Copyright
All patterns, photos, and written content are the property of MJ’s Off The Hook Designs Inc. and protected by copyright law.
Usage
Free patterns are for viewing only on this blog. You may not copy, download, print, screenshot, or redistribute any part of the pattern. Access must remain through this page with ads visible. Use of ad blockers, reader view, or any similar tools that remove or hide ads and site content is strictly prohibited.
Legal Notice
Unauthorized reproduction or distribution may result in copyright infringement penalties.
By accessing this post, you agree to these terms and conditions.
Yes! You may sell finished items made from MJ’s patterns, but please credit:
“Pattern by MJ’s Off The Hook Designs Inc.”
Pattern Support is only available in our Facebook Community group and Video Tutorials.
No additional support is provided for modified patterns, alternate yarns, or changes to gauge.
Having trouble unlocking the pattern?
If you’re seeing the message “Email subscription failed, please try again”, don’t worry — it’s usually an easy fix! Here are a few quick things to try:
First, double-check your login details. Make sure you’re signing in with the same email you originally used to create your Grow account. If you’re not sure, click “Forgot Password” to reset your login. Once you’ve updated it, return to my site and try again.
Next, clear your browser’s cache and cookies. Sometimes the login just gets stuck. You can also try opening the page in a private or incognito window, or switching to another browser like Chrome, Safari, or Firefox to see if that does the trick.
It also helps to make sure you’re logged into Grow directly. Visit https://grow.me and sign in there first. Once you’re logged in, come back to my site and refresh the page — your pattern should unlock automatically.
If you’re still having trouble, check your browser’s privacy settings. Grow needs cookies to verify your account, so make sure cookies and cross-site tracking are allowed. On iPhone, go to Settings → Safari → Privacy & Security, then turn off “Prevent Cross-Site Tracking” and “Block All Cookies.” On Android or Chrome, go to Settings → Site Settings → Cookies and select “Allow all cookies.”
Lastly, ad blockers or browser extensions can sometimes block the login pop-up. Try turning them off temporarily while you sign in. If nothing seems to work, log out of Grow completely by going to https://grow.me, selecting your profile icon, and choosing Log Out. Then come back to my site and try logging in again.
If you’re still stuck after trying all of this, please reach out through my Contact Page and let me know what device and browser you’re using (and include a screenshot if you can).
Construction
The Heavenly Herringbone Crochet Mittens are worked from the cuff up. The cuff is worked in rows from the side across and then joined. The mitten is worked in rounds, and each round is turned for the herringbone effect. The mitten and thumb can easily be customized for a long or shorter fit—tutorial for toddler size on YouTube https://youtu.be/flB8hJ-trTA.
Sizing Chart


Pattern – Heavenly Herringbone Crochet Mittens
This pattern is the sole property of MJ’s Off the Hook Designs. This pattern is copyright protected and cannot be copied or reproduced in any way. You are welcome to sell your finished items from this pattern. I require a reference or link for my design. My photos are copyright protected and are not to be used to sell your items.
Sizes: Baby (Toddler, Child, Ladies, Men’s)
A helpful tip for keeping the correct stitch count is to place a st marker in the first and last st of every round. All sizes are listed separately.
Baby Herringbone Crochet Mittens: Make 2
Cuff
Row 1 (WS): With smaller hook, ch 13, work 1 sc in the 2nd ch from the hook and in each ch across, turn—12 sts.
Row 2 (RS): Ch 1 (not included as a st, here and throughout), work 1 sc in the blo of each st across, turn—12 sts.
Rows 3-18: Rep row 2, after last row ch 1
to join the cuff, fold the cuff in half with RS facing. Sl st the last row to row 1, working through the blo of each st across. Keep the seam to the outside of work.
Body
Body
Setup Round: Ch 1, evenly work 18 sc sts around the band (1 st/ row), sl st in the first sc to join—18 sts. Change to larger hook.
Round 1 (Incr.): With larger hook, ch 1 (not incl. as a st here and throughout), sc in first, hbsc in next 2 sts, 2 hbsc in next st, *1 hbsc in next 3 sts, 2 hbsc in next; rep from * around, end with 1 hbsc in last 2 sts, sl st in the first sc to join, TURN—22 sts.
Round 2: Ch 1, reverse sc in first st, reverse hbsc in each st around, sl st in the first st to join, TURN—22 sts.
Round 3: Ch 1, sc in first st, hbsc in each st around, sl st in the first st to join, TURN—22 sts.
Rounds 4-6: Rep rounds 2 & 3 ending with round 2. Depending on the size of babies hand, you can add additional repeats if needed. Then proceed to decrease round.
Round 7 (Decr.): Ch 1, sc2tog across first 2 sts, *hbsc2tog across next 2 sts; rep from * around, sl st in the first st to join—11 sts. Fasten off with a tail for weaving.
With tapestry needle weave through the flo of each st around, pull tight closing the top of the mittens. Weave in all ends.

Toddler Herringbone Crochet Mittens: Make
Cuff
Row 1 (WS): With smaller hook, ch 17, work 1 sc in the 2nd ch from the hook and in each ch across, turn—16 sts.
Row 2 (RS): Ch 1 (not included as a st, here and throughout), work 1 sc in the blo of each st across, turn—16 sts.
Rows 3-22: Rep row 2, after last row ch 1 to join the cuff, fold the cuff in half with RS facing. Sl st the last row to row 1, working through the blo of each st across. Keep the seam to the outside of work.
Body
Setup Round: Ch 1, evenly work 22 sc sts around the band (1 st/ row), sl st in the first sc to join—22 sts. Change to larger hook.
Round 1 (Incr.): With larger hook, ch 1 (not incl. as a st here and throughout), sc in first, hbsc in next 2 sts, 2 hbsc in next st, *1 hbsc in next 3 sts, 2 hbsc in next; rep from * around, end with 1 hbsc in last 2 sts, sl st in the first sc to join, TURN—27 sts.
Round 2:
Ch 1, reverse sc in first st, reverse hbsc in each st around, sl st in the first st to join, TURN—27 sts.
Round 3:
Ch 1, sc in first st, hbsc in each st around, sl st in the first st to join, TURN—27 sts.
Round 4:
Rep round 2.
Separate Thumb and Upper hand
Round 5: Ch 1, sc in first st, hbsc in each of next 7 sts, 2 hbsc in next st, sk 9 sts (leaving an opening for thumb), 2 hbsc next st, 1 hbsc next 8 sts, sl st in the first st to join—20 sts.
Continue working the upper hand of the mitten, leaving the thumb unworked.
Rounds 6-10: Rep rounds 2 & 3 ending with round 2—20 sts.
Round 11 (Decr.): Ch 1, sc2tog across first 2 sts, *hbsc2tog across next 2 sts; rep from * around, sl st in the first st to join—10 sts. Fasten off with a tail for weaving.
With tapestry needle weave through the flo of each st around, pull tight closing the top of the mittens. Weave in all ends.
Thumb
Join yarn into the first skd st of round 5. Leave a long starting tail to seam the opening at the side of the thumb.
Round 1:
With larger hook, ch 1, sc in first st, hbsc in each skd st around, sl st in the first st to join, TURN—9 sts.
Round 2:
Ch 1, reverse sc in first st, reverse hbsc in each st around, sl st in the first st to join, TURN—9 sts.
Round 3 (Decr.):
Ch 1, sc2tog across first 2 sts, *hbsc2tog across next 2 sts; rep from * around, 1 hbsc in last st, sl st in the first st to join—5 sts. Fasten off with a tail for weaving. With tapestry needle weave through the flo of each st around, pull tight closing the top of the thumb. Weave in all ends. With starting tail, sew the opening at the side of the thumb.
Child Herringbone Crochet Mittens: Make 2
Cuff
Row 1 (WS): With smaller hook, ch 19, work 1 sc in the 2nd ch from the hook and in each ch across, turn—18 sts.
Row 2 (RS): Ch 1 (not included as a st, here and throughout), work 1 sc in the blo of each st across, turn—18 sts.
Rows 3-26: Rep row 2, after last row ch 1
to join the cuff, fold the cuff in half with RS facing. Sl st the last row to row 1, working through the blo of each st across. Keep the seam to the outside of work.
Body
Setup Round: Ch 1, evenly work 26 sc sts around the band (1 st/ row), sl st in the first sc to join—26 sts. Change to larger hook.
Round 1 (Incr.): With larger hook, ch 1 (not incl. as a st here and throughout), sc in first, hbsc in next 2 sts, 2 hbsc in next st, *1 hbsc in next 3 sts, 2 hbsc in next; rep from * around, end with 1 hbsc in last 2 sts, sl st in the first sc to join, TURN—32 sts.
Round 2: Ch 1, reverse sc in first st, reverse hbsc in each st around, sl st in the first st to join, TURN—32 sts.
Round 3: Ch 1, sc in first st, hbsc in each st around, sl st in the first st to join, TURN—32 sts.
Rounds 4-6: Rep rounds 2 & 3 ending with round 2.
Separate Thumb and Upper hand
Round 7: Ch 1, sc in first st, hbsc in each of next 6 sts, 2 hbsc in next 3 sts, sk 12 sts (leaving an opening for thumb), 2 hbsc next 3 sts, 1 hbsc next 7 sts, sl st in the first st to join—26 sts.
Continue working the upper hand of the mitten, leaving the thumb unworked.
Rounds 8-14: Rep rounds 2 & 3 ending with round 2—26 sts.
Round 15 (Decr.): Ch 1, sc2tog across first 2 sts, *hbsc2tog across next 2 sts; rep from * around, sl st in the first st to join—13 sts. Fasten off with a tail for weaving.
With tapestry needle weave through the flo of each st around, pull tight closing the top of the mittens. Weave in all ends.
Thumb
Join yarn into the first skd st of round 7.
Leave a long starting tail to seam the opening at the side of the thumb.
Round 1: With larger hook, ch 1, sc in first st, hbsc in each skd st around, sl st in the first st to join, TURN—12 sts.
Round 2: Ch 1, reverse sc in first st, reverse hbsc in each st around, sl st in the first st to join, TURN—12 sts.
Rounds 3-4: Rep rounds 1 & 2
Round 5 (Decr.): Ch 1, sc2tog across first 2 sts, *hbsc2tog across next 2 sts; rep from * around, sl st in the first st to join—6 sts. Fasten off with a tail for weaving. With tapestry needle weave through the flo of each st around, pull tight closing the top of the thumb. Weave in all ends. With starting tail, sew the opening at the side of the thumb.
Ladies Herringbone Crochet Mittens: Make 2
Cuff
Row 1 (WS): With smaller hook, ch 21, work 1 sc in the 2nd ch from the hook and in each ch across, turn—20 sts.
Row 2 (RS): Ch 1 (not included as a st, here and throughout), work 1 sc in the blo of each st across, turn—20 sts.
Rows 3-28: Rep row 2, after last row ch 1
to join the cuff, fold the cuff in half with RS facing. Sl st the last row to row 1, working through the blo of each st across. Keep the seam to the outside of work.
Body
Setup Round: Ch 1, evenly work 28 sc sts around the band (1 st/ row), sl st in the first sc to join—28 sts. Change to larger hook.
Round 1 (Incr.): With larger hook, ch 1 (not incl. as a st here and throughout), sc in first, hbsc in next 2 sts, 2 hbsc in next st, *1 hbsc in next 3 sts, 2 hbsc in next; rep from * around, sl st in the first sc to join, TURN—35 sts.
Round 2: Ch 1, reverse sc in first st, reverse hbsc in each st around, sl st in the first st to
join, TURN—35 sts.
Round 3: Ch 1, sc in first st, hbsc in each st around, sl st in the first st to join, TURN—35 sts.
Rounds 4-8: Rep rounds 2 & 3 ending with round 2.
Separate Thumb and Upper hand
Round 9: Ch 1, sc in first st, hbsc in each of next 6 sts, 2 hbsc in next 4 sts, sk 13 sts (leaving an opening for thumb), 2 hbsc next 4 sts, 1 hbsc next 7 sts, sl st in the first st to join—30 sts.
Continue working the upper hand of the mitten, leaving the thumb unworked.
Rounds 10-20: Rep rounds 2 & 3 ending with round 2—30 sts.
Round 21 (Decr.): Ch 1, sc2tog across first 2 sts, *hbsc2tog across next 2 sts; rep from * around, sl st in the first st to join—15 sts. Fasten off with a tail for weaving.
With tapestry needle weave through the flo of each st around, pull tight closing the top of the mittens. Weave in all ends.
Thumb
Join yarn into the first skd st of round 9.
Leave a long starting tail to seam the opening at the side of the thumb.
Round 1: With larger hook, ch 1, sc in first st, hbsc in each skd st around, sl st in the first st to join, TURN—13 sts.
Round 2: Ch 1, reverse sc in first st, reverse hbsc in each st around, sl st in the first st to join, TURN—13 sts.
Rounds 3-6: Rep rounds 1 & 2
Round 7 (Decr.): Ch 1, sc2tog across first 2 sts, *hbsc2tog across next 2 sts; rep from * around, 1 hbsc in last st, sl st in the first st to join—7 sts. Fasten off with a tail for weaving. With tapestry needle weave through the flo of each st around, pull tight closing the top of the thumb. Weave in all ends. With starting tail, sew the opening at the side of the thumb.
Men’s Herringbone Crochet Mittens: Make 2
Cuff
Row 1 (WS): With smaller hook, ch 23, work 1 sc in the 2nd ch from the hook and in each ch across, turn—22 sts.
Row 2 (RS): Ch 1 (not included as a st, here and throughout), work 1 sc in the blo of each st across, turn—22 sts.
Rows 3-30: Rep row 2, after last row ch 1
to join the cuff, fold the cuff in half with RS facing. Sl st the last row to row 1, working
through the blo of each st across. Keep the seam to the outside of work.
Body
Setup Round: Ch 1, evenly work 30 sc sts
around the band (1 st/ row), sl st in the first sc to join—30 sts. Change to larger hook.
Round 1 (Incr.): With larger hook, ch 1 (not incl. as a st here and throughout), sc in first, hbsc in next st, 2 hbsc in next st, *1 hbsc in next 2 sts, 2 hbsc in next; rep from * around, sl st in the first sc to join, TURN—40 sts.
Round 2: Ch 1, reverse sc in first st, reverse hbsc in each st around, sl st in the first st to
join, TURN—40 sts.
Round 3: Ch 1, sc in first st, hbsc in each st around, sl st in the first st to join, TURN—40 sts.
Rounds 4-10: Rep rounds 2 & 3 ending with round 2.
Separate Thumb and Upper hand
Round 11: Ch 1, sc in first st, hbsc in each of next 6 sts, 2 hbsc in next 5 sts, sk 16 sts (leaving an opening for thumb), 2 hbsc next 5 sts, 1 hbsc next 7 sts, sl st in the first st to join—34 sts.
Continue working the upper hand of the mitten, leaving the thumb unworked.
Rounds 10-24: Rep rounds 2 & 3 ending with round 2—34 sts.
Round 25 (Decr.): Ch 1, sc2tog across first 2 sts, *hbsc2tog across next 2 sts; rep from * around, sl st in the first st to join—17 sts. Fasten off with a tail for weaving.
With tapestry needle weave through the flo of each st around, pull tight closing the top of the mittens. Weave in all ends.
Thumb
Join yarn into the first skd st of round 11.
Leave a long starting tail to seam the opening at the side of the thumb.
Round 1: With larger hook, ch 1, sc in first st, hbsc in each skd st around, sl st in the first st to join, TURN—16 sts.
Round 2: Ch 1, reverse sc in first st, reverse hbsc in each st around, sl st in the first st to join, TURN—16 sts.
Rounds 3-8: Rep rounds 1 & 2
Round 9 (Decr.): Ch 1, sc2tog across first 2 sts, *hbsc2tog across next 2 sts; rep from * around, sl st in the first st to join—8 sts. Fasten off with a tail for weaving. With tapestry needle weave through the flo of each st around, pull tight closing the top of the thumb. Weave in all ends. through the blo of each st across. Keep the seam to the outside of work.
Add a garment tag for a personalized touch. Purchase Leather Rivets HERE
Make the matching hat HERE

If you enjoyed this pattern you may also enjoy these patterns;
This pattern is designed by Michelle Moore of MJ’s Off The Hook Designs Inc., based in Lakefield, Ontario, Canada. Your go-to source for modern, easy crochet patterns. Published on January 30th, 2022.
Thank you for visiting MJ’s Off The Hook Designs! I hope you enjoyed this pattern and feel inspired to pick up your hook and start creating.
You can find even more crochet patterns in our Ravelry andEtsy shops.
For daily inspiration and behind the scenes peeks join me over on Faceb
You’ve got questions, we’ve got a community!
Crocheting is better with friends! Join our group to post pictures and ask all your pattern support questions.