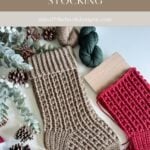

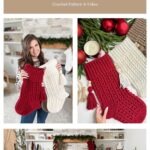

Welcome to the Snuggle Season Crochet Stocking pattern, your new favourite project for adding warmth and style to your holiday decor! Featuring the same delightful cozy puff and post stitch design as our beloved Snuggle Season headband and beanie, this pattern coordinates beautifully with our Holiday Weave Stocking and the entire Holiday Home Collection.

These oversized stockings offer the perfect size for filling with treats and surprises for your loved ones, making them a charming addition to your festive celebrations. Personalize each stocking with name tags and hangers to create lasting memories that you’ll cherish for years to come.
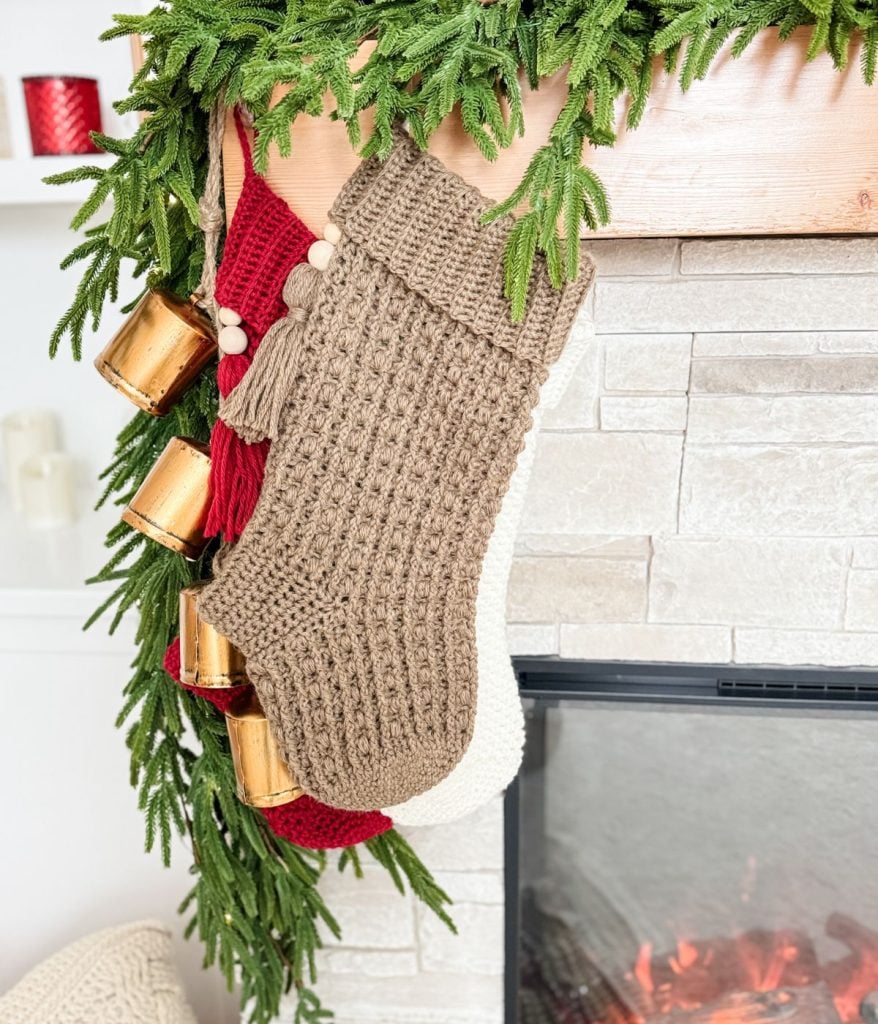
To enhance the stocking’s character, I’ve incorporated beaded tassels, adding extra flair and fun. Designed as an intermediate-level project, this pattern includes a comprehensive step-by-step tutorial on YouTube, guiding you through the techniques required, such as front and back post double crochet stitches and puff stitches.
Table of Contents
Key Takeaways
- The Snuggle Season Crochet Stocking pattern offers a cozy and stylish addition to your holiday decor.
- This intermediate-level project features beaded tassels, puff and post stitches, and uses Wool of The Andes Bulky yarn.
- A comprehensive YouTube tutorial guides you through each step of creating the stocking.
- Personalize each stocking with name tags to create lasting memories for your festive celebrations.
- Additional patterns are available for those who enjoy the crochet stocking design.

Crocheted with Wool of The Andes Bulky weight yarn, these stockings will not only look great but also provide the cozy, snuggly feel that embodies the spirit of the season.
Get ready to crochet your way into the heart of the holidays with the Snuggle Season Stocking!
Unique Crochet Stocking Pattern
I’ve received so much wonderful feedback on how much you’ve loved the Snuggle Season Hat and Headband patterns, so I just had to design another piece using this stitch! With Christmas right around the corner, a stocking felt like the perfect choice.
This puff and post stitch design is both unique and fun, guaranteed to make your stockings stand out! Plus, they pair beautifully with our Holiday Home Stockings, making it easy to mix and match colours and textures for a cohesive holiday look.
Video for the Crochet Stocking
Snuggle Season Crochet Stocking
Join me and follow along to this detailed tutorial to complete the Snuggle Season Crochet Stocking.

Yarn Requirements
#5 Weight 100% Peruvian Highland Wool
137yds/100g ball Shown in White (MC), Camel Heather (A), Cranberry (E)
340 yards per stocking or 3 hanks
Crochet Stocking Size
Height 21″ x Width 7.5″
Skill Level
Gauge
Suitable Yarn Substitutes
Bulky Yarn Subs
Worsted or Dk (use 2 strands)
Brava Worsted or Brava Tweed 218yds/100g
Mellowspun DK (CDN) 284yds/100g
Wool Of The Andes Worsted (Tweed) 110yds/50g
Worsted (use 1 strand)
Premier Everyday Worsted (cdn site)
Starlette Worsted Weight Yarn #4 (cdn site) 180yds/100g
Crochet Hooks Required

Helpful Resources
- Sign up for our YouTube Membership
- Join our Facebook Crochet Community for pattern support and inspiration
- Subscribe on YouTube for hundreds of free tutorials
- Sign up for our newsletter and receive 40% off your first Ravelry purchase!
Abbreviations
Ch – Chain
Hdc – Half Double Crochet
Rep – Repeat
Rev sl st – Reverse Slip Stitch
RS – Right Side
Sc – Single Crochet
Sk – Skip
Sl St – Slip Stitch
Sp(s) – Space(s)
St(s) – Stitch(es)
WS – Wrong Side
Special Stitches
Back Post Double Crochet (bpdc): Yo (Yarn Over), insert your hook from back to front to back around the post of the next stitch; yo, pull up a loop; yo, pull through 2 loops on your hook, yo, pull through remaining two loops on your hook.
Front Post Double Crochet (fpdc): Yo, insert your hook from front to back to front around the post of the next stitch; yo, pull up a loop; yo, pull through 2 loops on your hook; yo, pull through the remaining two loops on your hook.
Front Post Double Crochet Decrease (fpdc2tog): Yo, insert hook around indicated post and pull up a loop, yo, pull through 2 loops, yo, insert hook around next post, pull up a loop, yo, pull up a loop, yo, pull through 2 loops, yo, pull through the last 3 loops on the hook.
Puff Stitch (Puff st): [Yo, go through the indicated stitch and pull up a loop] 3 times; yo, pull through all 7 loops on the hook, ch 1.
Rev sl st – Reverse Slip Stitch: Go through the stitch back to front, Keep working yarn to the front, YU (yarn under) pulling through the loop on the hook.

Snuggle Season Crochet Stocking
FAQ & Terms
This pattern requires an Intermediate Skill Level
This pattern is professionally written in technical writing and tech edited for accuracy. You need to be comfortable reading technical repeats.
This post may contain affiliate links. Purchases made through these links may earn MJ’s Off The Hook Designs Inc. a small commission at no extra cost to you. Content on this site is supported by ads—please do not block or remove them.
Copyright
All patterns, photos, and written content are the property of MJ’s Off The Hook Designs Inc. and protected by copyright law.
Usage
Free patterns are for viewing only on this blog. You may not copy, download, print, screenshot, or redistribute any part of the pattern. Access must remain through this page with ads visible. Use of ad blockers, reader view, or any similar tools that remove or hide ads and site content is strictly prohibited.
Legal Notice
Unauthorized reproduction or distribution may result in copyright infringement penalties.
By accessing this post, you agree to these terms and conditions.
Yes! You may sell finished items made from MJ’s patterns, but please credit:
“Pattern by MJ’s Off The Hook Designs Inc.”
Pattern Support is only available in our Facebook Community group and Video Tutorials.
No additional support is provided for modified patterns, alternate yarns, or changes to gauge.


Tassel
Cut 30 yarn strands that are 15 inches long each. Cut two additional strands at 25-inches in length. Next, tie and knot the 30 strands together with the 25-inch yarn strand at the halfway point. Tie the 2nd 25-inch yarn length tightly around all the strands, creating a small ball shape. Knot and weave ends under the ball. Trim. If adding decorative wooden beads, thread them down the twine toward the tassel ball with a yarn needle. Finally, attach the tassel to the stocking by tying it securely with the yarn tail to the bottom edge of the band seam.
I-cord for Hanging
Begin with a long tail 25″. Join yarn to the top of the folded band at the seam with a sl st. *YO (yarn over) the hook with the tail, YO with the working yarn, and pull through two loops on the hook; repeat from * for a total of 15 sts. Slip stitch to the band. Fasten off knot tails and trim. Alternatively, attach a faux leather garment tag for hanging.
Blocking
Place the stocking on a piece of cardboard and trace its shape. Cut out the stocking shape and insert the cardboard inside. This step is crucial for ensuring the stocking maintains its best appearance. After blocking, the stocking will retain its shape and achieve a polished look. You can also store or hang your stocking with the cardboard inside to preserve its perfect shape. I recommend saving shipping boxes for this purpose.
If you enjoyed this pattern, you may also like these patterns:
This pattern is designed by Michelle Moore of MJ’s Off The Hook Designs Inc, based in Lakefield, Ontario, Canada. Your go-to source for modern, easy crochet patterns. Published on November 21st, 2024.
Thank you for visiting MJ’s Off The Hook Designs I hope you enjoyed this pattern and feel inspired to pick up your hook and start creating.
You can find even more crochet patterns in our Ravelry and Etsy shops.
For daily inspiration and behind-the-scenes peeks, join me over on Facebook or Instagram, or join our YouTube Membership for exclusive content!