*This post may contain affiliate links to support the cost of this blog. At no cost to you, I may make a small commission if you purchase through these links. Read our Privacy Policy HERE

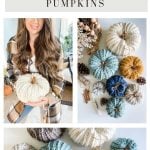


Learn how to Crochet Rustic Farmhouse Pumpkins for your home. This free crochet pattern includes everything you need to know to crochet these adorable rustic farmhouse pumpkins.
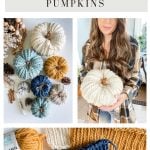
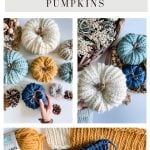
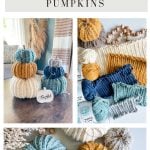
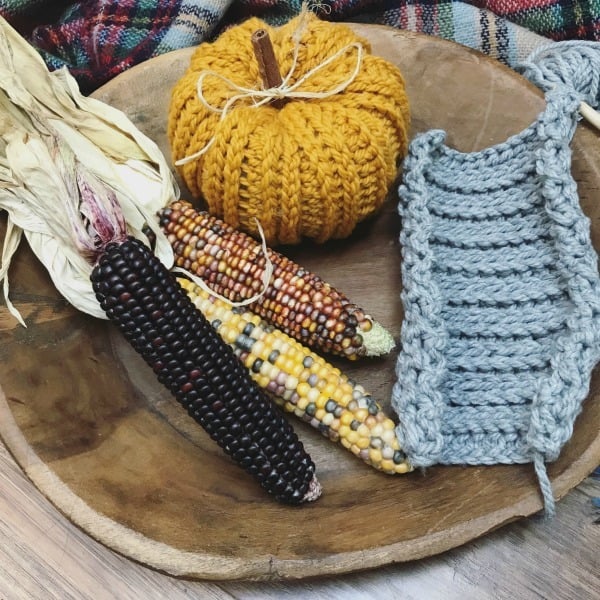
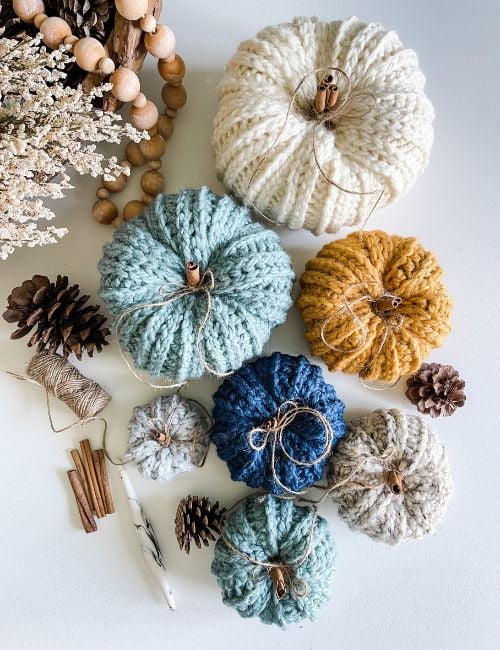
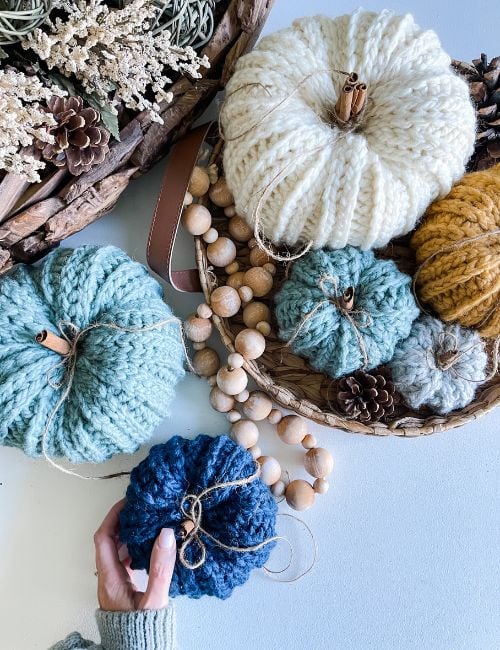
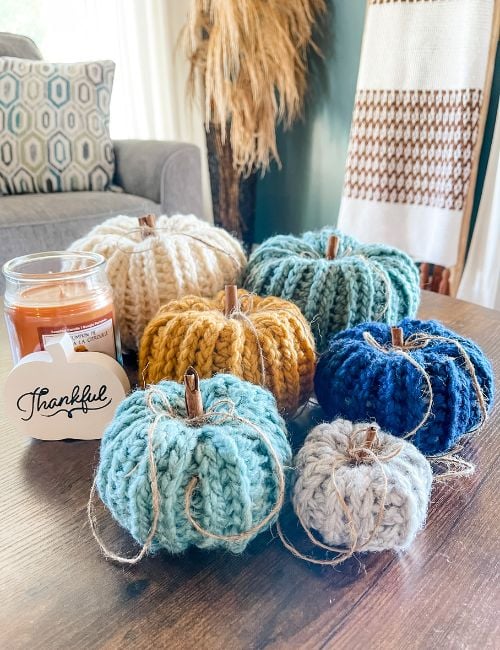
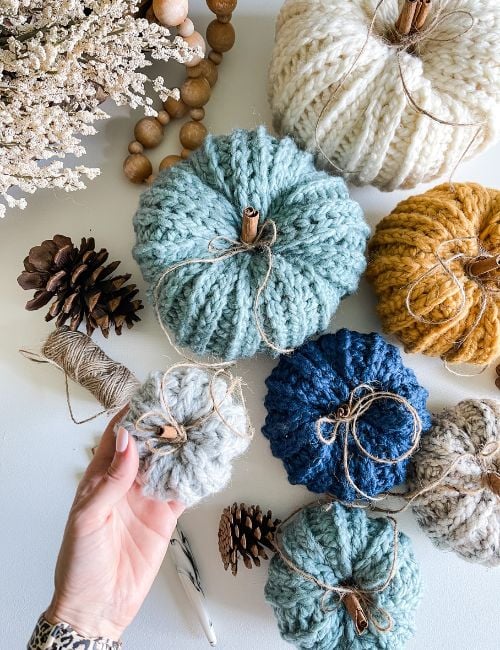
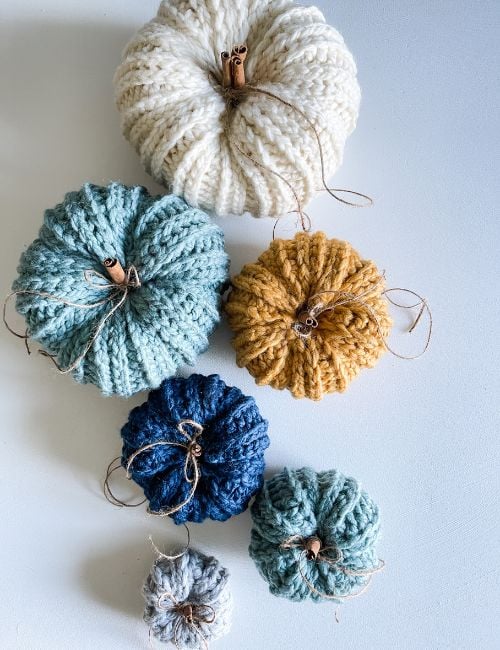
The Bulky & Quick Crochet Rustic Farmhouse pumpkin is an easy ‘knit look’ ribbed crochet pumpkin pattern. The unique ribbing is crocheted by working half double crochet stitches in the third loop. Crochet a simple rectangle and seam to form a pumpkin shape. The pattern includes 6 sizes that are perfect for stacking. Finish the pumpkins by adding scented cinnamon sticks and twine.
Key Takeaways
- Learn to make Crochet Rustic Farmhouse Pumpkins in multiple sizes for your home decor.
- This beginner-friendly pattern features a unique ribbed design using half double crochet stitches in the third loop.
- The pattern includes instructions for six sizes and a pumpkin wreath tutorial, enhancing your fall decorations.
- You can purchase an AD-FREE PDF version for convenience, and the pattern is supported by affiliate links.
- Share your creations in our community for inspiration and support while enjoying this fun craft.
Where to purchase the AD-FREE Digital PDF that includes all 6 sizes plus a pumpkin wreath Tutorial
How to Crochet Rustic Farmhouse Pumpkins
The pumpkin is worked flat in rows from the side across. The ribbed stitch is crocheted by working a half double crochet in the third loop, alternating working one row from behind and 1 row in front.
The bottom is seamed closed and stuffed with polyester fiberfill, finishing by seaming the top closed. Indents on the sides are made by weaving the yarn needle down through rows. Step-by-step video tutorial included for Large size on YouTube.
Disclaimer
This post contains affiliate links for the items I used to crochet this pattern at no cost to you. I make a small commission if you purchase through these links. This blog post also displays ads. The revenue I receive from Ads, and affiliate links, allows me to post this crochet pattern for free on my blog. I do so in good faith that you will not copy and paste or print this pattern or distribute it in any way.
If you prefer not to view the pattern on the blog, you may purchase an AD-FREE digital PDF pattern in one of my pattern shops for a small fee. Whether you choose to purchase this pattern or view the pattern on my blog, I greatly appreciate your support and readership.
The pattern includes 6 crochet pumpkin sizes PLUS the tutorial to make a pumpkin wreath!
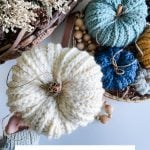
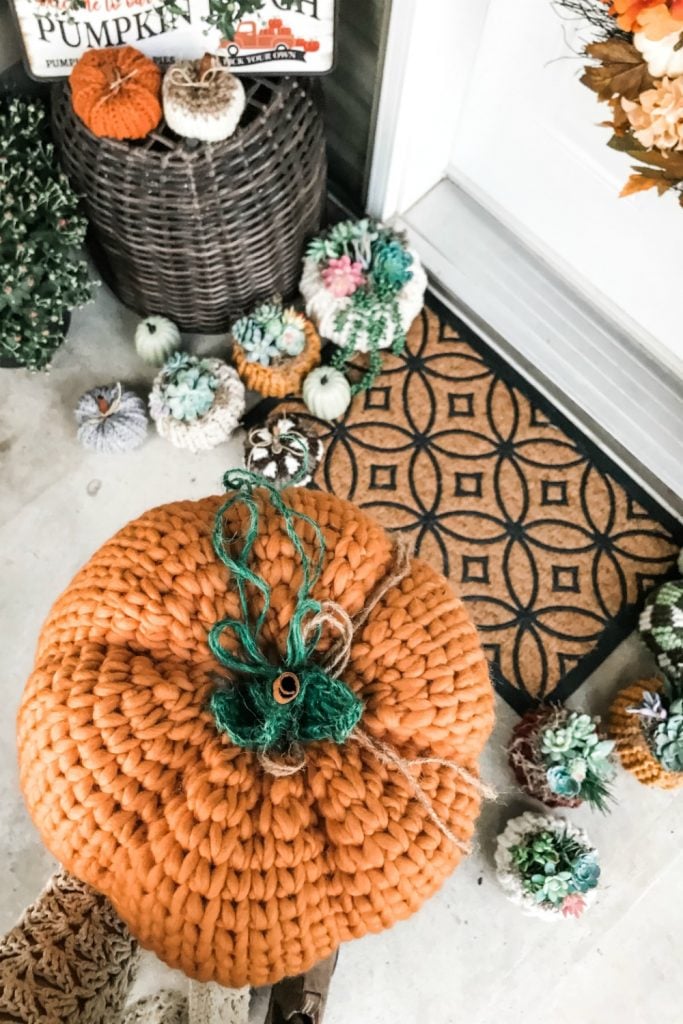
You can decorate your dining room table for Thanksgiving with an assortment of crochet pumpkins. I also designed the succulent pumpkins. You can find the free crochet Succulent Pumpkin Cozies pattern HERE

If you’re looking for ideas for the front porch, get inspired by my display of crochet pumpkins. There are so many ways you can use them to decorate. Tag us in your photos so we can see how you’re displaying your pumpkins!

How to Make Tiny Crochet Pumpkins
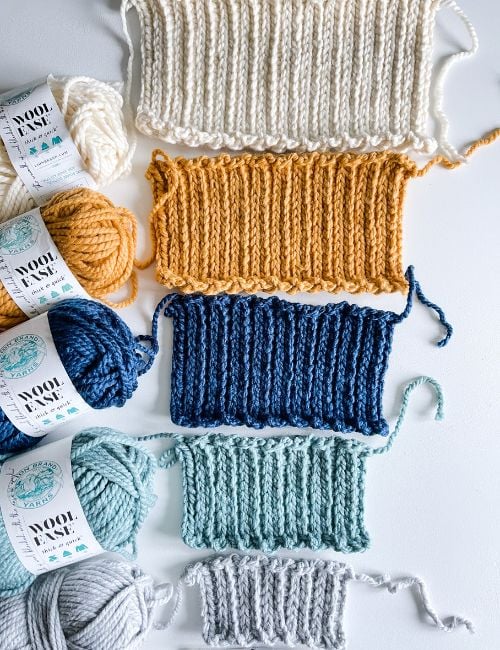
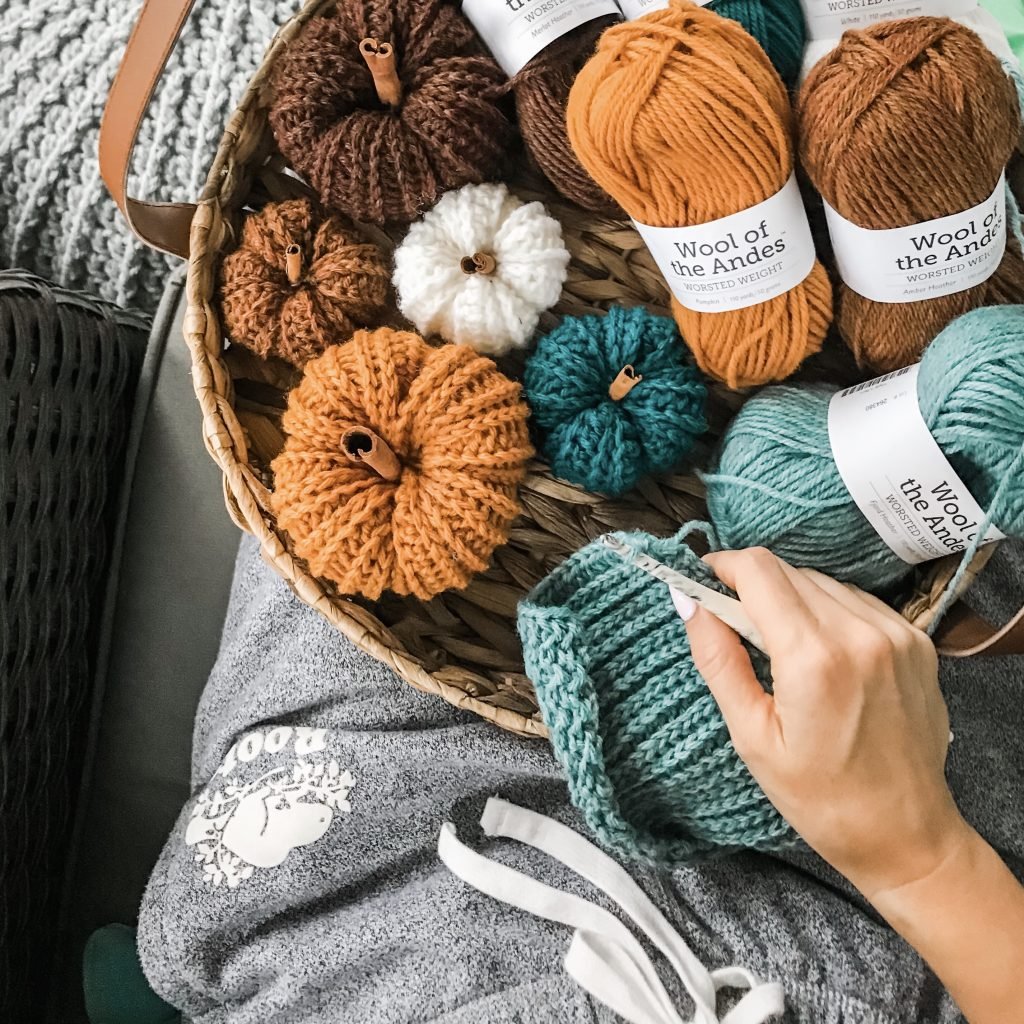
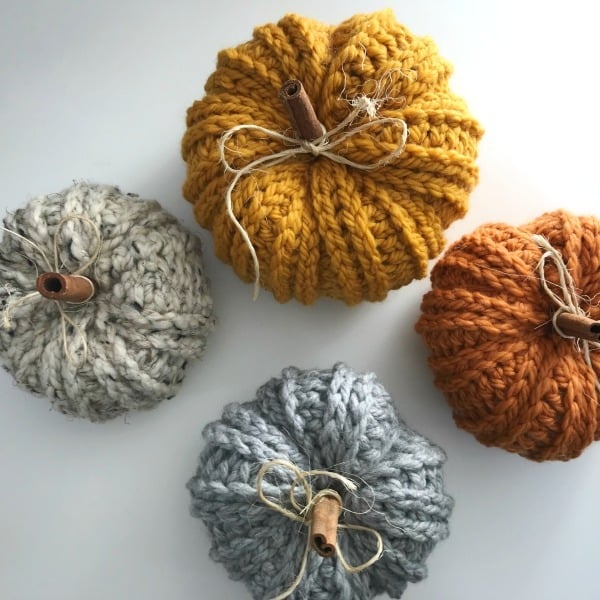
If you prefer, you can crochet the pumpkins in worsted weight yarn and a 5mm crochet hook instead of super bulky yarn to get small adorable pumpkins. Due to the gorgeous autumn colour range, I settled on Wool of the Andes Worsted Weight from WeCrochet. ( I picked all these colours for our family photoshoot too ) I’m seriously drooling over these shades.
If you’re wondering, here’s the colour list;
Spruce
Fjord Heather
Merlot Heather
Amber Heather
White
Pumpkin
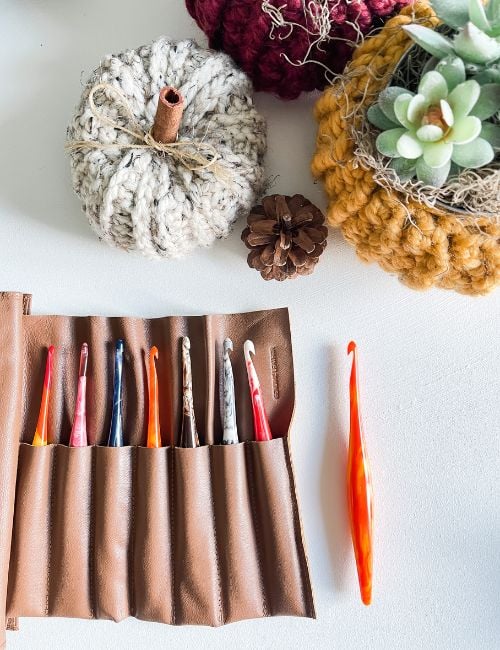
I highly suggest Furls Crochet Streamline swirl if you suffer from hand pain. I find them light with an excellent grip. I’ve found this hook has helped my hand from cramping. I’m using my Cookies N’ Cream from Furls Crochet.
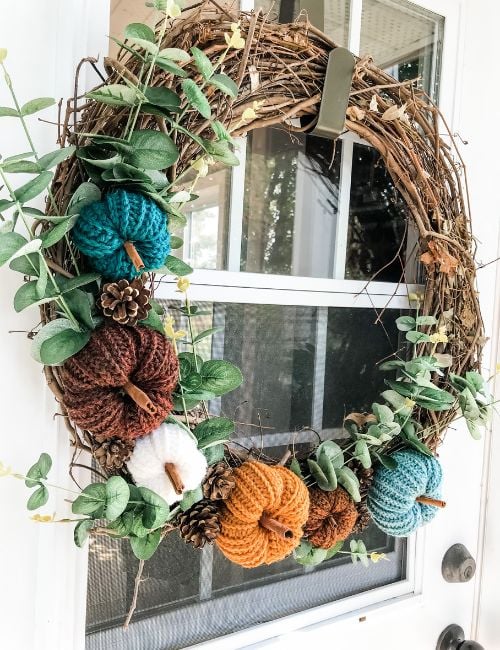
I made this gorgeous pumpkin wreath with my small pumpkins. The tutorial is included in the PDF, or go to the free tutorial HERE
Crochet Rustic Farmhouse Pumpkin Pattern – Now in 6 sizes
Yarn Requirements:
Support my designs and purchase the Ad-free PDF on Ravelry HERE or ETSY HERE
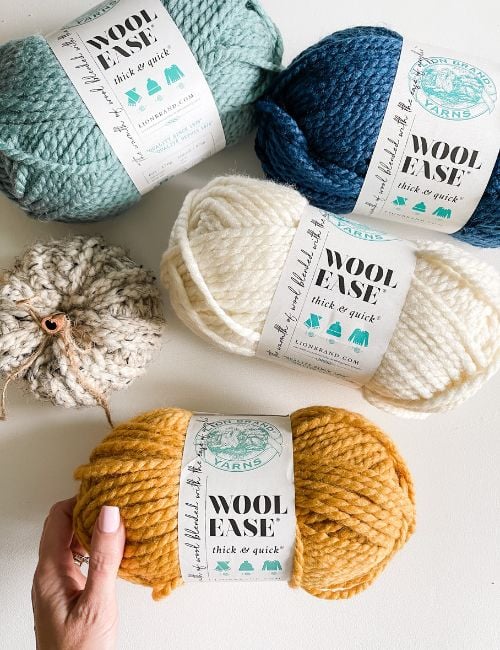
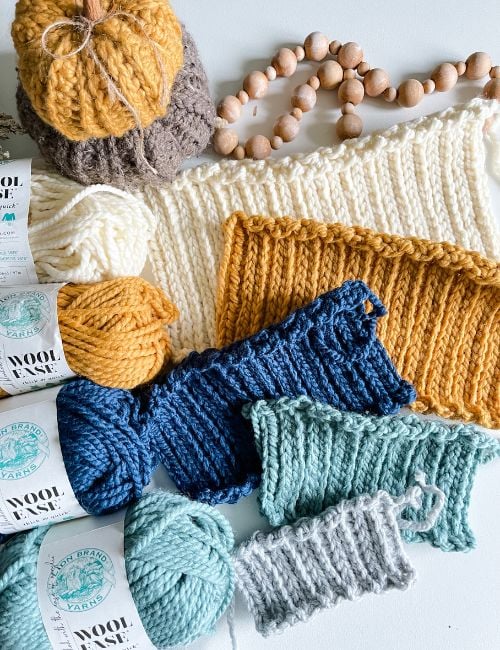
Lion Brand Wool-Ease Thick & Quick – Super Bulky weight #6 (80% Acrylic, 20% Wool, 106 yds/170g)
Shown in Fisherman, Succulent, Mustard, Petrol Blue, Grey
Yards 20 (30, 40, 65, 80, 95)
Crochet Rustic Farmhouse Pumpkins Yarn Substitutes
Or Hold together 2-3 strands of Worsted weight yarn
Wool of the Andes Worsted Weight from WeCrochet
Crochet Hook Requirements
or size needed to obtain gauge
Material Needed
Helpful Resources
- Join our Facebook Crochet Community for pattern support and inspiration
- Subscribe on YouTube for hundreds of free tutorials
- Sign up for our newsletter and receive 40% off your first Ravelry purchase!
- Sign up for our YouTube Membership
Pattern Gauge
7 sts and 6.75 rows equal to 4″ with 8mm crochet hook in pattern
FAQ & Terms
This pattern requires a beginner skill level.
This pattern is professionally written in technical writing and tech edited for accuracy.
1. Affiliate Links & Ad Support
This post may contain affiliate links. At no extra cost to you, purchases made through these links may earn MJ’s Off The Hook Designs a small commission. The content on this site is supported by advertisements. By using this site, you agree not to circumvent, block, or tamper with these ads.
2. Copyright & Intellectual Property
All content on this blog, including free crochet patterns, instructions, charts, photos, videos, and written materials, is the property of MJ’s Off The Hook Designs Inc. and is protected under copyright and other intellectual property laws.
3. Personal Viewing & Use Only
Free patterns published on this site are provided for viewing only on this blog. You may not:
• Copy, download, print, take screenshots, or redistribute the pattern in any form (digital or physical) outside this blog.
• Post the pattern or instructions elsewhere online or share it publicly without written consent.
Even for “personal use,” the pattern must only be used while viewing this blog post with the ads intact. Tampering with, hiding, or removing ads while accessing the pattern is strictly prohibited.
4. Screenshots & Unauthorized Sharing
Screenshots or any other method of copying the pattern for offline use or redistribution is prohibited. Sharing patterns in forums, social media groups, or private messages without permission is also prohibited.
5. Legal Enforcement
Violation of these terms may constitute copyright infringement and could result in civil or criminal penalties under intellectual property laws. By using this pattern, you agree to comply fully with these terms.
6. Questions & Permissions
For questions about these terms or for permission to use or share patterns outside of these rules, please contact MJ’s Off The Hook Designs Inc. in writing.
Thank you for respecting our work and supporting MJ’s Off The Hook Designs.
Yes! You may sell finished items made from MJ’s patterns, but please credit:
“Pattern by MJ’s Off The Hook Designs Inc.”
Pattern Support is only available in our Facebook Community group and Video Tutorials.
No additional support is provided for modified patterns, alternate yarns, or changes to gauge.
If you’re seeing the message “Email subscription failed, please try again”, don’t worry — it’s usually an easy fix! Here are a few quick things to try:
First, double-check your login details. Make sure you’re signing in with the same email you originally used to create your Grow account. If you’re not sure, click “Forgot Password” to reset your login. Once you’ve updated it, return to my site and try again.
Next, clear your browser’s cache and cookies. Sometimes the login just gets stuck. You can also try opening the page in a private or incognito window, or switching to another browser like Chrome, Safari, or Firefox to see if that does the trick.
It also helps to make sure you’re logged into Grow directly. Visit https://grow.me and sign in there first. Once you’re logged in, come back to my site and refresh the page — your pattern should unlock automatically.
If you’re still having trouble, check your browser’s privacy settings. Grow needs cookies to verify your account, so make sure cookies and cross-site tracking are allowed. On iPhone, go to Settings → Safari → Privacy & Security, then turn off “Prevent Cross-Site Tracking” and “Block All Cookies.” On Android or Chrome, go to Settings → Site Settings → Cookies and select “Allow all cookies.”
Lastly, ad blockers or browser extensions can sometimes block the login pop-up. Try turning them off temporarily while you sign in. If nothing seems to work, log out of Grow completely by going to https://grow.me, selecting your profile icon, and choosing Log Out. Then come back to my site and try logging in again.
If you’re still stuck after trying all of this, please reach out through my Contact Page and let me know what device and browser you’re using (and include a screenshot if you can).
Video
To Unlock Exclusive Subscriber content click the Box below! Grow will pop up so you can subscribe to my Blog. Enter your email and create a password. Every time you see Exclusive Content on my Blog, log in to your account!
Pumpkin Sizing – Purchase the PDF for Sizing Chart HERE
XXS (XS, S, M, L, XL)
Special Stitches
Hdc 3rd lp – Half Double Crochet in the 3rd Loop –
Row 1 (RS): Ch 2, *yo (yarn over), insert hook through the stitch from back to front, push the hook under the third loop of hdc, pull up a loop, yo, pull through all three loops on the hook; rep from * across, turn. This pushes the front and back loop of the stitch to the front (RS of work).
Row 2 (WS): Ch 2, *yo, from the front of work, insert hook under the third loop only, pull up a loop, yo, pull through all three loops on the hook; rep from * across, turn. This pushes the front and back loop of the stitch to the RS of work.
Instructions
XXS (XS, S, M, L, XL)
Notes
Each size is written out separately. Before starting the beginning chain, leave a long tail for seaming.
Extra Extra Small
Row 1 (WS):
Leave a long tail for seaming, ch 10, work 1 hdc in the back hump of the 3rd ch from hook and in each ch across, turn—8 sts.
Row 2 (RS):
Ch 2 (not included as a st here and throughout), work 1 hdc in the 3rd loop of each st across (insert hook through the stitch from back to front, push the hook under the third loop of hdc), turn—8 sts.
Row 3:
Ch 2, 1 hdc in the 3rd loop of each stitch across (from the front of work, insert hook under the third loop only), turn—8 sts.
Rows 4-11: Rep Row 2 and 3, ending on the RS of work.
Fold the rectangle so that the WS is facing. Sl st through each st across to seam.
Bottom Closure
With the starting tail and yarn needle, weave through every other row around, pull closed and weave in ends. Skip to finishing.
Extra Small
Row 1 (WS):
Leave a long tail for seaming, ch 13, work 1 hdc in the back hump of the 3rd ch from hook and in each ch across, turn—11 sts.
Row 2 (RS):
Ch 2 (not included as a st here and throughout), work 1 hdc in the 3rd loop of each st across (insert hook through the stitch from back to front, push the hook under the third loop of hdc), turn—11 sts.
Row 3:
Ch 2, 1 hdc in the 3rd loop of each stitch across (from the front of work, insert
hook under the third loop only), turn—11 sts.
Rows 4-15: Rep Row 2 and 3, ending on the RS of work.
Fold the rectangle so that the WS is facing. Sl st through each st across to seam.
Bottom Closure
With the starting tail and yarn needle, weave through every other row around, pull closed and weave in ends. Skip to finishing.
Small
Row 1 (WS):
Leave a long tail for seaming, ch 16, work 1 hdc in the back hump of the 3rd ch from hook and in each ch across, turn—14 sts.
Row 2 (RS):
Ch 2 (not included as a st here and throughout), work 1 hdc in the 3rd loop of each st across (insert hook through the stitch from back to front, push the hook under the third loop of hdc), turn—14 sts.
Row 3:
Ch 2, 1 hdc in the 3rd loop of each stitch across (from the front of work, insert hook under the third loop only), turn—14 sts.
Rows 4-19: Rep Row 2 and 3, ending on the RS of work.
Fold the rectangle so that the WS is facing. Sl st through each st across to seam.
Bottom Closure
With the starting tail and yarn needle, weave through every other row around, pull closed and weave in ends. Skip to finishing.
Medium
Row 1 (WS):
Leave a long tail for seaming, ch 19, work 1 hdc in the back hump of the 3rd ch from hook and in each ch across, turn—17 sts.
Row 2 (RS):
Ch 2 (not included as a st here and throughout), work 1 hdc in the 3rd loop of each st across (insert hook through the stitch from back to front, push the hook under the third loop of hdc), turn—17 sts.
Row 3:
Ch 2, 1 hdc in the 3rd loop of each stitch across (from the front of work, insert hook under the third loop only), turn—17 sts.
Rows 4-23: Rep Row 2 and 3, ending on the RS of work.
Fold the rectangle so that the WS is facing. Sl st through each st across to seam.
Bottom Closure
With the starting tail and yarn needle, weave through every other row around, pull closed and weave in ends. Skip to finishing.
Large
Row 1 (WS):
Leave a long tail for seaming, ch 22, work 1 hdc in the back hump of the 3rd ch from hook and in each ch across, turn—20 sts.
Row 2 (RS):
Ch 2 (not included as a st here and throughout), work 1 hdc in the 3rd loop of each st across (insert hook through the stitch from back to front, push the hook under the third loop of hdc), turn—20 sts.
Row 3:
Ch 2, 1 hdc in the 3rd loop of each stitch across (from the front of work, insert hook under the third loop only), turn—20 sts.
Rows 4-27: Rep Row 2 and 3, ending on the RS of work.
Fold the rectangle so that the WS is facing. Sl st through each st across to seam.
Bottom Closure
With the starting tail and yarn needle, weave through every other row around, pull closed and weave in ends. Skip to finishing.
Extra Large
Row 1 (WS):
Leave a long tail for seaming, ch 25, work 1 hdc in the back hump of the 3rd ch from hook and in each ch across, turn—23 sts.
Row 2 (RS):
Ch 2 (not included as a st here and throughout), work 1 hdc in the 3rd loop of each st across (insert hook through the stitch from back to front, push the hook under the third loop of hdc), turn—23 sts.
Row 3:
Ch 2, 1 hdc in the 3rd loop of each stitch across (from the front of work, insert hook under the third loop only), turn—23 sts.
Rows 4-31: Rep Row 2 and 3, ending on the RS of work.
Fold the rectangle so that the WS is facing. Sl st through each st across to seam.
Bottom Closure
With the starting tail and yarn needle, weave through every other row around, pull closed and weave in ends. Skip to finishing.
*To make a larger pumpkin, increase each size by 3 sts and 4 rows.
Finishing:
XXS (XS, S, M, L, XL)
Stuffing
Stuff the pumpkin with polyester fiberfill. Join yarn back to the working yarn at the top opening.
Top Closure
Round 1: Ch 1, work 1 sc in every other row around the edge, sl st in the first sc to join. Fasten off with an extra long tail for seaming and indents. With a yarn needle, weave through the flo of each st around, and pull the top of the pumpkin closed.
Indents
Weave the tail down through ribbing to give the pumpkin more definition and shape.
With the long yarn tail from the top closure, create indents in every 2nd or 3rd ribbed row between the ridges. Weave the yarn needle down through the stitches, and push the yarn needle through the bottom closure, coming up through the top closure. Repeat this step around.
Cinnamon Sticks
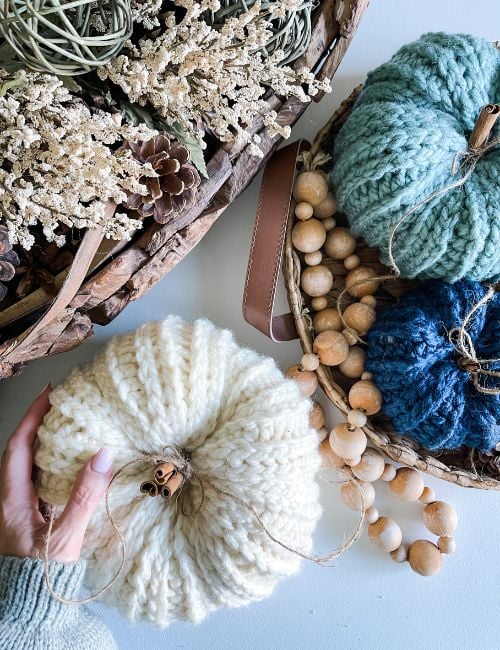
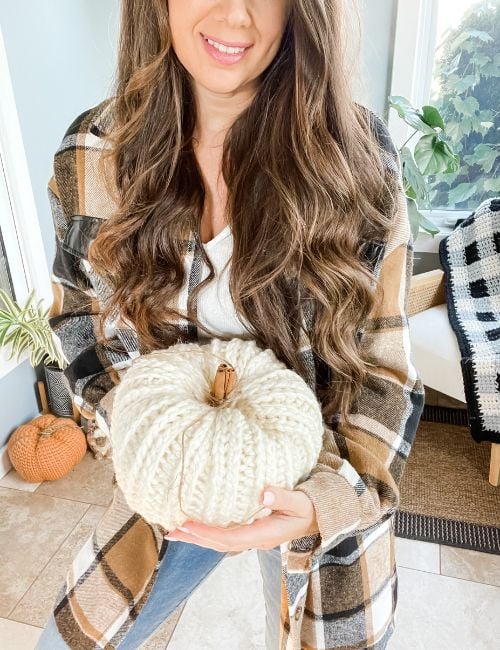
Use a glue gun to secure cinnamon sticks in the hole of the top closure. Tie a piece of twine or plaid ribbon in a bow around the cinnamon stick to finish. Don’t use glue if you want to remove the stick for stacking sizes.
Stacking
Stacking sizing options as shown or mix and match to create your own combinations.
Option #1:
Bottom XL, Middle M, Top XS
Option #2:
Bottom L, Middle S, Top XXS
Option #3:
Bottom L, Top S
Pumpkin stacks can be secured together by weaving yarn up through each pumpkin. Start at the bottom and weave back down from the top. Knot ends and trim.
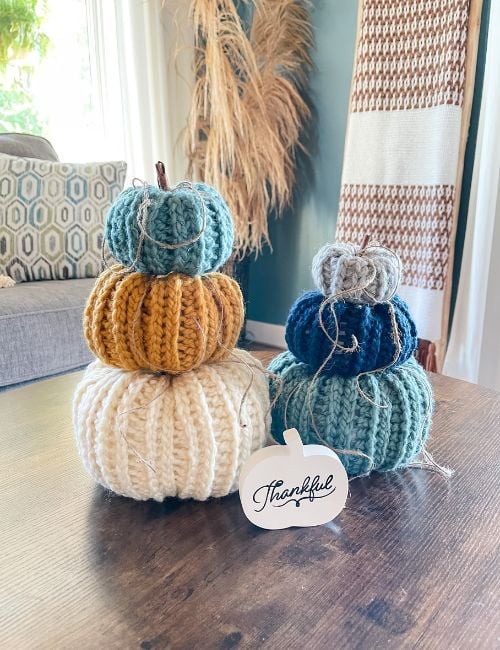
Display crochet rustic farmhouse pumpkins throughout your home as stacks or placed individually. They make a festive centrepiece on a coffee or dining room table.
See our Crochet Plaid Pumpkin Pattern HERE
Watch the Video Here

You might also love our Knit look pumpkin! Find it HERE
If you liked this pattern you may also enjoy:
This pattern is designed by Michelle Moore of MJ’s Off The Hook Designs Inc, based in Lakefield, Ontario, Canada. Your go-to source for modern, easy crochet patterns. Published on October 5th, 2018.
Thank you for visiting MJ’s Off The Hook Designs. I hope you enjoyed this pattern and feel inspired to pick up your hook and start creating.
You can find even more crochet patterns in our Ravelry and Etsy shops.
For daily inspiration and behind-the-scenes peeks, join me over on Facebook or Instagram, or join our YouTube Membership for exclusive content!
* This post contains affiliate links at no cost to you!
You’ve got questions, we’ve got a community!
Crocheting is better with friends! Join our group to post pictures and ask all your pattern support questions.