*This post may contain affiliate links to support the cost of this blog. At no cost to you, I may make a small commission if you purchase through these links. Read our Privacy Policy HERE
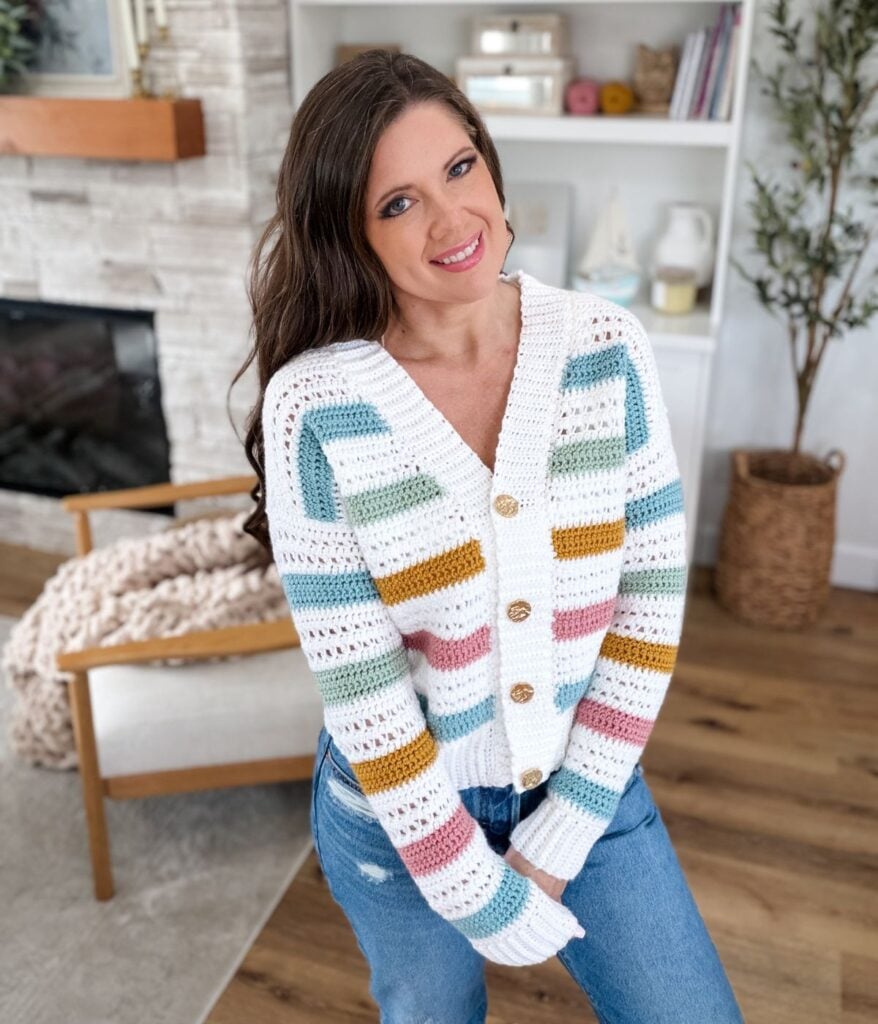
Looking for a free crochet cardigan pattern that is modern, comfortable, and a timeless piece you will wear for years to come? The MJ’s Signature Cardigan was designed to be exactly that.

I always knew I wanted to create a true signature MJ’s Off The Hook Designs cardigan. A design that represented my personal style, my love for timeless colours, and the classic, effortless pieces I reach for in my own wardrobe.
When I had the opportunity to create my own signature yarn line, Timeless Tones in collaboration with Mary Maxim, I knew this cardigan had to be part of the collection.
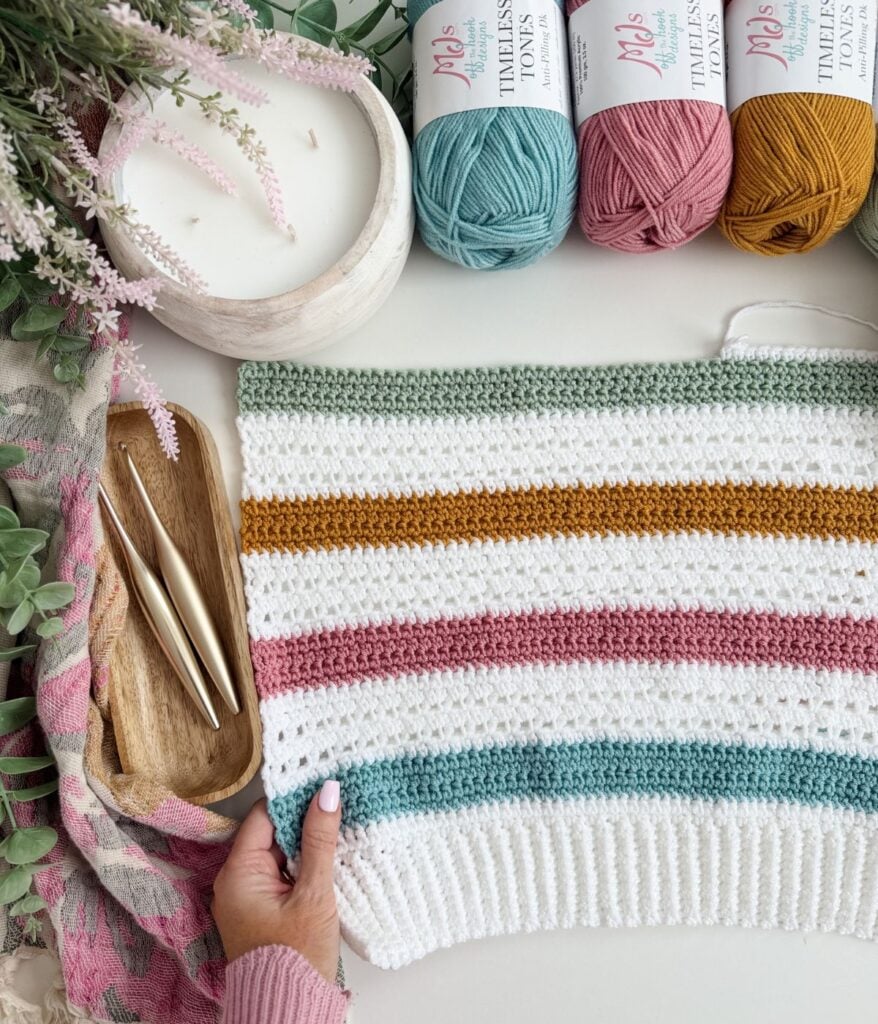
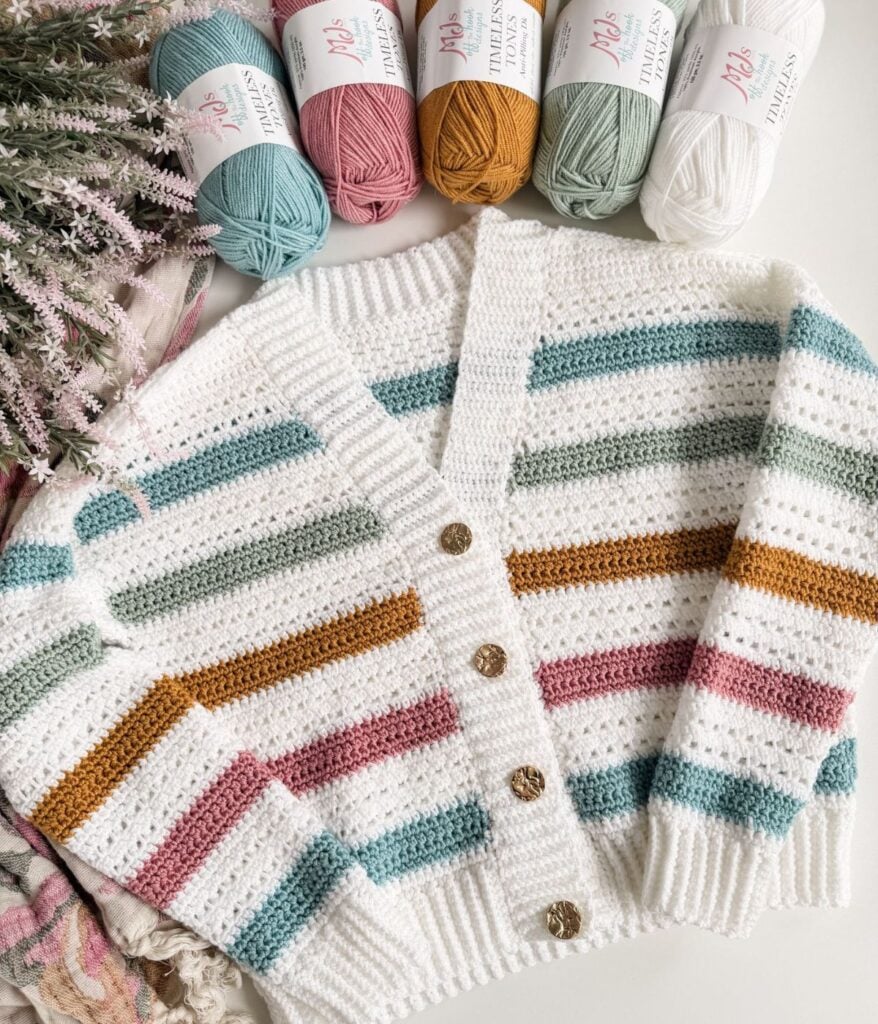
The beautiful striped design showcases my brand colours and highlights everything I love about Timeless Tones. The yarn has a soft feel, excellent stitch definition, a lofty twist, and anti-pilling fibres, making it the perfect choice for a crochet garment you will enjoy wearing season after season.
This free crochet cardigan pattern includes sizes XS to 5X and comes with a full step-by-step video tutorial to guide you through the process.
Project Overview
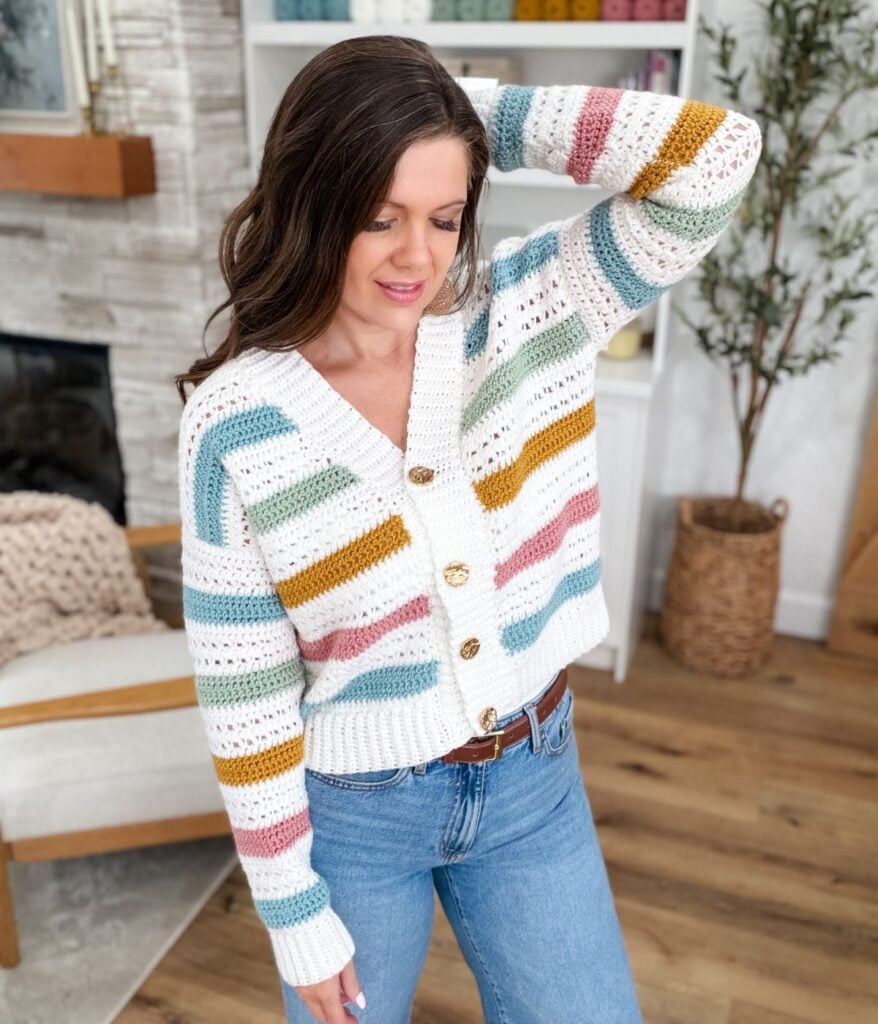
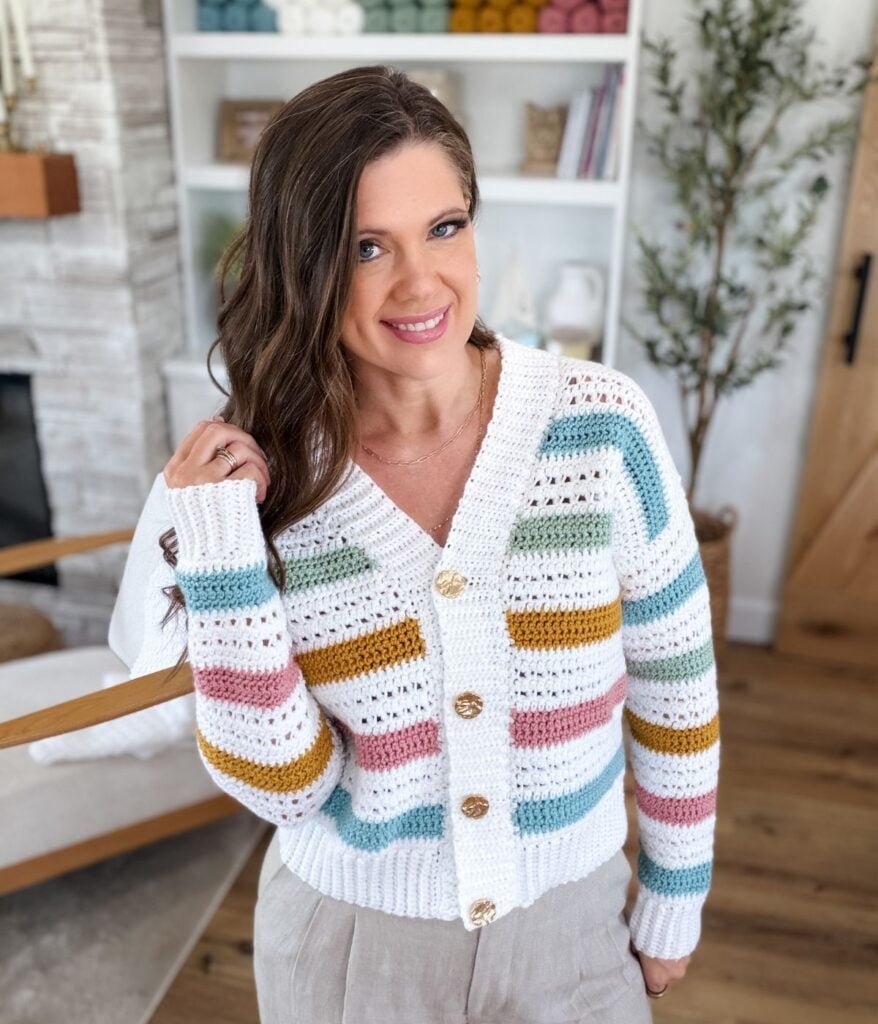
MJ’s Signature Cardigan features a relaxed, slightly oversized fit with a clean, modern look that’s perfect for layering through spring and cooler days. The striped design adds visual interest while maintaining a timeless, easy-to-wear style, and subtle shoulder shaping provides an improved, more comfortable fit. The button-up, open-front design adds versatility for everyday wear. This design is made using MJ’s Off The Hook Timeless Tones anti-pilling DK-weight yarn, created in collaboration with Mary Maxim, offering a soft feel, excellent stitch definition, and long-lasting wear.
Skill level: Intermediate
Sizes: XS (S, M, L, XL, 2X, 3X, 4X, 5X )
Finished Fit: Oversized
Yarn Weight: DK Weight #3
Yarn: MJ’s Off The Hook Designs Timeless Tones
Hook Sizes: 5 mm and 5.5 mm
Construction: Flat from the bottom up in pieces
Video Tutorial: https://youtu.be/JhHqYauVMac
Meet the MJ’s Signature Cardigan
The MJ’s Signature Cardigan is a lightweight DK-weight crochet cardigan with a slightly relaxed fit and thoughtful details that make it both beautiful and comfortable to wear.
Why You’ll Love This Free Crochet Cardigan Pattern
• Modern, timeless striped crochet cardigan design
• Slightly relaxed fit with approximately 0 to 5 inches of positive ease
• Sizes XS (S, M, L, XL, 2X, 3X, 4X, 5X)
• Designed with subtle shoulder shaping for an improved fit
• Button-up front with a beautiful ribbed collar
• Lightweight DK-weight construction, perfect for layering
• Full step-by-step YouTube video tutorial included
• Designed with my signature Timeless Tones yarn line
• A wardrobe staple you can enjoy for years
About the Timeless Tones Signature Collection
The MJ’s Signature Cardigan is one of seven beautiful designs in my Timeless Tones Signature Collection.
Timeless Tones is my signature anti-pilling DK-weight yarn line created in collaboration with Mary Maxim. With 24 gorgeous colours to choose from, this yarn was designed to inspire timeless crochet projects with beautiful stitch definition, softness, and durability.
The Signature Collection includes:
• MJ’s Signature Sweater
• MJ’s Signature Cardigan
• Timeless Star Stitch Cardigan
• Timeless Star Stitch Blanket
• Mini Star Stitch Cardigan
• Star Stitch Baby Bear Hat
• Sailboat Mosaic Baby Blanket
If you love this cardigan, I encourage you to explore the entire collection and create your own coordinated handmade wardrobe and home pieces.
Video Tutorial
Video Tutorial

Yarn
MJ’s Off The Hook Designs Timeless Tones (CDN)
DK Weight #3, 100% Premium Acrylic
273 yds/100 g, Shown in Snowflake, Seabreeze, Petal Pink, Sunflower Field and Eucalyptus
Sizes: XS (S, M, L, XL, 2X, 3X, 4X, 5X) See size chart below for yarn requirements.
Size Chart
XS (S, M, L, XL, 2X, 3X, 4X, 5X)
To Fit Bust (in):
28–30 (32–34, 36–38, 40–42, 44–46, 48–50, 52–54, 56–58, 60–62)
Finished Bust (in):
30 (34, 39, 43, 47.5, 52, 56.25, 60.5, 65)
Balls Required
White (MC):
3 (3, 3, 4, 4, 5, 5, 5, 6)
Blue (A):
1 (1, 1, 1, 1, 1, 1, 1, 2)
Pink (B):
1 (1, 1, 1, 1, 1, 1, 1, 1)
Yellow (C):
1 (1, 1, 1, 1, 1, 1, 1, 1)
Green (D):
1 (1, 1, 1, 1, 1, 1, 1, 1)
Yardage
White (MC):
640 (725, 805, 930, 1020, 1100, 1190, 1275, 1365) yds
Blue (A):
130 (150, 165, 190, 210, 225, 240, 260, 280) yds
Pink (B):
70 (80, 90, 105, 115, 125, 135, 145, 155) yds
Yellow (C):
75 (85, 95, 110, 120, 130, 140, 150, 165) yds
Green (D):
80 (90, 100, 115, 125, 135, 145, 155, 170) yds
Total Yardage:
995 (1130, 1255, 1450, 1590, 1715, 1850, 1985, 2135) yds
Fit and Ease
Designed with a lightly relaxed fit and approximately 0–5″ of positive ease. Choose a size based on your preferred finished bust measurement. For a more fitted look, choose a size with less ease. For a more relaxed fit or layering, size up. Model shown is wearing size Medium with a 36″ bust.
Yarn Quantity Note
Yarn amounts are approximate and based on the sample size Medium. Yardage includes a small buffer for Colour A but may vary depending on gauge, tension, and any length adjustments. Additional yarn may be required when modifying the body or sleeve length.
Crochet Hook
or the size needed to obtain the gauge
Materials
4 Buttons 25mm or desired size
Gauge
Taking the time to check your crochet gauge is one of the most important steps when making a crochet garment. A correct gauge ensures your cardigan will fit as intended.
If you are new to garment making, be sure to check out my complete guide on how to crochet a gauge swatch and why gauge matters before starting.
Pattern Gauge:
14.5 stitches and 13 rows = 4 inches (10 cm) in extended single crochet using a 5.5 mm hook
Ribbing Gauge:
10 stitches and 10 rows = 2 inches (5 cm) in single crochet worked in the back loop only using a 5 mm hook
Construction
This cardigan is worked flat in separate pieces. The back panel is worked first, including shoulder shaping. Two front panels (left and right) are worked separately from the hem up, with shaping along the neckline and shoulders. Sleeves are worked separately from the cuff up with shaping throughout. All pieces are sewn together, and the front edges are finished with a button band and collar.
Abbreveations
Blo – Back Loop Only
Ch – Chain
Esc – Extended Single Crochet
Incr – Increase
MC – Main Colour
Pm – Place Marker
Rep – Repeat
RS – Right Side
Sc – Single Crochet
Sk – Skip
Sl St – Slip Stitch
Sp(s) – Space(s)
St(s) – Stitch(es)
WS – Wrong Side
( ) – Work step in parentheses in the indicated stitch
[ ] – Work step in brackets the number of times indicated
Extended Single Crochet (esc): Insert hook in indicated stitch and pull up a loop, yarn over and pull through 1 loop on hook, yarn over and pull through remaining 2 loops.
Extended Single Crochet Decrease (esc2tog): Insert hook in indicated stitch and pull up a loop, pull up a loop in next st, yarn over and pull through 2 loops on hook, yarn over and pull through remaining 2 loops.
Project Tips for the Best Results
• Block your panels to the finished measurements before seaming for the most accurate fit
• Keep your colour changes consistent by changing colours on the final yarn over of the last stitch
• Leave yarn tails unwoven until all seaming is complete and you are happy with the fit
• Match your striped sections carefully while seaming for a professional-looking finish
• Slightly stretch the sleeve when attaching it to the armhole to distribute the fullness evenly
Frequently Asked Questions & Terms
Got a question? We’ve got answers!
This is an intermediate crochet cardigan pattern. You should be comfortable with reading crochet patterns, seaming pieces, changing colours, and working simple shaping techniques. A full step-by-step video tutorial is included to help guide you through every step.
Yes! A complete YouTube video tutorial is included to help you make the cardigan from start to finish. Watch the tutorial.
The pattern includes nine sizes from XS through 5X, making it a size-inclusive crochet cardigan pattern.
This cardigan was specifically designed for Timeless Tones, my signature anti-pilling DK weight yarn line created with Mary Maxim (273 yds / 100 g = 2.73 yds per gram). When substituting yarn, look for a DK-weight yarn with a similar yards per gram ratio to achieve comparable results.
Suggested Substitutions
Mary Maxim Mellowspun DK (CDN) : 284 yds / 100 g = 2.84 yds per gram
Knit Picks Brava Baby: 273 yds / 100 g = 2.73 yds per gram
Premier Basix DK (CDN): 306 yds / 100 g = 3.06 yds per gram
Lion Brand Color Theory: 246 yds / 100 g = 2.46 yds per gram
Yes. You can adjust the body or sleeve length to suit your preference. Keep in mind that additional yarn may be needed when making length modifications.
Pattern Support is only available in our Facebook Community group and Video Tutorials.
No additional support is provided for modified patterns, alternate yarns, or changes to gauge.
Yes! You may sell finished items made from MJ’s patterns, but please credit:
“Pattern by MJ’s Off The Hook Designs Inc.”
This post may contain affiliate links. Purchases made through these links may earn MJ’s Off The Hook Designs Inc. a small commission at no extra cost to you. Content on this site is supported by ads—please do not block or remove them.
Copyright
All patterns, photos, and written content are the property of MJ’s Off The Hook Designs Inc. and protected by copyright law.
Usage
Free patterns are for viewing only on this blog. You may not copy, download, print, screenshot, or redistribute any part of the pattern. Access must remain through this page with ads. The use of tools that remove or hide ads or site content is strictly prohibited.
Legal Notice
Unauthorized reproduction or distribution may result in copyright infringement penalties.
By accessing this post, you agree to these terms and conditions.
A Timeless Crochet Cardigan You’ll Wear Again and Again
The MJ’s Signature Cardigan is so much more than just another crochet cardigan pattern. It represents my style, my brand colours, and the beginning of my Timeless Tones yarn journey.
I designed this cardigan to be a piece you can proudly wear, style, and enjoy for years to come. Whether you choose my signature colour palette or create your own combination from the 24 beautiful Timeless Tones colours, I cannot wait to see your version.

Digital Download + No Ads!
Upgrade to the Digital PDF Download
The printable PDF includes the schematic and the complete pattern in one beautiful, easy-to-follow download.
Digital pattern only. No physical item will be shipped.
To unlock Exclusive Content on my Blog, all you need to do is click the box below and the Grow.me app will pop up, allowing you to enter your email and create a password. Once you’ve created an account, every time you see Exclusive Content on my blog, simply login to your Grow account. Be sure to switch to the login screen to enter your login credentials.
If you forget your password, click the “forgot password” link and follow the prompts. Please note that I’m unable to assist with resetting Grow passwords or accessing your Grow account, so be sure to save your login information in a safe place.
To make things even easier, I’ve created a video for both desktop and mobile users that offer additional assistance. You can access this video by visiting my FAQs page HERE or by watching the video below.
Thank you for subscribing and for joining me on my crochet journey. I hope you enjoy the exclusive content available to our subscribers and create beautiful crochet projects using the resources you discover.

Pattern
XS (S, M, L, XL, 2X, 3X, 4X, 5X)
This Cardigan is worked flat in pieces, including the back panel, front panels, and two sleeves. The pattern is written for the smallest size, with larger sizes shown in parentheses ( ). A step-by-step video tutorial is included and demonstrates the medium size. When changing colours, work the new colour on the last yarn over of the final stitch of a wrong side row, then continue with the new colour on the following right side row for a clean, consistent finish throughout. Yarn tails can be crocheted over as you work in one direction; at the end, weave them back in the opposite direction to secure.
Back
Band
Row 1:
With the smaller hook and MC, ch 13 work 1 sc in 2nd ch from hook and in each ch across, turn—12 sts.
Row 2:
Ch 1 (not included as a st here and throughout), work 1 sc in the blo of each st across, turn—12 sts.
Rows 3-55 (63, 71, 79, 87, 95, 103, 111, 119):
Rep Row 2. After the final Row, turn.
Body
Setup Row(RS):
Ch 1 and work sc sts evenly along the length of the band (1 st per row)—55 (63, 71, 79, 87, 95, 103, 111, 119) sts. Change to larger hook.
Front left
Row 1 (RS):
With D, 1 esc in each st across to last 2 sts, 1 esc2tog across last 2 sts, turn—22 (26, 30, 34, 38, 42, 46, 50, 54) sts.
Rows 2-4:
Ch 1, 1 esc in each st across, turn—22 (26, 30, 34, 38, 42, 46, 50, 54) sts. Last row change to MC, Cut D.
Row 5:
Ch 1, 1 esc in each st across to last 2 sts, 1 esc2tog across last 2 sts, turn—21 (25, 29, 33, 37, 41, 45, 49, 53) sts.
Row 6:
Ch 1, 1 esc in first st, *ch 1, sk st, 1 esc in next st; rep from across, turn—21 (25, 29, 33, 37, 41, 45, 49, 53) sts.
Row 7:
Ch 1, 1 esc in first st, *1 esc in ch-1 sp, 1 esc in next st; rep from * across, turn—21 (25, 29, 33, 37, 41, 45, 49, 53) sts.
Row 8:
Rep Row 6.
Row 9:
Ch 1, 1 esc in first st, *1 esc in ch-1 sp, 1 esc in next st; rep from * across to last ch-1 sp and st, 1 esc2tog across ch-1 sp and last st, turn—20 (24, 28, 32, 36, 40, 44, 48, 52) sts.
Row 10:
Ch 1, 1 esc in each st across, change to A, cut MC, turn—20 (24, 28, 32, 36, 40, 44, 48, 52) sts.
Row 11:
Ch 1, 1 esc in each st across, turn—20 (24, 28, 32, 36, 40, 44, 48, 52) sts.
Row 12:
Ch 1, 1 esc2tog across first 2 sts, 1 esc in each st across, turn—19 (23, 27, 31, 35, 39, 43, 47, 51) sts.
Rows 13-14:
Ch 1, 1 esc in each st across, turn—19 (23, 27, 31, 35, 39, 43, 47, 51) sts. Last row change to MC, Cut A.
Row 15:
Ch 1, 1 esc in each st across to last 2 sts, 1 esc2tog across last 2 sts, turn—18 (22, 26, 30, 34, 38, 42, 46, 50) sts.
Row 16:
Ch 1, 1 esc in first 2 sts, *ch 1, sk st, 1 esc in next st; rep from across, turn—18 (22, 26, 30, 34, 38, 42, 46, 50) sts.
Row 17:
Ch 1, 1 esc in first st, *1 esc in ch-1 sp, 1 esc in next st; rep from * across to last 2 sts, 1 esc2tog across last 2 sts, turn —17 (21, 25, 29, 33, 37, 41, 45, 49) sts.
Row 18:
Ch 1, 1 esc in first st, *ch 1, sk st, 1 esc in next st; rep from across, turn—17 (21, 25, 29, 33, 37, 41, 45, 49) sts.
Row 19:
Ch 1, 1 esc in first st, *1 esc in ch-1 sp, 1 esc in next st; rep from * across, turn—17 (21, 25, 29, 33, 37, 41, 45, 49) sts.
Row 20:
Ch 1, 1 esc in each st across, turn—17 (21, 25, 29, 33, 37, 41, 45, 49) sts.
Shoulder Shaping – Short rows
Row 1 (RS):
With MC, join yarn in 2 (6, 10, 14, 18, 22, 26, 30, 34) st from right edge with a sl st. Ch 1, work 1 sc in each of next 16 sts, turn—16 sts.
Rows 2-5:
Follow the instructions for Back Right shoulder shaping.
Sleeves – Make 2
Band
Row 1:
With the smaller hook and MC, ch 13 work 1 sc in 2nd ch from hook and in each ch across, turn—12 sts.
Row 2:
Ch 1 (not included as a st here and throughout), work 1 sc in the blo of each st across, turn—12 sts.
Rows 3-27 (29, 31, 33, 35, 37, 39, 41, 43):
Rep Row 2. After the final Row, turn.
Body XS (S, M, L, XL)
Setup Row (RS):
Ch 1 and work sc sts evenly along the length of the band (1 st per row)—27 (29, 31, 33, 35) sts. Change to larger hook.
Row 1 (WS):
With larger hook, ch 1, 1 esc in each st across, change to A, cut MC, turn—27 (29, 31, 33, 35) sts.
Row 2:
Ch 1, 1 esc in each st across, turn—27 (29, 31, 33, 35) sts.
Rows 3-4:
Ch 1, 1 esc in each st across, turn—27 (29, 31, 33, 35) sts.
Row 5 (Incr):
Ch 1, 2 esc in first st, 1 esc in each st across to last st, 2 esc in last st, turn—29 (31, 33, 35, 37) sts. Change to MC, Cut A.
Row 6:
Ch 1, 1 esc in each st across, turn—29 (31, 33, 35, 37) sts.
Row 7:
Ch 1, 1 esc in first st, *ch 1, sk st, 1 esc in next st; rep from across, turn—29 (31, 33, 35, 37) sts.
Row 8:
Ch 1, 1 esc in first st, *1 esc in ch-1 sp, 1 esc in next st; rep from * across, turn—29 (31, 33, 35, 37) sts.
Rows 9:
Rep Row 7.
Row 10 (Incr.):
Ch 1, 2 esc in first st, *1 esc in ch-1 sp, 1 esc in next st; rep from * across to last st, 2 esc in last st, turn—31 (33, 35, 37, 39) sts.
Row 11:
Ch 1, 1 esc in each st across, change to B, cut MC, turn—31 (33, 35, 37, 39) sts.
Rows 12-51:
Work Rows 2–11 for stripe/Increase pattern. Each stripe section is worked as follows: Rows 2–5 in contrast colour, then Rows 6–11 in MC.
Work colour sequence as follows: A, B, C, D, then repeat A,
ending with a final MC section.
Sleeve stitch counts ending in 47 (49, 51, 53, 55) sts.
Body 2X (3X, 4X, 5X)
Setup Row(RS):
Ch 1 and work sc sts evenly along the length of the band (1 st per row)—37 (39, 41, 43) sts. Change to larger hook.
Row 1 (WS):
With larger hook, ch 1, 1 esc in each st across, change to A, cut MC, turn—37 (39, 41, 43) sts.
Row 2:
Ch 1, 1 esc in each st across, turn—37 (39, 41, 43) sts.
Row 3 (Incr):
Ch 1, 2 esc in first st, 1 esc in each st across to last st, 2 esc in last st, turn—39 (41, 43, 45) sts.
Rows 4-5:
Ch 1, 1 esc in each st across, turn—39 (41, 43, 45) sts. Last row change to MC, Cut A.
Row 6 (Incr):
Ch 1, 2 esc in first st, 1 esc in each st across to last st, 2 esc in last st, turn—41 (43, 45, 47) sts.
Row 7:
Ch 1, 1 esc in first st, *ch 1, sk st, 1 esc in next st; rep from across, turn—41 (43, 45, 47) sts.
Row 8:
Ch 1, 1 esc in first st, *1 esc in ch-1 sp, 1 esc in next st; rep from * across, turn—41 (43, 45, 47) sts.
Rows 9:
Rep Row 7.
Row 10 (Incr.):
Ch 1, 2 esc in first st, *1 esc in ch-1 sp, 1 esc in next st; rep from * across to last st, 2 esc in last st, turn—43 (45, 47, 49) sts.
Row 11:
Ch 1, 1 esc in each st across, change to B, cut MC, turn—43 (45, 47, 49) sts.
Rows 12-51:
Work Rows 2–11 for stripe/Increase pattern. Each stripe section is worked as follows: Rows 2–5 in contrast colour, then Rows 6–11 in MC.
Work colour sequence as follows: A, B, C, D, then repeat A, ending with a final MC section.
Sleeve stitch counts ending in 67 (69, 71, 73) sts.
Blocking (optional)
Wet block to shape and size. Fill a sink or basin with lukewarm water and add a small amount of wool wash. Submerge the pieces and allow it to soak thoroughly. Gently squeeze out excess water without wringing. Roll the pieces in a clean towel to
remove additional moisture, then lay flat on blocking mats. Shape to measurements and pin in place. Allow to dry completely before removing pins.
Shoulder Seaming Directions
With a smaller hook, place a slip knot on your hook. Lay shoulder panels side by side with right sides facing up. Working through the inside loops of both panels, insert your hook into the back loop only (blo) of the first stitch on the front left shoulder, then into the blo of the first stitch on the back right shoulder. Keeping the working yarn at the back and centred between the panels, yarn over and pull through all loops on the hook to complete the slip stitch. Continue slip-stitching in this manner across. Fasten off and weave in tails. Repeat for the second shoulder.
Attaching Sleeve to Body
Fold the sleeve in half and place a stitch marker at the centre of the sleeve cap. With right sides facing, align the marked centre of the sleeve to the shoulder seam and secure with a stitch marker or pin. Match sleeve edges evenly along the armhole, using the body rows as a guide. Slightly stretch the sleeve as needed to distribute fullness evenly. Whip stitch the sleeve to the body panel across. Repeat for the second sleeve. Weave in tails once satisfied with placement.
Side and Sleeve Seaming
With right sides facing, fold the cardigan so the front and back panels align. Using a whip stitch, sew the side seams and continue down the sleeves. Leave a yarn tail approximately 2 times the length of the seam.
As you seam, place stitches carefully within the colour sections to prevent the MC from showing through. Work through small sections of yarn on each side for a clean finish.
Alternatively, use a mattress stitch for a more hidden seam.
Fasten off and weave in all remaining tails.
Edging
With smaller hook, place a slip knot on the hook. Join yarn at the bottom of the right front band edge. Work single crochet evenly around the edge of the cardigan. Fasten off and weave in ends.
Join-As-You-Go Collar
The collar is joined as you go to the edge.
Mark Buttonholes
With RS facing at the front right side, count 3 sts from the bottom edge, pm in 3rd st, *count 14 sts, pm in 15th st; rep from *, making as many buttonholes as desired. The sample is made with 4 buttonholes.
Buttonhole Row:
Ch 1, work 1 sc in blo 4 sts, ch 2, sk 2 sts, 1 sc in blo last 4 sts.
Next Row:
Ch 1, work 1 sc in blo 4 sts, 2 sc in ch-2 sp, 1 sc in blo last 4 sts. As you work the collar rows and come to a place marker, use these two rows in place to create the buttonhole.
Row 1 (RS):
With RS facing and smaller hook, join yarn to the front right edge with a sl st, ch 11, 1 sc in 2nd ch from hook and in each ch across, sk first st at the edge, sl st in blo next 2 sts, turn—10 sts.
Row 2:
Sk sl sts, 1 sc in the blo of each st across, turn—10 sts.
Row 3:
Ch 1, work 1 sc in the blo of each st across, sl st in blo next 2 sts (edge), turn—10 sts.
Rep Row 2 & 3 around the collar edge. After the last row, fasten off and weave in tails. Sew buttons opposite buttonholes on the front left ribbed collar.
Helpful Resources
Sign up for our YouTube Membership
Join our Facebook Crochet Community for pattern support and inspiration
Subscribe on YouTube for hundreds of free tutorials
Sign up for our newsletter and receive 40% off your first Ravelry purchase!
I hope you love our Free Striped Cardigan Pattern. You might also love these crochet patterns:
- Waffle Stitch Cardigan
- Autumn’s Charm Mosaic Cardigan
- Everyday Ragg Cardigan
- Granny Stitch Cardigan
- Cabot Trail Cardigan
This pattern is designed by Michelle Moore of MJ’s Off The Hook Designs Inc., based in Lakefield, Ontario, Canada. Your go-to source for modern, easy crochet patterns. Published on June 15th, 2026.
Thank you for visiting MJ’s Off The Hook Designs! I hope you enjoyed this pattern and feel inspired to pick up your hook and start creating.
You can find even more crochet patterns in our Ravelry and Etsy shops.
For daily inspiration and behind-the-scenes peeks, join me over on Facebook or Instagram or join our YouTube Membership for exclusive content!
You’ve got questions, we’ve got a community!
Crocheting is better with friends! Join our group to post pictures and ask all your pattern support questions.