*This post may contain affiliate links to support the cost of this blog. At no cost to you, I may make a small commission if you purchase through these links. Read our Privacy Policy HERE
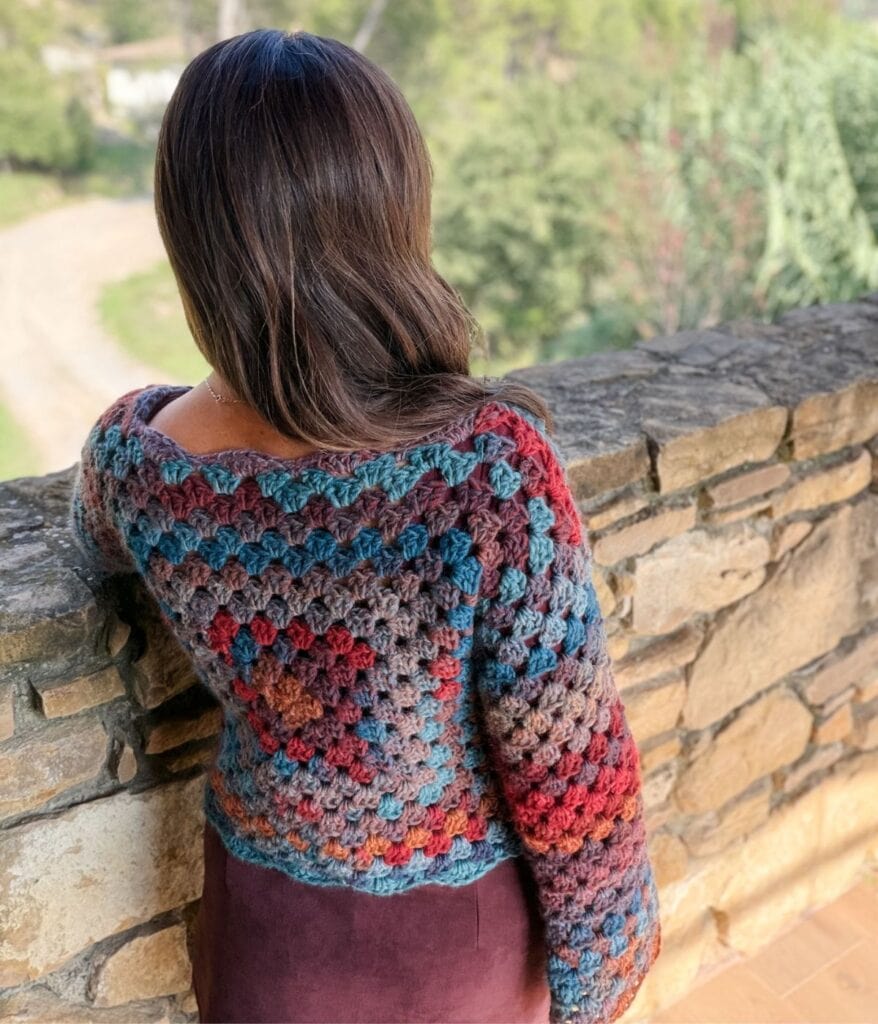
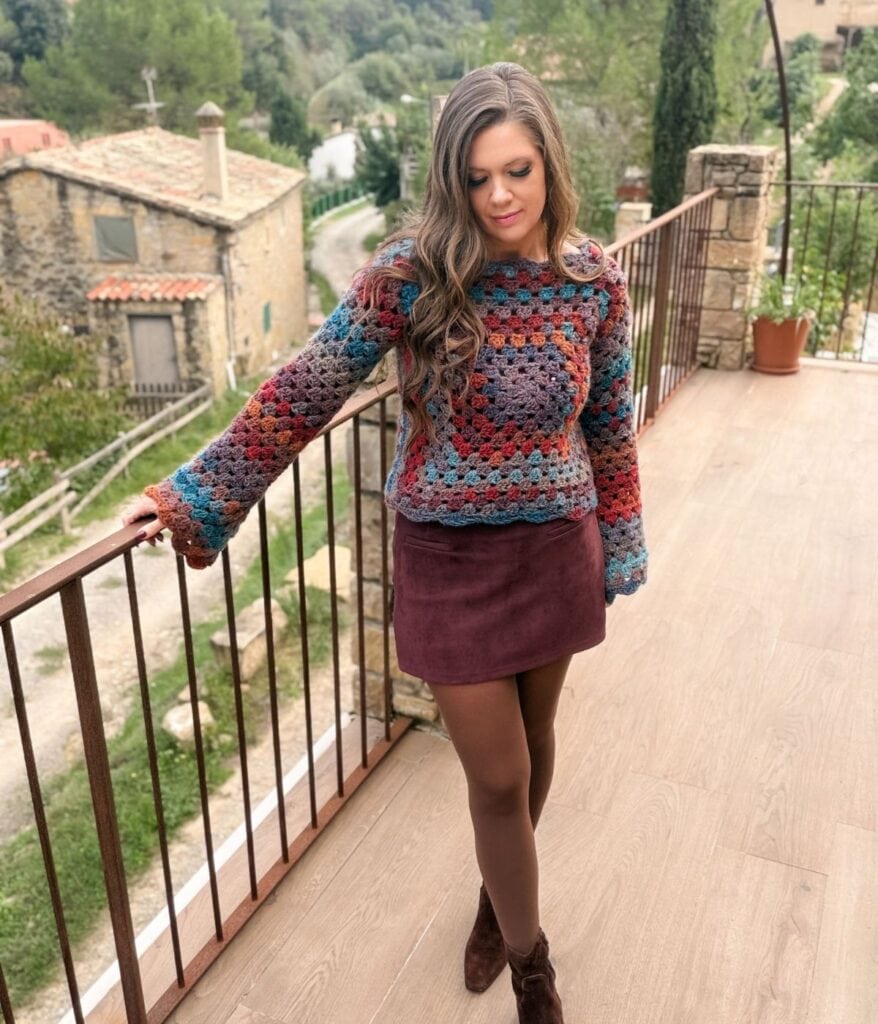
If you love granny squares as much as I do, you’re going to love the Mariposa Granny Square Sweater! This free crochet sweater pattern combines classic granny stitches with beautiful bell sleeves and delicate shell edging for a fun, feminine design that’s surprisingly easy to make!

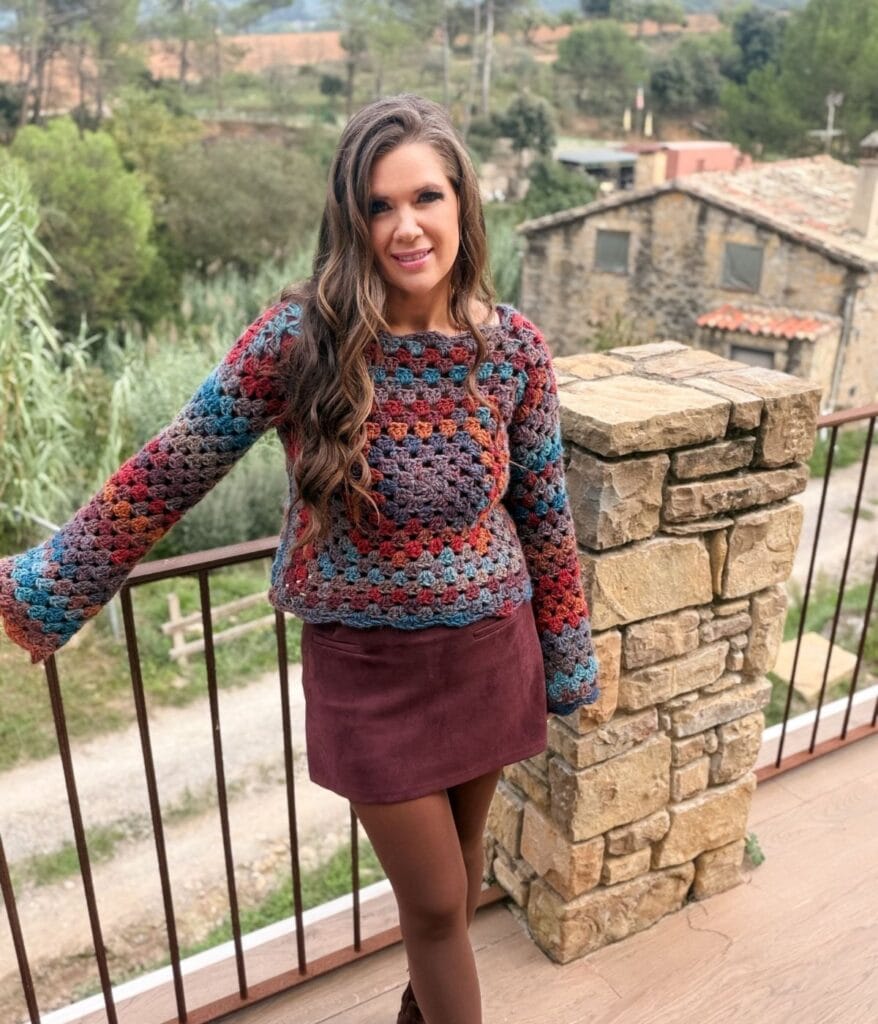
The Mariposa Sweater is part of my Winter in Spain Collection, designed in collaboration with Katia Yarns. I wanted to create something colourful, comfortable and a little different from your typical granny square sweater.
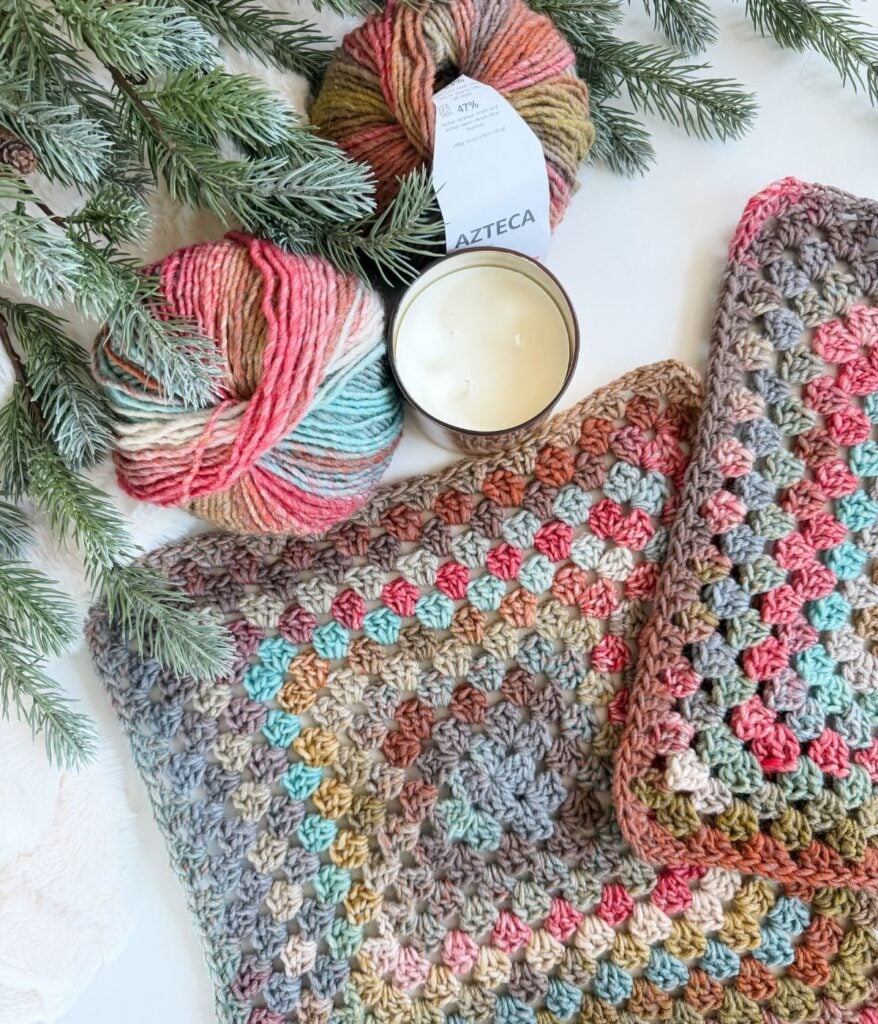
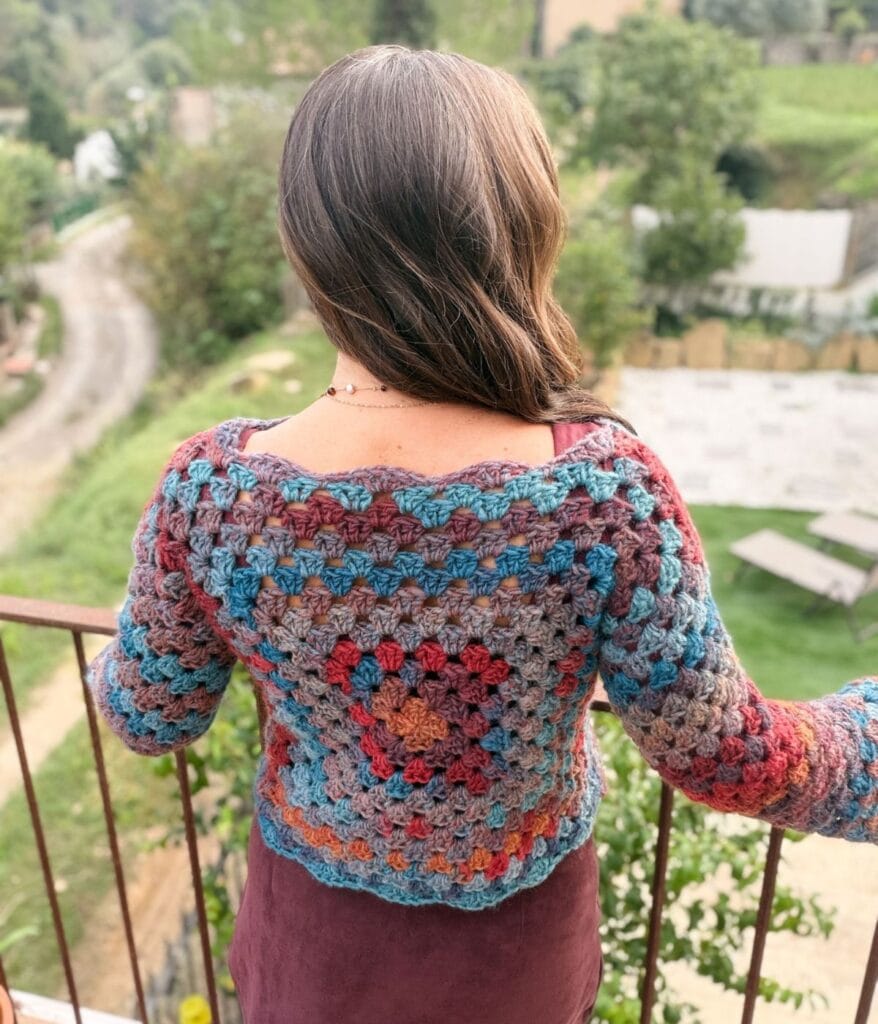
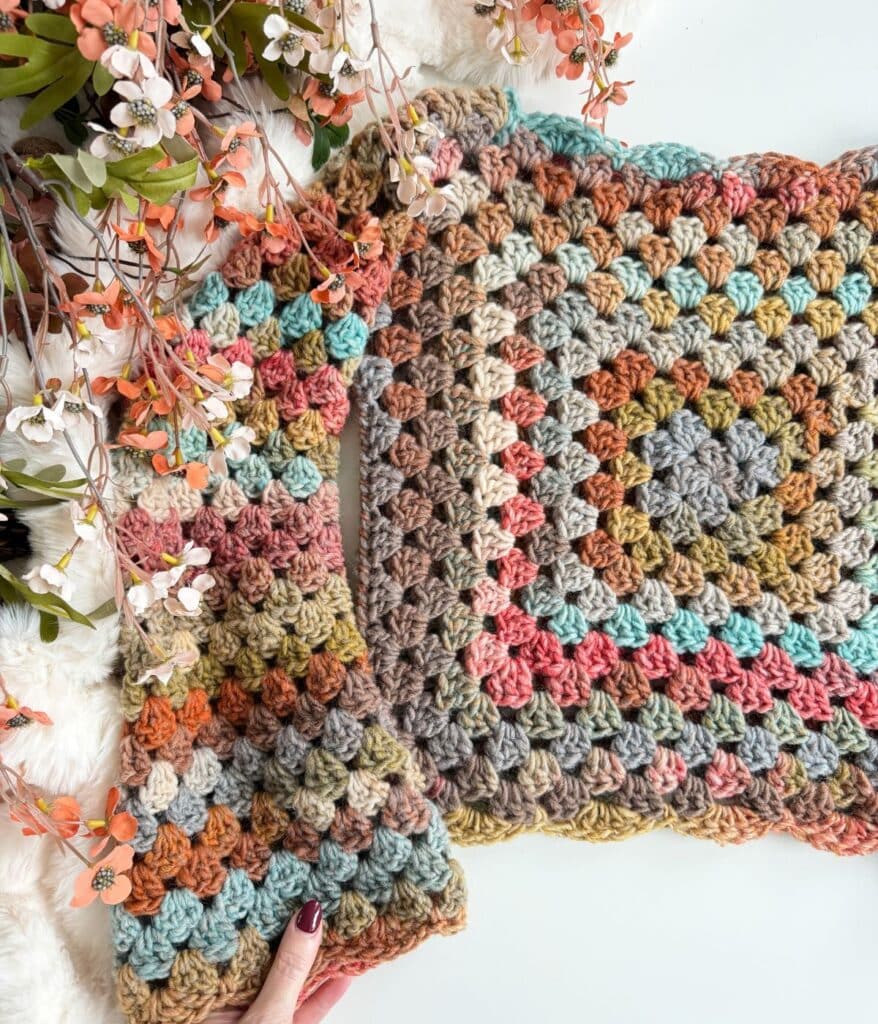
What I love most about this design is how simple the construction is! The sweater starts with just two large granny squares, and the gorgeous colour changes in Katia Azteca yarn make each one completely unique. There’s no need to change colours throughout the pattern because the yarn does all the work for you!
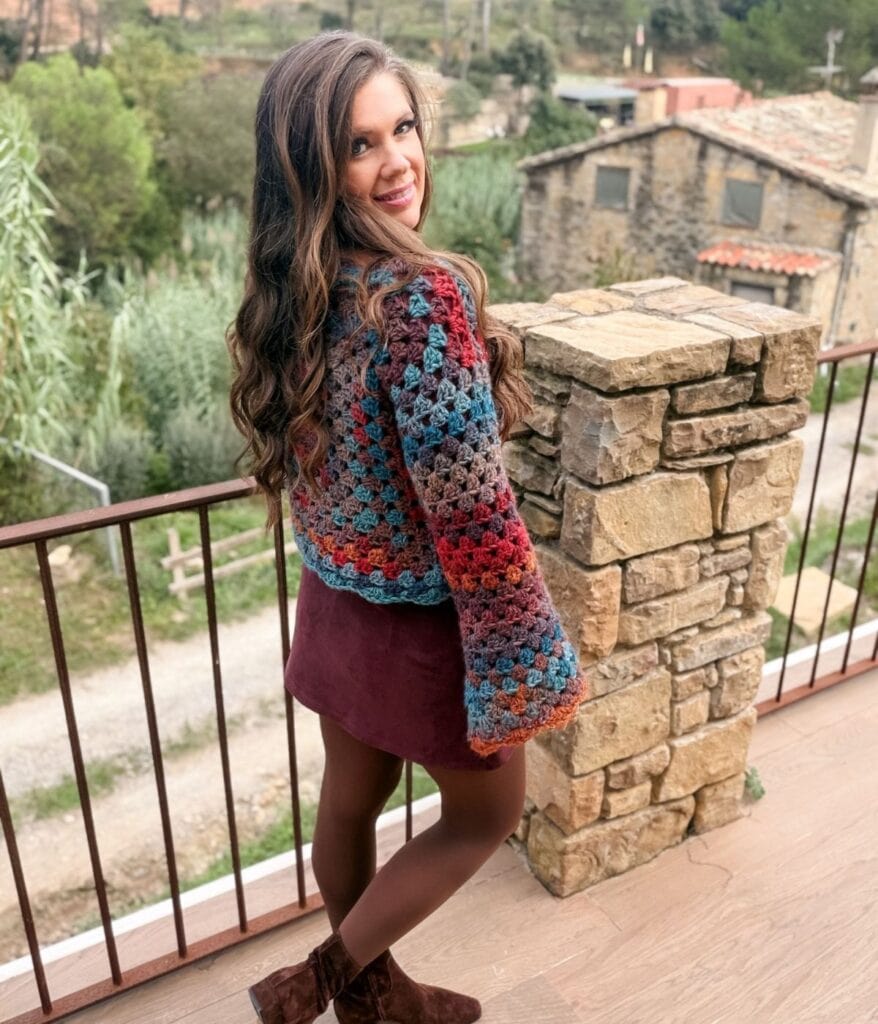
The slightly fitted silhouette and flared bell sleeves give this sweater such a pretty shape. It looks beautiful with jeans for an everyday outfit or dressed up over a skirt or dress.
Want less distractions?
Join Off the Hook Crochet Club
Join the Off The Hook Crochet Club and enjoy hundreds of MJ’s crochet patterns ad-free, plus exclusive resources, member perks and new free patterns added every week.
Best of all, this is a beginner-friendly crochet sweater pattern! The bulky weight yarn and large crochet hook help it work up quickly, and the repetitive granny stitch pattern makes it easy to follow.
The complete Mariposa Granny Square Sweater pattern is available for free below, along with a step-by-step YouTube video tutorial to guide you through the entire project!
Project Overview
The Mariposa Granny Square Sweater pairs bold colour with a playful silhouette. Statement bell sleeves and delicate shell edging give this classic granny design a feminine finish, while Katia Azteca’s shifting colours make each sweater unique. Quick to crochet and easy to style, it looks beautiful with jeans or layered over a dress. The soft wool blend brings warmth and comfortable stretch, making it a piece you’ll reach for throughout the cooler months. A step-by-step video tutorial is included to guide you through making your own Mariposa Sweater.
Skill level: Beginner
Sizes: XS (S, M, L, XL, 2X, 3X, 4X, 5X)
Finished Fit: Fitted/Classic
Yarn Weight: Bulky Weight #5
Yarn: Katia Azteca
Inspired by Our Winter in Spain Collection
The Mariposa Granny Square Sweater is one of eight crochet designs from my Winter in Spain Collection, created in collaboration with Katia Yarns.
I had the incredible opportunity to travel to Barcelona, Spain, with three talented crochet designers: Sarah-Jayne from Bella Coco Crochet, Hannah from HanJan Crochet and Wilma from Wilmade.
Katia brought us together for an unforgettable experience filled with yarn, creativity and inspiration. We explored beautiful places around Barcelona, visited the countryside near Montserrat, toured Katia’s facilities and enjoyed a wonderful photo shoot showcasing our designs.
Our collections came together as the Barcelona Crochet Collective, and each of us created our own unique designs using Katia yarns.
For the Mariposa Sweater, I wanted something fun and colourful that would really show off the beautiful transitions in Katia Azteca. I love how the oversized granny squares create a different look depending on where the colours fall, especially when paired with those pretty bell sleeves!
It’s such a fun design to make, and I can’t wait to see all the different colour combinations everyone chooses!
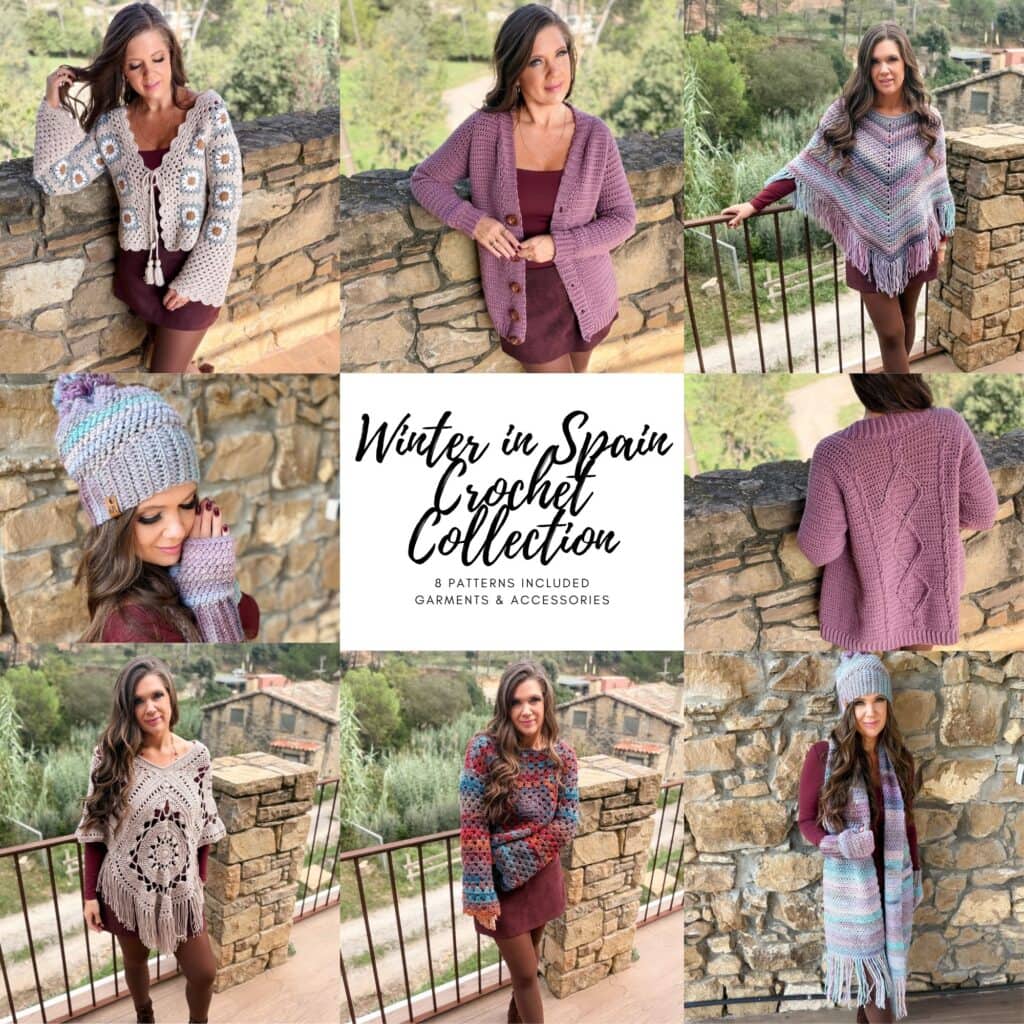
Join the Barcelona Crochet Collective
Our crochet along is completely free to join! Choose your favourite design from the collection, crochet at your own pace and share your progress with our community.
You’ll also find our supply lists, yarn substitution guide and all the collection details on our crochet along page.
Why You’ll Love This Free Granny Square Sweater Pattern
There are so many reasons to love the Mariposa Granny Square Sweater!
- Beginner-Friendly: The classic granny stitch is easy to learn and perfect for crocheters looking to make their first sweater.
- Simple Construction: Made from just two oversized granny squares with added shoulder shaping and sleeves.
- Quick to Crochet: Bulky weight yarn and an 8 mm hook help this project come together quickly.
- Beautiful Bell Sleeves: The flared sleeves create a pretty, feminine silhouette with lots of movement.
- Gorgeous Colour Changes: Katia Azteca creates beautiful colour transitions without the need for constant yarn changes.
- Pretty Shell Edging: Delicate shell stitches finish the neckline, cuffs and hem.
- Inclusive Sizing: The pattern includes nine sizes from XS to 5X.
- Customizable Fit: Adjust the neckline and sleeve length to suit your personal style.
- Video Tutorial Included: Follow along as I walk you through every step of the pattern.
- Free Written Pattern: The complete crochet instructions are available below!
How Is the Mariposa Granny Square Sweater Constructed?
One of my favourite things about this sweater is the simple construction.
Unlike traditional granny square garments that require you to make and seam together lots of individual squares, the Mariposa Sweater starts with just two oversized granny squares.
You’ll begin by crocheting the front and back panels in joined rounds, then add rows of granny clusters along the top to form the shoulders.
Once the granny squares are blocked to the correct measurements, the shoulders are seamed together, leaving an opening for the neckline.
The sleeves are worked directly onto the sweater in joined, turned rounds. Simple increases create the beautiful bell sleeve shape.
Finally, the sides are seamed and shell stitch edging is added to the neckline, cuffs and bottom hem.
It’s a great project for learning crochet garment construction without having to work complicated shaping!
Mariposa Granny Square Sweater Sizing and Fit
The Mariposa Sweater is designed with a slightly fitted to classic silhouette. Some sizes include negative ease, but the open granny stitch fabric provides considerable stretch.
I recommend choosing your size based on your actual bust measurement, the finished bust measurement and how you prefer your sweaters to fit.
If you prefer a more relaxed fit, compare the finished measurements with a sweater you already own and love.
Size Chart
| Size | To Fit Bust | Finished Bust | Finished Length |
| XS | 28–30″ | 31″ | 17.25″ |
| S | 32–34″ | 34″ | 18.75″ |
| M | 36–38″ | 37″ | 20.25″ |
| L | 40–42″ | 40″ | 21.75″ |
| XL | 44–46″ | 43″ | 23.25″ |
| 2X | 48–50″ | 49″ | 26.25″ |
| 3X | 52–54″ | 52″ | 27.75″ |
| 4X | 56–58″ | 55″ | 29.25″ |
| 5X | 60–62″ | 58″ | 30.75″ |
Yarn Requirements
The Mariposa Granny Square Sweater was designed using Katia Azteca (EU Site), a beautiful self striping bulky weight yarn.
This yarn features gorgeous colour transitions that create a unique look with every granny square. I love how the colours blend together, giving the sweater so much personality without having to weave in lots of extra yarn ends.
- Bulky Weight #5 (Aran)
- 53% Wool, 47% Acrylic
- 197 yds / 100 g
- Sample Colours: #7872 and #7880
How Much Yarn Do I Need?
| Size | Balls | Approximate Yardage |
| XS | 4 | 650 yds |
| S | 4 | 788 yds |
| M | 5 | 865 yds |
| L | 6 | 1,015 yds |
| XL | 7 | 1,100 yds |
| 2X | 8 | 1,360 yds |
| 3X | 9 | 1,460 yds |
| 4X | 10 | 1,650 yds |
| 5X | 10 | 1,760 yds |
Yardage is estimated from the size Small sample. Ball quantities are rounded up to allow for the remaining sizes.
Additional yarn may be required if you adjust the length of your sweater or sleeves or if your crochet tension differs from the pattern gauge.
Yarn Substitutions
If you can’t get Katia Azteca in your country, you can substitute another yarn that meets the pattern gauge and creates a similar drape.
The original yarn has a yardage to weight ratio of:
Katia Azteca: 197 yds/100 g = 1.97 yds per gram
Here are a few suggested alternatives to swatch:
- Herrschners Be Whirly: 171 yd/100 g = 1.71 yd per gram
- Premier Puzzle: 328 yd/200 g = 1.64 yd per gram
- Mary Maxim Marvelous Chunky (CDN): 270 yd/200 g = 1.35 yd per gram
- Knit Picks Chroma Worsted: 198 yd/100 g = 1.98 yd per gram
These alternatives have not been tested with this pattern. Knit Picks Chroma is labelled worsted weight, so be sure to make a gauge swatch before starting.
When choosing a substitute, always compare the yardage, fibre content, texture and most importantly the finished gauge. Purchase your yarn based on total yardage rather than the number of balls.
Download Our Winter in Spain Yarn Substitution Guide
Crochet Hook
or the size needed to obtain the gauge
Materials
Gauge
Granny Stitch: Approximately 3⅓ clusters and 6 rounds = 4″, measured in the sleeve pattern, flat without stretching. For a more accurate width check, 10 clusters = 12″.
Blocked Granny Square: 12 rounds = 17 × 17″, size Small, measured across the square only, excluding the shoulder rows.
*Block the front and back squares to the dimensions listed for your size before assembly.
Video Tutorial

Abbreveations
Ch – Chain
Dc – Double Crochet
Rep – Repeat
RS – Right Side
Sc – Single Crochet
Sk – Skip
Sl St – Slip Stitch
Sp(s) – Space(s)
St(s) – Stitch(es)
Tr – Treble Crochet
WS – Wrong Side
( ) – Work steps in parentheses in the indicated stitch or space
* – Repeat instructions following the asterisk as indicated
Granny Cluster: Work 3 dc in the indicated space. Work each stitch separately; do not join the stitches together.
Treble Cluster: Work 3 tr in the indicated space. Work each stitch separately; do not join the stitches together.
Shell: Work 5 dc in the indicated space.
Treble Crochet (tr): Yarn over twice, insert hook in indicated stitch or space and pull up a loop, [yarn over and pull through 2 loops] 3 times.
Project Tips
- Check your gauge: Measure your sleeve gauge without stretching the fabric, and block your granny squares to the dimensions listed for your size.
- Choose your colour placement: Azteca’s colour transitions make each square unique. Decide which panel you prefer for the front before adding the neckline edging.
- Customize your neckline: Work fewer clusters across each shoulder for a wider boat neckline, or more clusters for a narrower opening. Keep both shoulders equal and work matching counts on the front and back panels.
- Use stitch markers: Mark the sleeve placement spaces on both panels, counting carefully from the shoulder seam for even placement.
- Count your clusters: Check sleeve cluster counts after the shoulder seam adjustment and each bell sleeve increase.
- Adjust sleeve length early: Add or omit straight rounds in multiples of 2 before beginning the bell shaping. Try on the sweater as you work to check the length.
- Keep seams flexible: Whip stitch evenly without pulling too tightly, allowing the seams to stretch with the fabric.
Digital Download + No Ads!
Get the Digital PDF Download
The PDF includes a stitch chart and schematic
Digital pattern only. No physical item will be shipped.
Pattern
XS (S, M, L, XL, 2X, 3X, 4X, 5X)
Back/Front
Round 1:
Magic Ring, ch 3 (counts as 1 dc), 2 dc, ch 1, *3 dc, ch 1; rep from * 2 more times, pull ring tight, sl st in top of ch-3 and next 2 dc, sl st in ch-1 sp.
Round 2:
Ch 3, work 2 dc, ch 2, 3 dc) in ch-1 sp, *(3 dc, ch 2, 3 dc) in next ch-1 sp; rep from * around, sl st in top of ch-3 and next 2 dc, sl st in ch-2 sp.
Round 3:
(Ch 3, work 2 dc, ch 2, 3 dc) in ch-2 sp, 3 dc in sp between clusters, *(3 dc, ch 2, 3 dc) in next ch-2 sp, 3 dc between next clusters; rep from * around, sl st in top of ch-3 and next 2 dc, sl st in ch-2 sp.
Round 4:
(Ch 3, work 2 dc, ch 2, 3 dc) in ch-2 sp, 3 dc in each sp between clusters to corner ch-2 sp, *(3 dc, ch 2, 3 dc) in next ch-2 sp, 3 dc in each sp between clusters; rep from * around, sl st in top of ch-3 and next 2 dc, sl st in ch-2 sp.
Rounds 5-11 (12, 13, 14, 15, 17, 18, 19, 20):
Rep Round 4. Clusters between corner ch-2 sps will equal the number of rounds worked.
Shoulders
Continue from the final round of the granny square.
First Shoulder:
Ch 4 (counts as 1 tr), 2 tr in corner ch‑2 sp, work 3 tr in each of the next 2 (3, 3, 4, 4, 5, 6, 6, 7) sps between clusters. Fasten off with a tail for sewing.
Second Shoulder:
Counting the opposite corner ch‑2 sp as the first sp, join yarn in the 3rd (4th, 4th, 5th, 5th, 6th, 7th, 7th, 8th) sp from that corner. Ch 4 (counts as 1 tr), 2 tr in same sp, work 3 tr in each remaining sp across to and including the corner ch‑2 sp. Fasten off with a tail for sewing. Each shoulder has 3 (4, 4, 5, 5, 6, 7, 7, 8) treble clusters. Repeat for the second panel.
Blocking
Before seaming the shoulders, block both granny square panels to the measurements listed for your size. Lay flat on a blocking mat and gently shape each square, keeping the corners even and the edges straight. Pin in place without overstretching. Shape the shoulder rows evenly, then allow the panels to dry completely before removing the pins and continuing with assembly.
Shoulder Seams
With right sides facing each other, align the front and back panels. Seam the corresponding shoulders together, leaving the centre open for the neckline.
Sleeve Placement:
Sleeves
Count 4 (5, 5, 6, 6, 7, 7, 8, 8) spaces down from the shoulder seam on both the front and back panels. Place a marker in each space.
Round 1 (RS):
Join yarn in marked sp, ch 3 (counts as 1 dc), 2 dc in same sp, work 3 dc in each sp to shoulder seam, work 1 dc on each side of shoulder seam, then work 3 dc in each remaining sp to and including opposite marked sp. Fold sleeve opening together and sl st in top of beginning ch-3 to join, turn—8 (10, 10, 12, 12, 14, 14, 16, 16) clusters plus 2 dc.
Round 2 (WS):
Ch 3 (counts as 1 dc), 2 dc in sp at base of ch-3, work 3 dc in each sp to sp before the 2 shoulder seam dc, work 1 dc in this sp, sk next 2 dc, work 2 dc in next sp, then work 3 dc in each remaining sp around, sl st in top of beginning ch-3, turn—8 (10, 10, 12, 12, 14, 14, 16, 16) clusters.
Round 3:
Ch 3 (counts as 1 dc), 2 dc in sp at base of ch-3, work 3 dc in each sp between clusters around, treating the 1 dc and 2 dc at the shoulder seam as one cluster and skipping the sp between them, sl st in top of beginning ch-3, turn—8 (10, 10, 12, 12, 14, 14, 16, 16) clusters.
Rounds 4-18:
Rep Round 3.
Adjusting Sleeve Length: To shorten or lengthen the sleeves omit or add rounds before beginning the bell shaping at Round 19. Adjust in multiples of 2 rounds to maintain the right side orientation. Each 2 rounds measures approximately 1⅓ inches. The bell shaping adds approximately 6⅔ inches, plus the shell edging.
Round 19 (RS):
Ch 3 (counts as 1 dc), (2 dc, ch 1, 3 dc) in sp at base of ch-3, work 3 dc in each remaining sp between clusters around, sl st in top of beginning ch-3, turn—9 (11, 11, 13, 13, 15, 15, 17, 17) clusters.
Rounds 20–21:
Ch 3 (counts as 1 dc), 2 dc in sp at base of ch-3, work 3 dc in each remaining sp between clusters around, including ch‑1 sp, sl st in top of beginning ch-3, turn.
Round 22:
Rep Round 19—10 (12, 12, 14, 14, 16, 16, 18, 18) clusters.
Rounds 23–24:
Rep Rounds 20–21.
Round 25:
Rep Round 19—11 (13, 13, 15, 15, 17, 17, 19, 19) clusters.
Rounds 26–27:
Rep Rounds 20–21.
Round 28:
Rep Round 19—12 (14, 14, 16, 16, 18, 18, 20, 20) clusters.
Round 29:
Ch 1, sc in sp at base of ch-1, *5 dc in next sp, sc in next sp; rep from * around to last sp, 5 dc in last sp, sl st in first sc to join. Fasten off and weave in tails—6 (7, 7, 8, 8, 9, 9, 10, 10) shells.
Side Seams
Turn sweater inside out with right sides facing. Using a yarn tail, whip stitch each side seam from the underarm to the bottom edge. Weave in tails.
Neckline Edging
Note: The front and back are interchangeable. Before adding the neckline edging, hold the sweater up in front of a mirror and choose which granny square you prefer for the front based on the colour transitions.
With RS facing, place a slip knot on hook and join yarn at a back neckline corner.
Round 1:
Sc in first sp between clusters, 5 dc in next sp, *sc in next sp, 5 dc in next sp; rep from * around, maintaining the alternating sc and shell pattern and treating each shoulder seam as a sp, sl st in first sc to join. Fasten off and weave in tails.
Bottom Edging
With RS facing, place a slip knot on hook and join yarn at the back bottom edge.
Round 1:
Sc in first sp between clusters, 5 dc in next sp, *sc in next sp, 5 dc in next sp; rep from * around, sl st in first sc to join. Fasten off and weave in tails.
Care Instructions
Gently hand wash in cool water. Press out excess water without wringing, reshape the sweater, and lay flat to dry. Do not tumble dry.
You may also love these crochet patterns:
How many granny squares do I need for this sweater?
You only need two large granny squares!
One forms the front panel and the other forms the back. Shoulder rows are added to shape the neckline before joining the panels and working the sleeves.
Yes! You may sell finished items made from MJ’s patterns, but please credit:
“Pattern by MJ’s Off The Hook Designs Inc.”
All patterns, photos, and written content are the property of MJ’s Off The Hook Designs Inc. and protected by copyright law.
Usage
Free patterns are for viewing only on this blog. You may not copy, download, print, screenshot, or redistribute any part of the pattern. Access must remain through this page with ads. The use of tools that remove or hide ads or site content is strictly prohibited.
Legal Notice
Unauthorized reproduction or distribution may result in copyright infringement penalties.
By accessing this post, you agree to these terms and conditions.
This post may contain affiliate links. Purchases made through these links may earn MJ’s Off The Hook Designs Inc. a small commission at no extra cost to you. Content on this site is supported by ads—please do not block or remove them.
This pattern is designed by Michelle Moore of MJ’s Off The Hook Designs Inc., based in Lakefield, Ontario, Canada. Your go-to source for modern, easy crochet patterns. Published on November 18, 2026.
Thank you for visiting MJ’s Off The Hook Designs! I hope you enjoyed this pattern and feel inspired to pick up your hook and start creating.
You can find even more crochet patterns in our Ravelry and Etsy shops.
For daily inspiration and behind-the-scenes peeks, join me over on Facebook or Instagram or join our YouTube Membership for exclusive content!
You’ve got questions, we’ve got a community!
Crocheting is better with friends! Join our group to post pictures and ask all your pattern support questions.