*This post may contain affiliate links to support the cost of this blog. At no cost to you, I may make a small commission if you purchase through these links. Read our Privacy Policy HERE






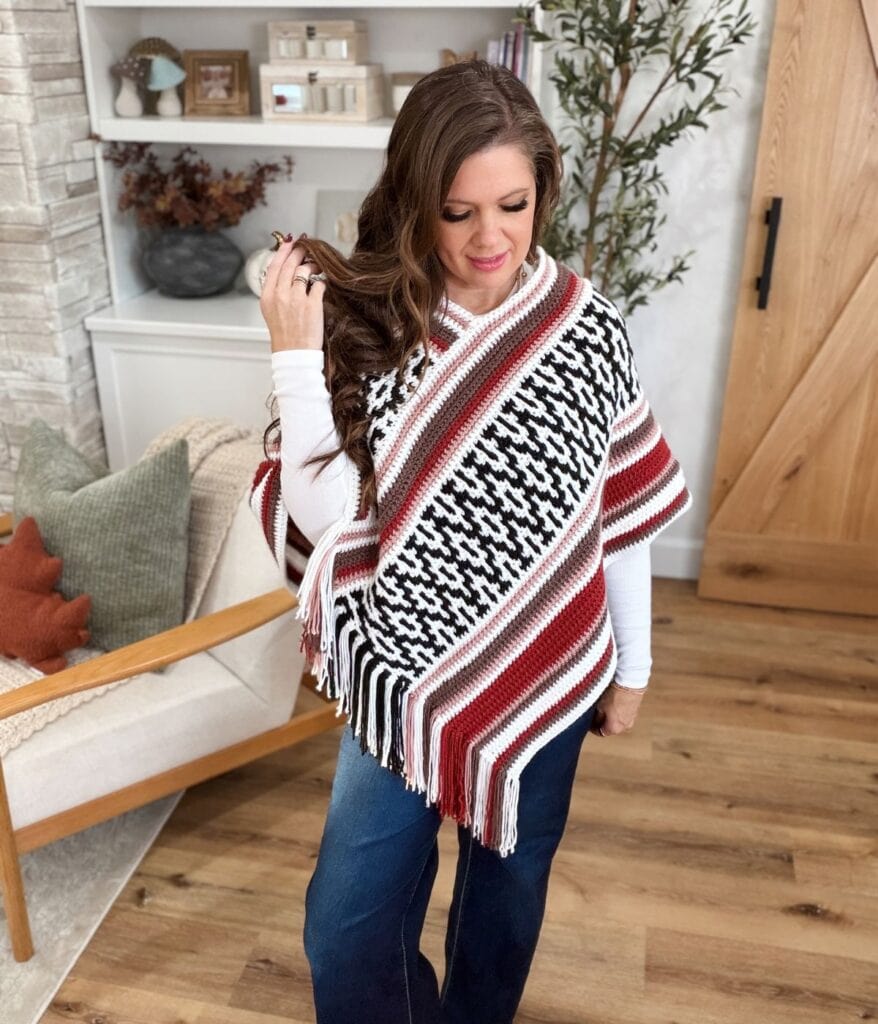
The Painted Desert Mosaic Poncho is one of those projects that looks much more complicated than it actually is.

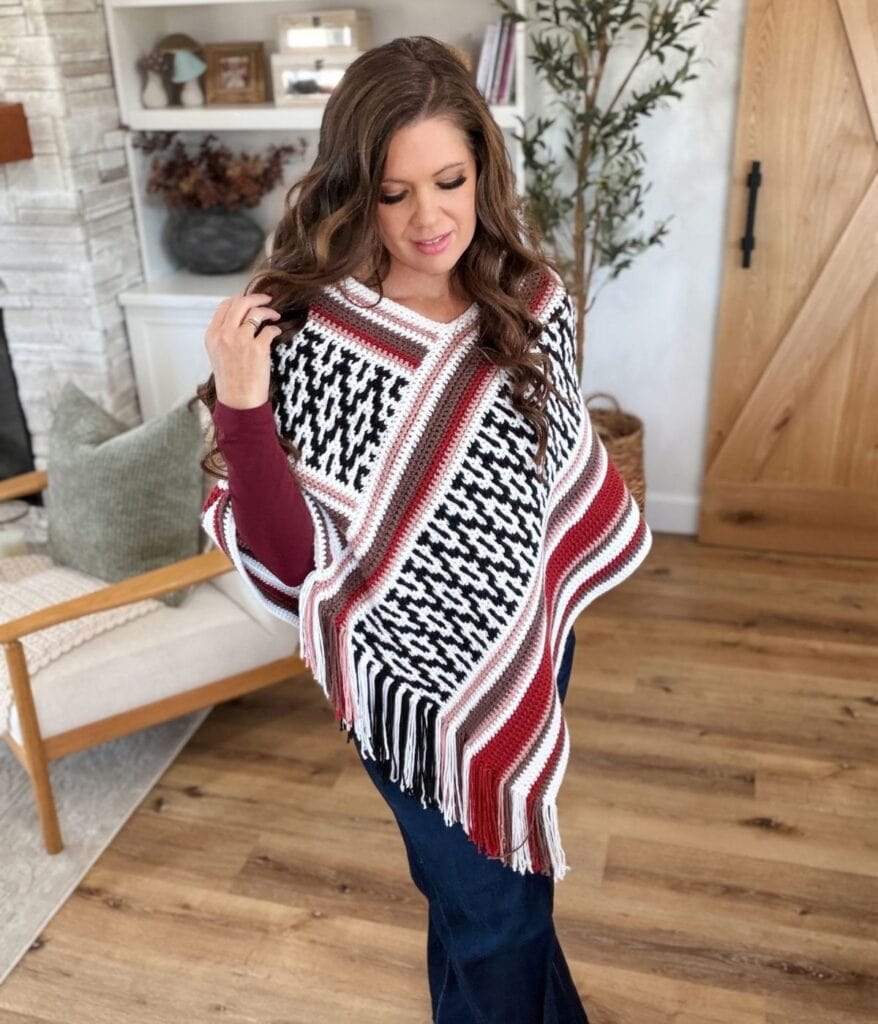
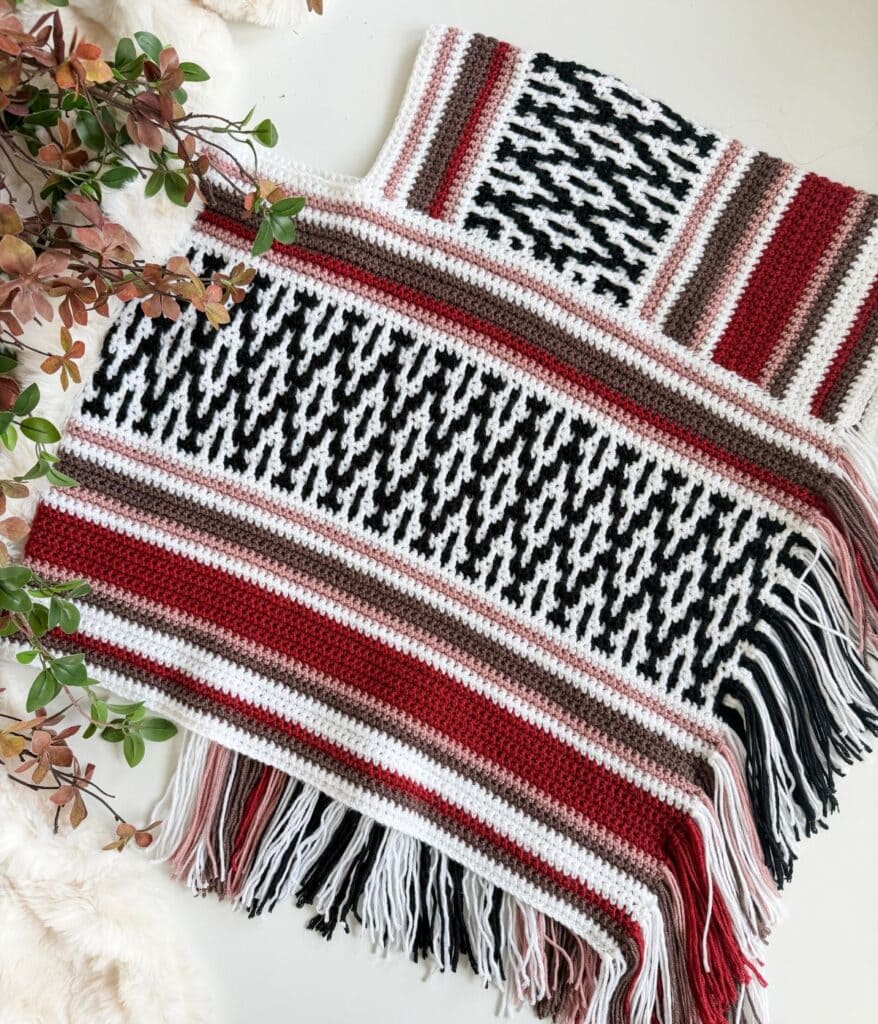
This cozy fall and winter poncho combines bold inset mosaic crochet, simple stripes and long fringe for a fun statement piece that is perfect for layering. The construction is surprisingly straightforward too. The entire poncho is made from just two rectangles, which are blocked, seamed together and finished with fringe.
If you have been wanting to try mosaic crochet but have felt intimidated by all the colourwork, this is a great project to start with. The pattern gives you lots of practice with changing colours, reading a mosaic chart and working mosaic double crochet stitches, without complicated shaping.
And one of my favourite parts is the fringe. In the striped sections, the yarn tails are left along the edge and blend right into the finished fringe, which means you do not have a huge pile of ends to weave in when you are finished.

Want less distractions?
Join Off the Hook Crochet Club
Join the Off The Hook Crochet Club and enjoy hundreds of MJ’s crochet patterns ad-free, plus exclusive resources, member perks and new free patterns added every week.
The Painted Desert Mosaic Poncho crochet pattern is free to view here on the blog, and I also have a step-by-step video tutorial to help walk you through the entire project.
Project Overview
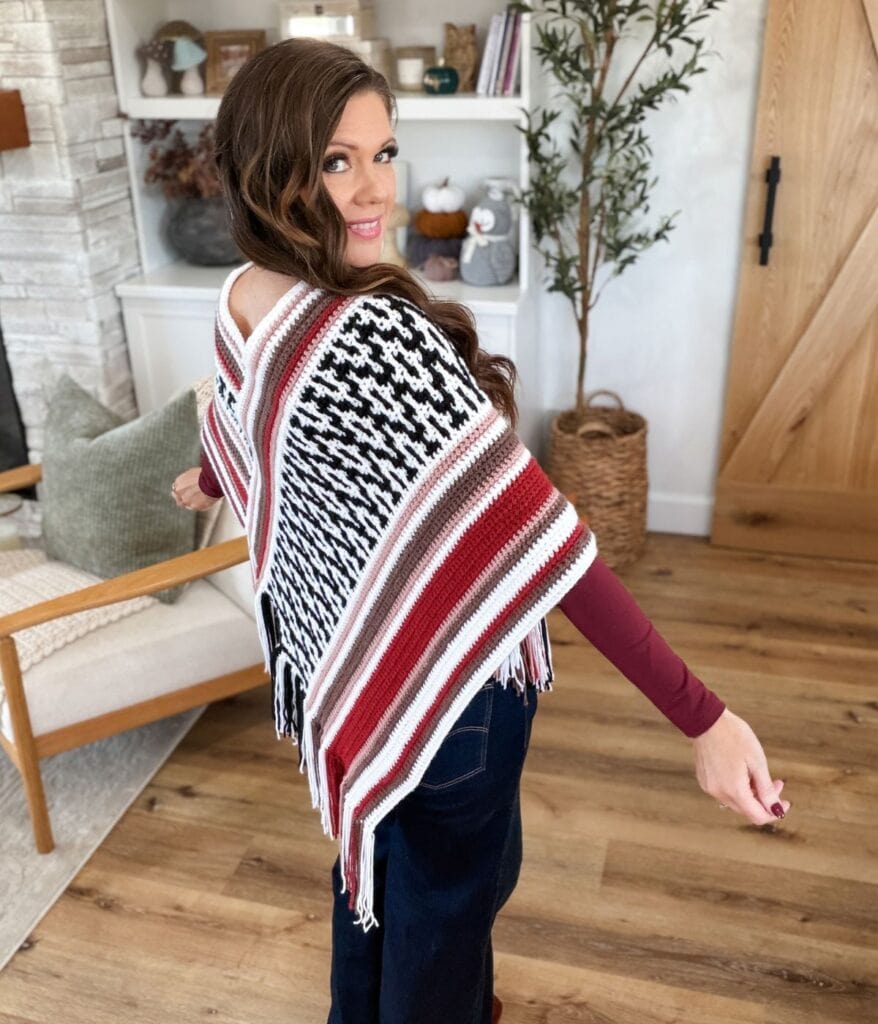
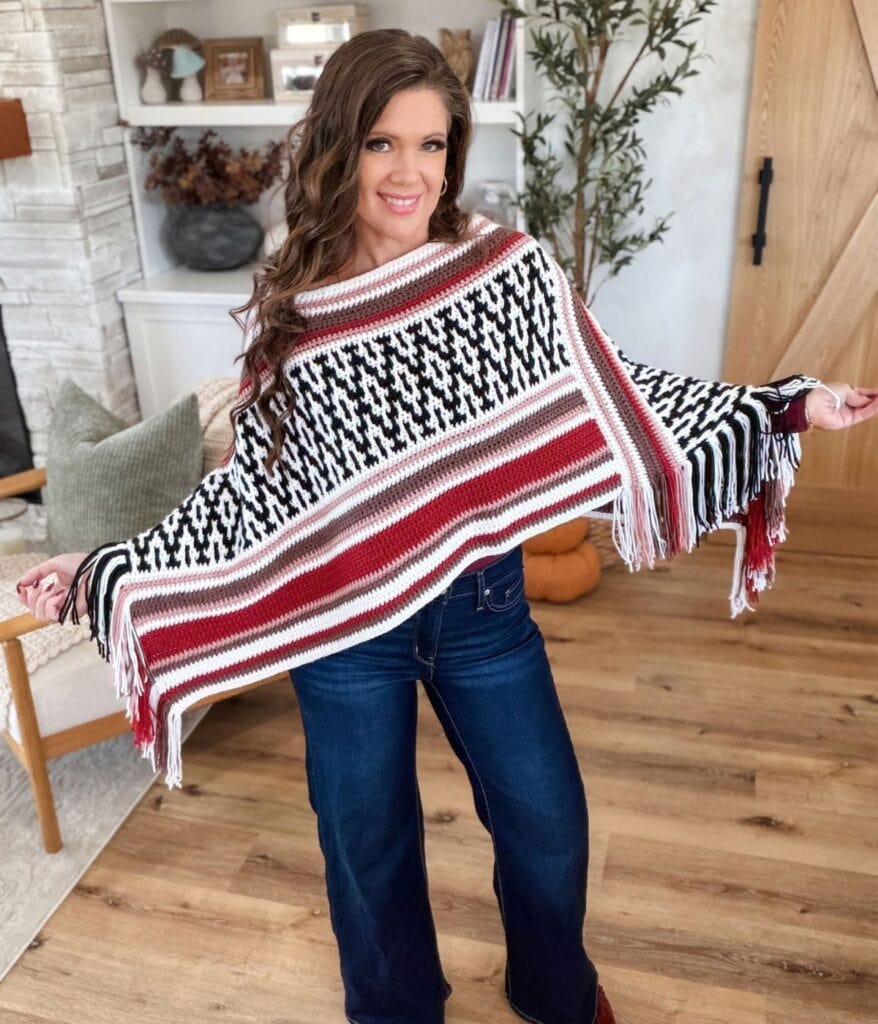
Cozy up for fall and winter in the Painted Desert Poncho, an easy poncho design made from just two rectangles with beautiful inset mosaic crochet, simple stripes and fringe. It’s a great project for learning mosaic crochet, practicing colour changes, and playing with different colour combinations to create your own unique look.
Even better, there are no yarn tails to weave in. The yarn ends are left along the edges so they blend naturally into the fringe for an easy finish. Follow along with the step-by-step video tutorial as I walk you through the mosaic technique, colour changes, assembly, and finishing.
Skill level: Intermediate
Sizes: One Size
Yarn Weight: DK weight #3
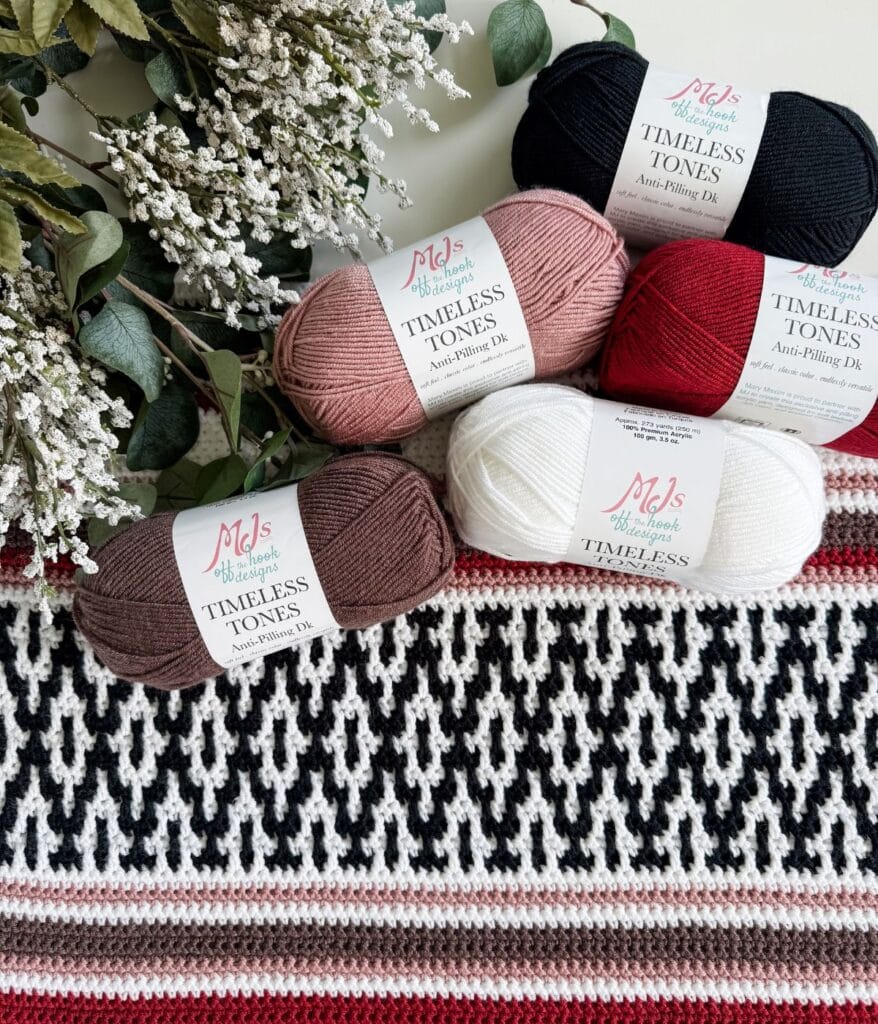
Yarn: MJ’s Off The Hook Designs Timeless Tones
What Is Inset Mosaic Crochet?
Inset mosaic crochet creates colourwork using a combination of single crochet, chain spaces and mosaic double crochet stitches.
Unlike some mosaic techniques where every row is worked from the same side, this pattern is worked back and forth in rows.
Each colour is worked for two rows before switching to the next colour. The mosaic double crochet stitches are worked on the right side into skipped stitches several rows below, creating the geometric pattern.
The wrong side rows are much simpler and basically maintain the stitch pattern created on the previous row.
If you are new to inset mosaic crochet, do not let the chart scare you. Once you understand how the first few rows work, the pattern becomes very repetitive.
A Great Project for Learning Mosaic Crochet
I think this is a really good introduction to mosaic crochet because you get to practice the technique without committing to an entire blanket.
The poncho begins with straightforward striped rows before moving into the mosaic section, so you have time to get comfortable with the yarn and your tension before starting the colourwork.
You will practice:
• Changing colours
• Reading a mosaic crochet chart
• Working chain spaces
• Working mosaic double crochet stitches
• Carrying unused yarn in the mosaic section
• Keeping straight edges
• Seaming two rectangles
• Adding fringe
No Pile of Ends to Weave In
If you have worked striped crochet projects before, you already know how quickly the yarn tails can add up.
For the striped sections of the Painted Desert Poncho, the yarn ends are intentionally left along the edge. Once the fringe is added, those ends simply blend into it.
In the mosaic section, the unused yarn is carried rather than cut after every colour change, which keeps the number of ends down even further.
That makes the finishing much easier than you might expect from a five colour project.
Video Tutorial
This tutorial is a little different from our usual videos.
MJ was still recovering from surgery and was not feeling well enough to film the entire tutorial, so Emma stepped in to help finish it.
That means this one is officially an MJ and Emma mashup!
Between the two of us, we walk you through the Painted Desert Mosaic Poncho from start to finish, including the stripes, mosaic crochet pattern, colour changes, construction, seaming and fringe.
MJ is doing better and taking things slowly while continuing to recover, but she is still dealing with some nerve pain. We are so thankful Emma was able to step in so we could still get this tutorial finished and out to you.
Watch the full Painted Desert Mosaic Poncho tutorial here:

Yarn
MJ’s Off The Hook Designs Timeless Tones (CDN)
DK Weight #3, 100% Premium Acrylic
273 yds/100 g
Shown in Snowflake (MC), Warm Cocoa (A), Crimson Spice (B), Vintage Rose (C), Midnight (D)
Yarn Requirements:
Pink: 1 ball/178 yards
Black: 1 ball/248 yards
Red: 1 ball/178 yards
Brown: 1 ball/202 yards
White: 3 balls/598 yards
7 balls (514 g/approximately 1,404 yards)
Crochet Hook Needed
or the size needed to obtain the gauge
Supplies
Gauge
Pattern: 15 sts and 18 rows equal to 4″ in mosaic/single crochet pattern with 5 mm hook
Size
One Size
Neck: 8″
Width: 33″
Length: 25″
Fringe: 5″
Rectangle
Width: 30″
Length: 19″
Abbrevations
Ch – Chain
Dc – Double Crochet
Rep – Repeat
RS – Right Side
Sc – Single Crochet
Sk – Skip
Sk(d) – Skip(ped)
Sl St – Slip Stitch
Sp(s) – Space(s)
St(s) – Stitch(es)
Tr – Treble Crochet
WS – Wrong Side
( ) – Work step in parentheses in the indicated stitch
Special Stitches:
Mdc (Mosaic Double Crochet): A drop-down dc is worked as a double crochet that is worked into the skipped st 3 rows below. It is indicated by an X on the chart. This stitch is always worked on the right side.
Project Tips
- Follow the Pattern Repeats
Many rows include repeats marked with *. Work the stitches following the * and repeat them across the row as instructed to keep the mosaic design aligned.
- Check Stitch Placement
Mosaic stitches are worked three rows below. Take a moment to locate the correct stitch before inserting your hook.
- Carry Yarn Up the Side
Carry the unused yarn up the side of the work rather than cutting it after each row, to reduce the number of ends to weave in. See the video for the demonstration.
- Keep Edges Straight
Work the first and last stitch of each row as a single crochet through both loops to maintain clean edges.
Inset Mosaic Technique
Each row of the chart represents two rows of crochet worked in the same colour. The odd numbered row is worked on the right side (RS) of the poncho and the following even numbered row is worked back across on the wrong side (WS). The colour for each pair of rows is shown on both sides of the chart.
Because each colour is worked for two consecutive rows, you can carry the unused yarn up the right edge of the poncho instead of cutting it after every colour change. Every row begins and ends with a single crochet (sc).
Right Side (RS)
- Blank box: Work 1 sc in the corresponding stitch using the indicated row colour.
- Contrasting coloured box: Work ch 1, sk 1 st. This creates the chain space for the mosaic design without changing colours.
- Box marked with an X: Work 1 mosaic double crochet (mdc) into the corresponding stitch three rows below, working in front of the chain space from the previous RS row.
Wrong Side (WS)
Work the WS row exactly as the stitches appear:
- Work 1 sc into each single crochet from the previous row.
- Work ch 1, sk 1 st over every chain-1 space from the previous RS row.
- Do not work any mosaic double crochet stitches on the WS.
Continue following the chart in order, working two rows in each colour. The WS rows simply maintain the stitch pattern established on the RS, while all mosaic double crochet stitches are worked on the RS only.
Please Note: To help protect our original chart designs, the mosaic chart is included exclusively in the PDF pattern. Complete written row-by-row instructions are provided below so you can still follow the full pattern here on the blog.
Can I Adjust the Size of the Poncho?
The Painted Desert Poncho is written as a one size design. The mosaic pattern is worked over a multiple of 6 + 3 stitches, with a foundation chain worked in a multiple of 6 + 4.
To adjust the width, add or subtract repeats of 6 stitches. Keep in mind that changing the rectangle width or length will also affect the finished poncho dimensions and neckline, so any size adjustments should be made carefully.
For best results, pin the rectangles together before seaming to check the overall fit and neckline opening.
Suitable Yarn Substitutes
This pattern was designed using Timeless Tones DK Weight #3 yarn
273 yds/100 g = 2.73 yds per gram
When substituting yarn, look for a DK-weight yarn with a similar yards per gram ratio to achieve comparable results.
Would you like to save this?
You can unsubscribe at any time.
Suggested Substitutions
Mary Maxim Mellowspun DK (CDN): 284 yds/100 g = 2.84 yds per gram
Knit Picks Brava Baby: 273 yds/100 g = 2.73 yds per gram
Premier Basix DK (CDN): 306 yds/100 g = 3.06 yds per gram
Lion Brand Color Theory: 246 yds/100 g = 2.46 yds per gram
Digital Download + No Ads!
Upgrade to the Digital PDF Download
Digital pattern only. No physical item will be shipped.
Pattern
The mosaic pattern is worked over a multiple of 6 + 3 stitches. For the foundation chain, chain a multiple of 6 + 4.
For the poncho: Ch 112 = 18 × 6 + 3 + 1 turning chain.
To adjust the width, add or subtract repeats of 6 stitches. For a gauge swatch, ch 22.
Make 2
Row 1:
With MC, Ch 112, work 1 sc in 2nd chain from hook and in each st across, turn — 111 sts
Row 2:
With MC, ch 1, work 1 sc in each st, Change to A on last st, turn— 111 sts
Row 3-4:
With A, ch 1, work 1 sc in each st, change to B on last st, turn.
Row 5-36:
Rep row 2 following Colour Pattern 1 and changing colour on the last stitch as required.
Colour Pattern 1 :
2 rows B, 4 rows MC, 2 rows A, 2 rows C, 8 rows B, 2 rows MC, 2 rows C, 4 rows A, 2 rows MC, 2 rows C, 2 rows A
Rows 37-68:
Follow Mosaic Stitch Pattern on page 9.
Row 69-82:
Rep pattern row 2 and follow colour pattern 2.
Colour Pattern 2:
2 rows C, 2 rows B, 4 rows A, 2 rows MC, 2 rows C, 2 rows MC
Blocking
Wet blocking is highly recommended to even out edges and provide an excellent drape.
To wet block:
Wet the poncho rectangles in lukewarm water with a small amount of woolwash. Allow them to soak for approximately 25 to 30 minutes. Gently squeeze out excess water and roll in a towel to remove additional moisture. Lay flat on blocking mats and pin to 30″ wide x 19″ tall. Allow to dry completely before removing the pins.
Seaming
With RS facing, arrange the two rectangles in an L shape as shown in the diagram, making sure the edges with the yarn tails are positioned along the outer edges of the poncho for the fringe.
Using a whip stitch, sew the top edge of Rectangle #1 to the side edge of Rectangle #2.
Edging
With the RS of the poncho facing, join on MC with a sc in any stitch along the back edge of the next opening. Work 1 sc evenly in each stitch around the edge of the poncho. Sl st in the first sc to join. Fasten off and weave in ends.
Fringe
Cut 120 (MC), 56 (A), 48 (B), 40 (C), and 64 (D) strands of yarn, each measuring 12″ long.
With the RS of the poncho facing you, insert your crochet hook from back to front under the first stitch along the edge. Fold 2 strands of yarn in half, place the folded loop on the hook, and pull it through the stitch. Pull the yarn tails through the loop and gently tighten to secure.
Repeat across the edge, attaching 2 strands of fringe to each row and matching the fringe colour to the colour of that row. Leave the existing yarn tails hanging along the edge so they blend naturally into the fringe.
Once all fringe is attached, trim the ends evenly if needed. Lightly steam the fringe to relax the fibres and help it hang smoothly. Allow the poncho to dry completely before wearing.
Mosaic Stitch Pattern:
Row 1:
With D, Ch 1, 1 sc in first st, 1 sc next st, * ch 1, sk 1 st, 1 sc next 3 sts, ch 1, sk st, 1 sc next st; rep from * across to last st, 1 sc in last st, turn.
Row 2:
With D, ch 1, 1 sc in first st, 1 sc in next st, * ch 1, sk st, 1 sc next 3 sts, ch 1, sk st, 1 sc next st; rep from * across to last st, 1 sc in last st, change to MC, turn. Drop off D and crochet over D on the first st of the next row and drop off. Crochet over tails in this manner throughout the mosaic pattern.
Row 3:
With MC, ch 1, 1 sc in first st, ch 1, sk st, * 1 mdc next st, 1 sc next st, ch 1, sk st, 1 sc next st, 1 mdc next st, ch 1, sk st; rep from * across to last st, 1 sc in last st, turn.
Row 4:
With MC, ch 1, 1 sc in first st, ch 1, sk st, * 1 sc next 2 sts, ch 1, sk st, 1 sc next 2 sts, ch 1, sk st; rep from * across to last st, 1 sc in last st, turn.
Row 5:
With D, ch 1, 1 sc in first st, 1 mdc next st, * ch 1, sk st, 1 sc in next st, 1 mdc next st, 1 sc in next st, ch 1, sk st, 1 mdc next st; rep from * across to last st, 1 sc in last st, turn.
Row 6:
With D, ch 1, 1 sc in first st, 1 sc in next st, * ch 1, sk st, 1 sc in next 3 sts, ch 1, sk st, 1 sc next st; rep from * across to last st, 1 sc in last st, turn.
Row 7:
With MC, ch 1, 1 sc in first st, 1 sc in next st, * 1 mdc next st, ch 1, sk st, 1 sc next st, ch 1, sk st, 1 mdc next st, 1 sc next st; rep from * across to last st, 1 sc in last st, turn.
Row 8:
With MC, ch 1, 1 sc in first st, 1 sc next st, * 1 sc next st, ch 1, sk st, 1 sc next st, ch 1, sk st, 1 sc next 2 sts; rep from * across to last st, 1 sc in last st, turn.
Row 9:
With D, ch 1, 1 sc in first st, ch 1, sk st, * 1 sc next st, 1 mdc next st, ch 1, sk st, 1 mdc next st, 1 sc next st, ch 1, sk st; rep from * across to last st, 1 sc in last st, turn.
Row 10:
With D, ch 1, 1 sc in first st, ch 1, sk st, * 1 sc next 2 sts, ch 1, sk st, 1 sc next 2 sts, ch 1, sk st; rep from * across to last st, 1 sc in last st, turn.
Row 11:
With MC, ch 1, 1 sc in first st, 1 mdc next st, * ch 1, sk st, 1 sc next st, 1 mdc next st, 1 sc next st, ch 1, sk st, 1 mdc next st; rep from * across to last st, 1 sc in last st, turn.
Row 12:
With MC, ch 1, 1 sc in first st, 1 sc next st, * ch 1, sk st, 1 sc next 3 sts, ch 1, sk st, 1 sc next st; rep from * across to last st, 1 sc in last st, turn.
Row 13:
With D, ch 1, 1 sc in first st, 1 sc next st, *1 mdc next st, ch 1, sk st, 1 sc next st, ch 1, sk st, 1 mdc next st, 1 sc next st; rep from * across to last st, 1 sc in last st, turn.
Row 14:
With D, ch 1, 1 sc in first st, 1 sc next st, * 1 sc next st, ch 1, sk st, 1 sc next st, ch 1, sk st, 1 sc next 2 sts; rep from * across to last st, 1 sc in last st, turn.
Row 15:
With MC, ch 1, 1 sc in first st, ch 1, sk st, * 1 sc next st, 1 mdc next st, ch 1, sk st, 1 mdc next st, 1 sc next st, ch 1, sk st; rep from * across to last st, 1 sc in last st, turn.
Row 16:
With MC, ch 1, 1 sc in first st, ch 1, sk st, *1 sc next 2 sts, ch 1, sk st, 1 sc next 2 sts, ch 1, sk st; rep from * across to last st, 1 sc in last st, turn.
Row 17:
With D, ch 1, 1 sc in first st, 1 mdc next st, *1 sc next st, ch 1, sk st, 1 mdc next st, ch 1, sk st, 1 sc next st, 1 mdc next st; rep from * across to last st, 1 sc in last st, turn.
Row 18:
With D, ch 1, 1 sc in first st, 1 sc next st, * 1 sc next st, ch 1, sk st, 1 sc next st, ch 1, sk st, 1 sc next 2 sts; rep from * across to last st, 1 sc in last st, turn.
Row 19:
With MC, ch 1, 1 sc in first st, 1 sc in next st, * ch 1, sk st, 1 mdc next st, 1 sc next st, 1 mdc next st, ch 1, sk st, 1 sc next st; rep from * across to last st, 1 sc in last st, turn.
Row 20:
With MC, ch 1, 1 sc in first st, 1 sc in next st, * ch 1, sk st, 1 sc next 3 sts, ch 1, sk st, 1 sc next st; rep from * across to last st, 1 sc in last st, turn.
Row 21:
With D, ch 1, 1 sc in first st, ch 1, sk st, * 1 mdc next st, 1 sc next st, ch 1, sk st, 1 sc next st, 1 mdc next st, ch 1, sk st; rep from * across to last st, 1 sc in last st, turn.
Row 22:
With D, ch 1, 1 sc in first st, ch 1, sk st, * 1 sc next 2 sts, ch 1, sk st, 1 sc next 2 sts, ch 1, sk st; rep from * across to last st, 1 sc in last st, turn.
Row 23:
With MC, ch 1, 1 sc in first st, 1 mdc next st, * 1 sc next st, ch 1, sk st, 1 mdc next st, ch 1, sk st, 1 sc next st, 1 mdc next st; rep from * across to last st, 1 sc in last st, turn.
Row 24:
With MC, ch 1, 1 sc in first st, 1 sc next st, * 1 sc in next st, ch 1, sk st, 1 sc next st, ch 1, sk st, 1 sc next 2 sts; rep from * across to last st, 1 sc in last st, turn.
Row 25:
With D, ch 1, 1 sc in first st, 1 sc next st, * ch 1, sk st, 1 mdc next st, 1 sc next st, 1 mdc next st, ch 1, sk st, 1 sc next st; rep from * across to last st, 1 sc in last st, turn.
Row 26:
With D, ch 1, 1 sc in first st, 1 sc next st, * ch 1, sk st, 1 sc next 3 sts, ch 1, sk st, 1 sc next t; rep from * across to last st, 1 sc in last st, turn.
Row 27:
With MC, ch 1, 1 sc in first st, 1 sc next st, * 1 mdc next st, 1 sc next st, ch 1, sk st, 1 sc next st, 1 mdc next st, ch 1, sk st; rep from * across to last st, 1 sc in last st, turn.
Row 28:
With MC, ch 1, 1 sc in first st, ch 1, sk st, *1 sc next 2 sts, ch 1, sk st, 1 sc next 2 sts, ch 1, sk st; rep from * across to last st, 1 sc in last st, turn.
Row 29:
With D, ch 1, 1 sc in first st, 1 mdc next st, * ch 1, sk st, 1 sc next st, 1 mdc next st, 1 sc next st, ch 1, sk st, 1 mdc next st; rep from * across to last st, 1 sc in last st, turn,
Row 30:
With D, ch 1, 1 sc in first st, 1 sc next st, * ch 1, sk st, 1 sc next 3 sts, ch 1, sk st, 1 sc next st; rep from * across to last st, 1 sc in last st, turn.
Row 31:
With MC, ch 1, 1 sc in first st, 1 sc in next st, * 1 mdc next st, 1 sc next 3 sts, 1 mdc next st, 1 sc next st; rep from * across to last st, 1 sc in last st, turn.
Row 32:
With MC, ch 1, 1 sc in each st across, turn.
Looking for beginner projects?
- Easiest Dishcloth Pattern
- Granny Stitch Throw
- Easy C2C Blanket
- Easiest Beanie Pattern
- Chunky Suzette Pocket Shawl
Is this mosaic crochet poncho beginner friendly?
I would rate the pattern intermediate, but it is a very approachable first mosaic crochet garment.
The poncho itself has simple construction with no complicated shaping. The main skill is learning the inset mosaic crochet technique.
If you are already comfortable with single crochet, double crochet, changing colours and reading basic crochet instructions, the video tutorial will help walk you through the mosaic portion.
Is this poncho made from rectangles?
Yes. The Painted Desert Poncho is made from two matching crochet rectangles that are blocked and seamed together.
That simple construction is one of the reasons this is such a fun first crochet garment.
What size are the rectangles?
Each rectangle should measure approximately 30″ wide x 19″ long after blocking.
Do I have to cut the yarn during the mosaic section?
No. The unused yarn can be carried during the mosaic section rather than cutting it after each colour change.
This greatly reduces the number of yarn ends.
Do I have to weave in all the yarn tails from the stripes?
No, and that is one of the best parts.
The colour change tails from the striped sections are left along the outer edge and blend into the fringe when the poncho is finished.
Yes! You may sell finished items made from MJ’s patterns, but please credit:
“Pattern by MJ’s Off The Hook Designs Inc.”
All patterns, photos, and written content are the property of MJ’s Off The Hook Designs Inc. and protected by copyright law.
Usage
Free patterns are for viewing only on this blog. You may not copy, download, print, screenshot, or redistribute any part of the pattern. Access must remain through this page with ads. The use of tools that remove or hide ads or site content is strictly prohibited.
Legal Notice
Unauthorized reproduction or distribution may result in copyright infringement penalties.
By accessing this post, you agree to these terms and conditions.
This post may contain affiliate links. Purchases made through these links may earn MJ’s Off The Hook Designs Inc. a small commission at no extra cost to you. Content on this site is supported by ads—please do not block or remove them.
I hope you love our Mosaic Crochet Poncho Pattern. You might also love these crochet patterns:
This pattern is designed by Michelle Moore of MJ’s Off The Hook Designs Inc., based in Lakefield, Ontario, Canada. Your go-to source for modern, easy crochet patterns. Published on October 14, 2026.
Thank you for visiting MJ’s Off The Hook Designs! I hope you enjoyed this pattern and feel inspired to pick up your hook and start creating.
You can find even more crochet patterns in our Ravelry and Etsy shops.
For daily inspiration and behind-the-scenes peeks, join me over on Facebook or Instagram or join our YouTube Membership for exclusive content!
You’ve got questions, we’ve got a community!
Crocheting is better with friends! Join our group to post pictures and ask all your pattern support questions.